Migration Coordinator (MC) is VMware’s tool to migrate from NSX Data Center for vSphere (NSX-V) to NSX-T Data Center (NSX-T). Last week I was helping a customer migrating their Distributed Firewall Configuration from NSX-V to NSX-T 3.2 and we were presented with a new step in the process called “Prepare Infrastructure”. I have never seen this step in NSX-T 3.1 and earlier, and was surprised to see it now since I had checked the documentation for any changes to the process.
The new step looks like this:
The documentation said that no changes would be done to NSX-V during the migration so I was trying to find anyone able to tell me what this step would do. Finally someone at VMware could to tell me that this step would create temporary IP Sets in NSX-V to to maintain security during the migration. When you migrate a VM from one vCenter (NSX-V) to another vCenter (NSX-T), the VM will no longer be included in the Security Groups in NSX-V since the object is not longer present there. Before NSX-T 3.2 we had to create these IP Sets manually in NSX-V so this is a welcome feature in NSX-T 3.2 MC. MC has already been creating temporary IP sets in NSX-T for some time. More details on this can be found here.
The latest version of the NSX-T 3.2 docs has now been updated with the missing information:
“In the Prepare Infrastructure step, temporary IP sets will be added to NSX-V if the NSX-V security groups are used in a distributed firewall rule. This is required to maintain security while the VMs are migrated from NSX-V to NSX-T. After the migration, during the finalize infrastructure phase, the temporary IP sets will be deleted. You can skip the Prepare Infrastructure step. However, doing so may compromise security until the finalize infrastructure phase is complete.”
I have used VLC to deploy nested VCF for a long time and I am quite happy with how it works. VLC is usually deployed to a VLAN Trunk Port Group. This requires the VLANs used in the nested VCF to be configured on the physical switches in the environment. This does not scale well, and it is hard to automate. By following the steps below we are able to deploy VLC to an NSX-T Overlay Segment which allows each VFC instance to be isolated on their own layer 2 network. NSX-T Overlay Segments can be deployed automatically and they don’t require any changes to the physical network. This also allows us to use overlapping IP addressing between them. I have not yet tested to connect my Segment to a Tier-1 Gateway so that the nested VCF can connect to any external networks, but I plan to do this soon and update this post.
NSX-T Configuration
The following configuration needs to be done on the hosting NSX-T environment.
To deploy VLC we need a jump host with two network adapters, one connected to your management network so that we can access it with RDP, and one connected to the nested environment so that we can connect to the nested appliances there. More details on this can be found in the VLC installation guide.
Change the MAC Address of NSX-T Virtual Distributed Router
You must change the default MAC address of the NSX-T virtual distributed router in the nested VCF deployment so that it does not use the same MAC address that is used by the hosting NSX-T virtual distributed router.
An alternative is to configure the hosting NSX-T environment’s Overlay Transport Zone with the nested_nsx property set to true, but this has to be done when creating the Transport Zone.
Thanks to Ben Sier for helping me getting this to work.
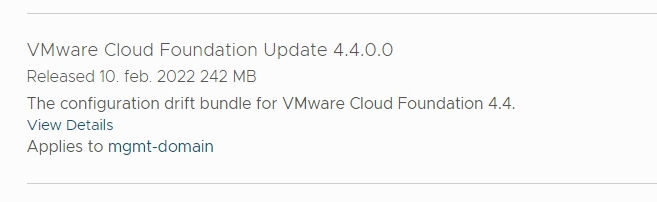
VMware Cloud Foundation 4.4 was just released so I wanted to check out what was new and upgrade my lab. Going into SDDC Manager and selecting Lifecycle Management and Release Versions gave me an overview of what is new:
Flexible vRealize Suite product upgrades: Starting with VMware Cloud Foundation 4.4 and vRealize Lifecycle Manager 8.6.2, upgrade and deployment of the vRealize Suite products is managed by vRealize Suite Lifecycle Manager. You can upgrade vRealize Suite products as new versions become available in your vRealize Suite Lifecycle Manager. vRealize Suite Lifecycle Manager will only allow upgrades to compatible and supported versions of vRealize Suite products. Specific vRealize Automation, vRealize Operations, vRealize Log Insight, and Workspace ONE Access versions will no longer be listed in the VMware Cloud Foundation BOM.
Improvements to upgrade prechecks: Upgrade prechecks have been expanded to verify filesystem capacity and passwords. These improved prechecks help identify issues that you need to resolve to ensure a smooth upgrade.
SSH disabled on ESXi hosts: This release disables the SSH service on ESXi hosts by default, following the vSphere security configuration guide recommendation. This applies to new and upgraded VMware Cloud Foundation 4.4 deployments.
User Activity Logging: New activity logs capture all the VMware Cloud Foundation API invocation calls, along with user context. The new logs will also capture user logins and logouts to the SDDC Manager UI.
SDDC Manager UI workflow to manage DNS and NTP configurations: This feature provides a guided workflow to validate and apply DNS and NTP configuration changes to all components in a VMware Cloud Foundation deployment.
2-node vSphere clusters are supported when using external storage like NFS or FC as the principal storage for the cluster: This feature does not apply when using vSAN as principal storage or when using vSphere Lifecycle Manager baselines for updates.
Security fixes: This release includes fixes for the following security vulnerabilities:
Apache HTTP Server: This release fixes CVE-2021-40438. See <a rel=”noreferrer noopener” href=”unsafe:CVE-2021-40438.
Multi-Instance Management is deprecated: The Multi-Instance Management Dashboard is no longer available in the SDDC Manager UI.
BOM updates: Updated Bill of Materials with new product versions.
Going to my Management Workload Domain showed that the upgrade was available for download:
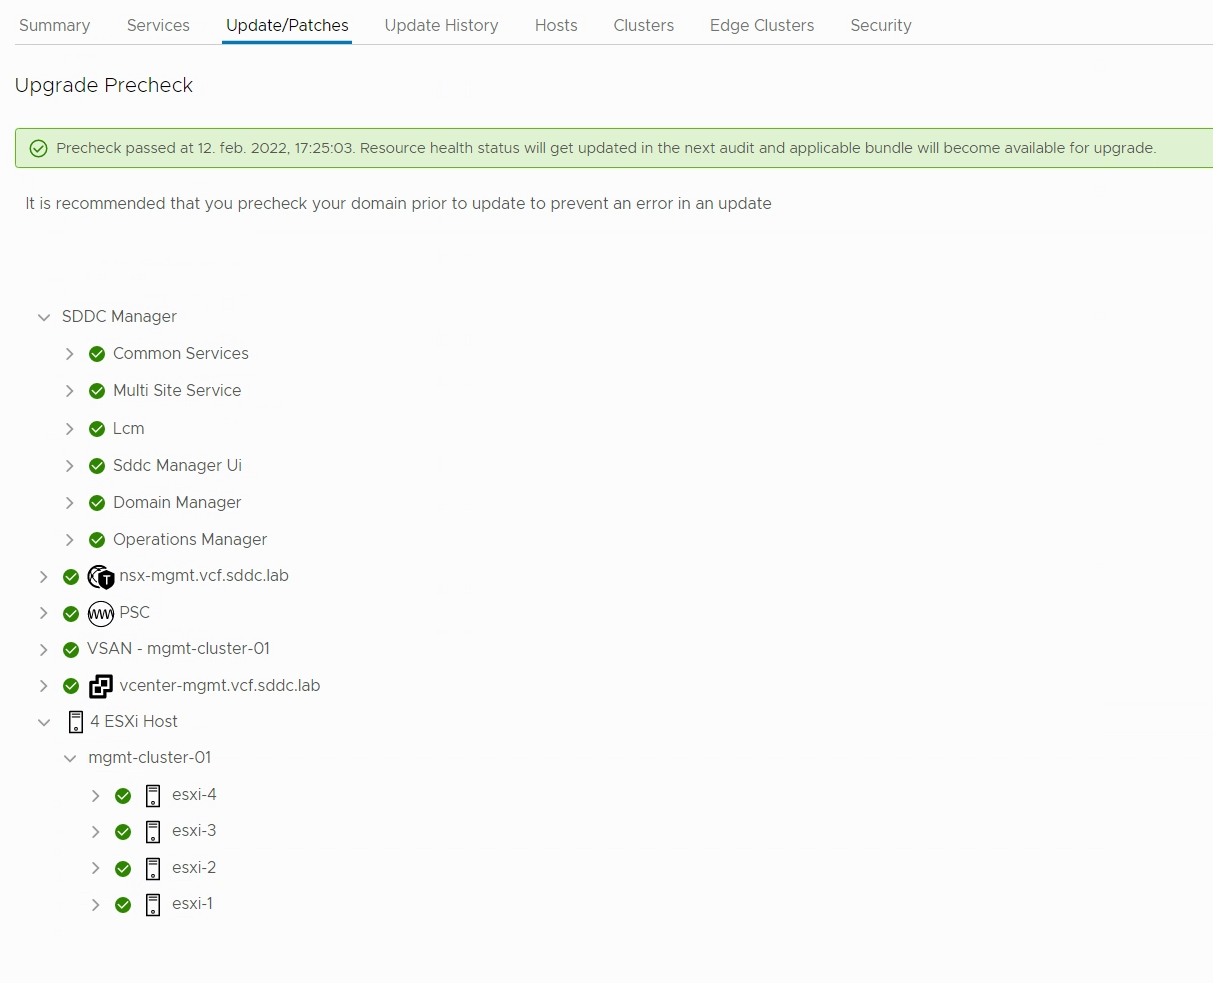
I did a precheck to verify that my environment was ready to be upgraded:
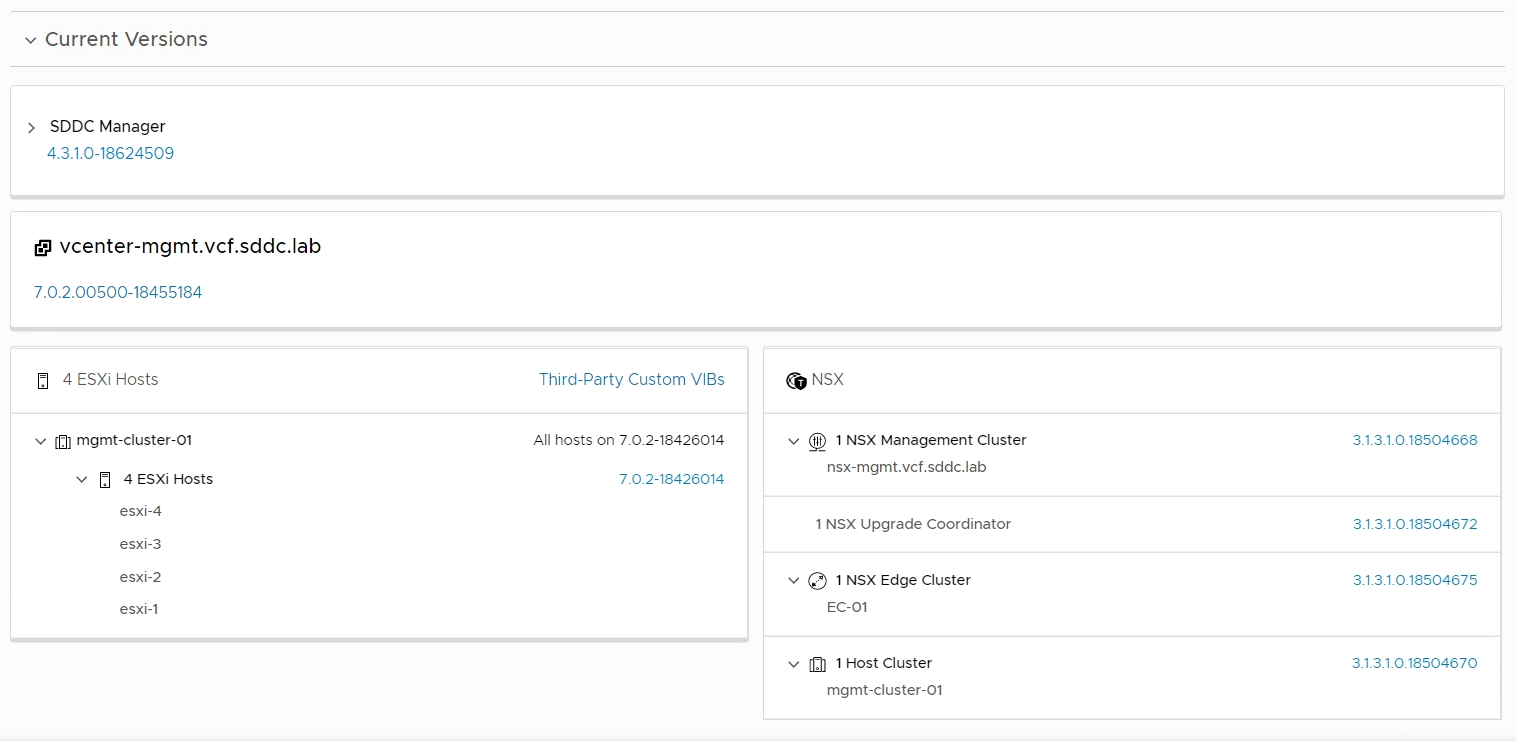
I checked what my current versions were at:
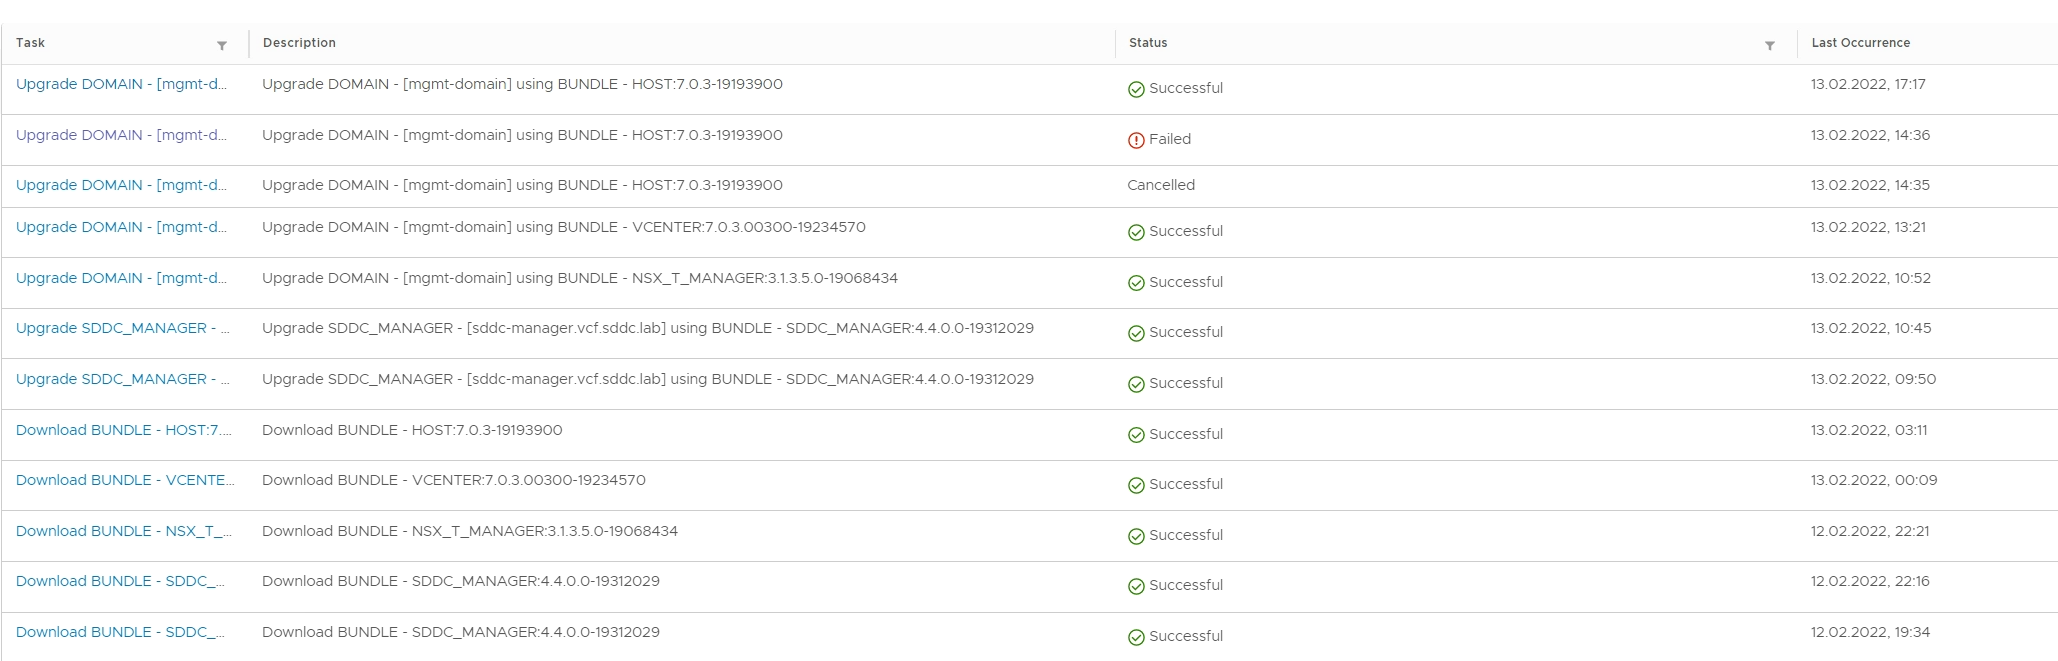
I downloaded and installed all the update bundles in the order dictated by SDDC Manager, and everything went well except for the first ESXi host upgrade:
The first ESXi host did not exit Maintenance Mode after being upgraded, hence the post check failed:
Message: VUM Remediation (installation) of an ESXi host failed. Remediation Message: High: VUM Remediation (installation) of an ESXi host failed. Manual intervention needed as upgrade failed during install stage. Check for errors in the lcm log files located on SDDC Manager under /var/log/vmware/vcf/lcm. Please retry the upgrade once the upgrade is available again.
Health check failed on vSAN enabled cluster while exiting maintenance mode on the host: vSAN cluster is not healthy because vSAN health check(s): com.vmware.vsan.health.test.controlleronhcl failed. The host is currently in maintenance mode.
The following KB addresses this issue, and I chose workaround number 3 which was to exit maintenance mode manually: https://kb.vmware.com/s/article/87698
Retrying the upgrade successfully upgraded the rest of my ESXi hosts.
The End of General Support for VMware NSX Data Center for vSphere (NSX-v) was January 16, 2022. More details can be found here: https://kb.vmware.com/s/article/85706
If you are still running NSX-v, please start planning your migration to NSX-T as soon as possible as this may be a complex and time consuming job.
I have done several NSX-v to NSX-T migrations lately and thought I should share some of my experiences, starting with my latest End-to-End Migration using Migration Coordinator. This was a VMware Validated Design implementation containing a Management Workload Domain and one VI Workload Domain. I will not go into all the details involved, but rather focus on the challenges we faced and how we resolved them.
Challenge 1
The first error we got in Migration Coordinator was this:
Config translation failed [Reason: TOPOLOGY failed with ”NoneType’ object has no attribute ‘get”]
After some investigation we tried to reboot the NSX-V Manager appliance, but this did not seem to resolve it. We then noticed that EAM status was in a Starting state on NSX Manager, but never changed to Up. We tried to figure out why, and after a while we found that the “Universal Synchronization Service” was stopped so we started it manually, and this made the EAM status change to Up. Not sure how this is related really, but we never saw the error again.
We went through the logs trying to figure out what was causing this, but never found any clues. We ended up going through every Portgroup on the DVS and found one unused Portgroup with no Active Uplinks. We deleted this Portgroup since it was not in use and this resolved the problem. If the Portgroup had been in use, we could have added an Uplink to it.
Challenge 3
Migration Coordinator failed to remove NSX-v VIBs from the ESXi host. At first we didn’t figure out why, but we tried to manually remove the VIBs using these commands:
esxcli software vib get -n esx-nsxv
Showed that the VIB was installed.
esxcli software vib remove -n esx-nsxv
Failed with “No VIB matching VIB search specification ‘esx-nsxv'”
After rebooting the host, the above command was successfully removing the NSX-v VIBs.
Challenge 4
NSX-T VIBs fail to install/upgrade, due to insufficient space in bootbank on ESXi host.
This was a common problem a few years back, but I hadn’t seen this in a while.
After removing many unused VIBs we were able to make enough room to install NSX-T. When we did this in advance on other hosts, we also got rid of Challenge 3.
Challenge 5
During the “Migrate NSX Data Center for vSphere Hosts” step we noticed the following in the doc:
“You must disable IPFIX and reboot the ESXi hosts before migrating them.”
We had already disabled IPFIX, but we hadn’t rebooted the hosts, so we decided to do that, however this caused all VMs to lose network connectivity. NSX-v is running in CDO mode, so I am not sure why this happened, but probably got to do with the fact that the control plane is down at this point in the process. We had a maintenance window scheduled so the customer didn’t care, but next time I would make sure to do this in advance.
Challenge 6
The customer were using LAG and when checking the Host Transport Nodes in NSX-T Manager, they all had PNIC/Bond Status Degraded. Since we had migrated all PNICs and VMKs to N-VDS, the hosts still had a VDS connected which had no PNICs attached. Removing the VDS solved this problem.
Challenge 7
Since we were migrating from NSX-v to NSX-T in a Management Cluster, we would end up migrating NSX-T Manager from a VDS to an N-VDS.
The NSX-T Data Center Installation Guide has the following guidance as well as details on how to configure this:
“In a single cluster configuration, management components are hosted on an N-VDS switch as VMs. The N-VDS port to which the management component connects to by default is initialized as a blocked port due to security considerations. If there is a power failure requiring all the four hosts to reboot, the management VM port will be initialized in a blocked state. To avoid circular dependencies, it is recommended to create a port on N-VDS in the unblocked state. An unblocked port ensures that when the cluster is rebooted, the NSX-T management component can communicate with N-VDS to resume normal function.”
Hopefully this post will help you avoid some of these challenges when migrating from NSX-v to NSX-T.
VMware just released VMware Cloud Foundation (VCF) 4.3 and I have several customers planning to upgrade in the near future, so I decided to upgrade my lab to get some experience. I also have two customers planning to deploy VCF 4.3 on new hardware so I will also soon deploy it from scratch to see what’s new with the bring-up procedure. VCF 4.3 comes with a lot of fixes and new features that you can read about in the Release Notes.
My current VCF lab is running version 4.2 and consist of one Management Workload Domain (WLD) with one Stretched Cluster. That is two Availability Zones with four ESXi hosts in each and a vSAN Witness running in a third independent site. In addition, I have one VI Workload Domain (WLD) containing three ESXi hosts in a non-stretched Cluster. Currently I don’t run vRealize Suite, Tanzu or anything else than what is included in the VCF base-platform. Everything is deployed using VLC.
The following steps were then performed to upgrade VCF to version 4.3. Note that all images are clickable to make them bigger.
First I did a quick health check of my environment by logging into the vSphere Client and SDDC Manager and looked for any alarms or warnings. It was surprisingly healthy.
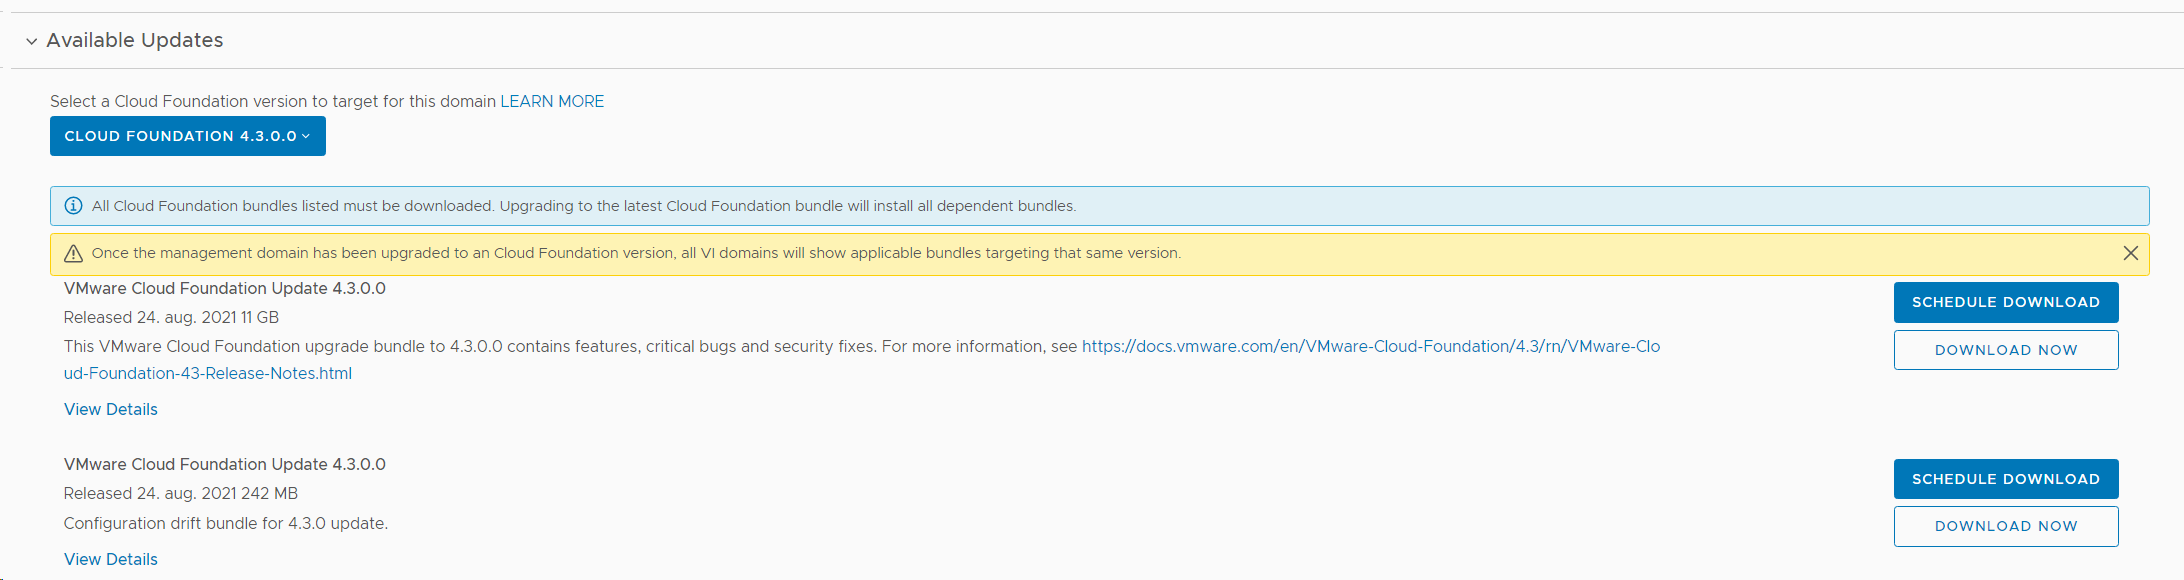
Then I checked that I was actually running on version 4.2, and verified that there was an update available for the Management WLD. I also selected to download both required upgrade bundles.
Ran an Update Precheck to ensure that my environment was ready for the update. It passed successfully, but I had already implemented a fix to skip vSAN HCL Checks for ESXi Upgrades since I am running on nested ESXi hosts, or else it would have failed.
Installed the VCF 4.3 update.
Went back to the Patches/Updates section for the Management WLD and found that the NSX-T 3.1.3 update was available, so I chose to download and install that.
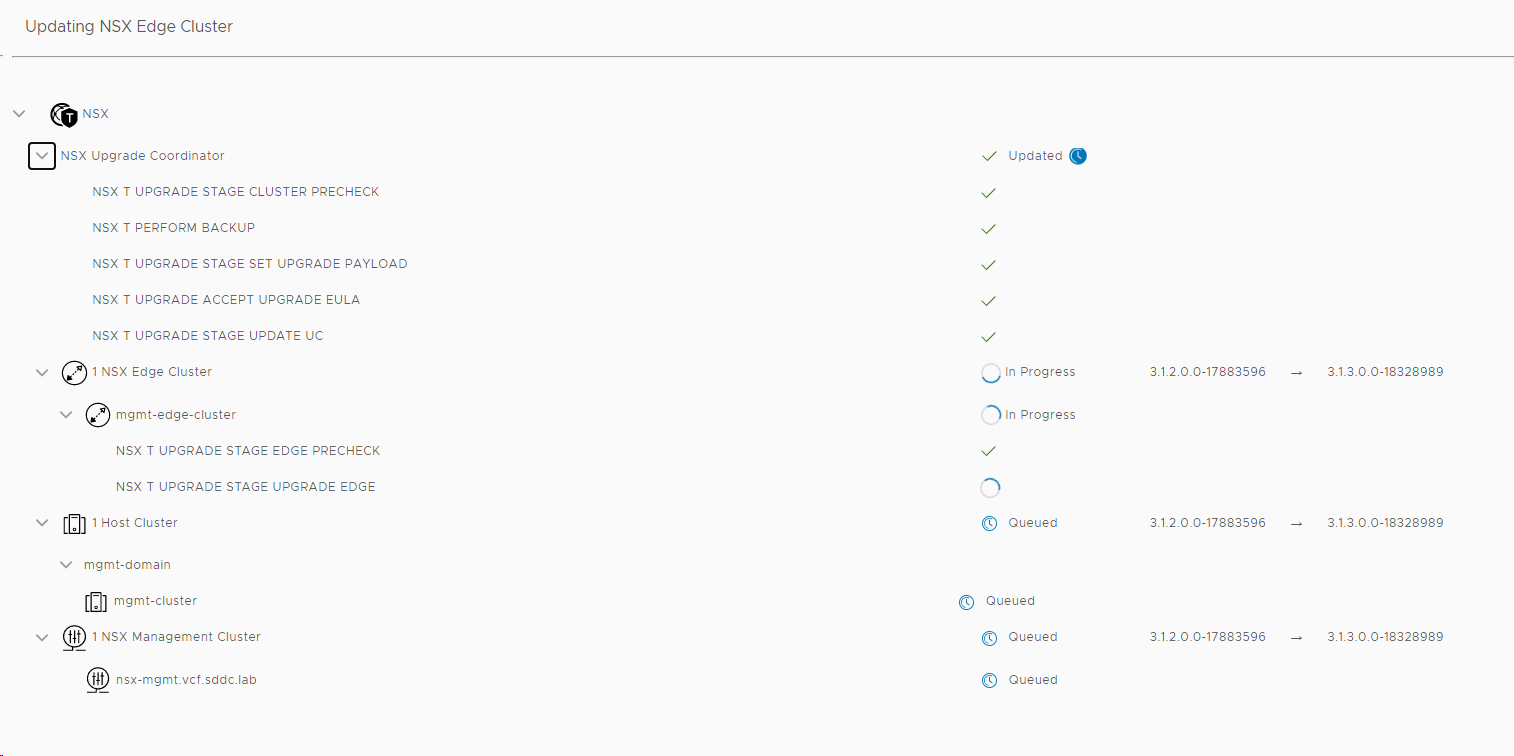
I chose to upgrade both my Edge Clusters and my Host Clusters in one go, but there is an option to upgrade them separately starting with the Edge Clusters. You can also choose between parallell or sequential upgrades, and I went for the default which is parallell even though it wouldn’t matter in my case since I only have one cluster of each type.
When the update starts, you can see status on each component it is updating.
You can also select VIEW UPDATE ACTIVITY to get more details on what it is doing.
Next available update was for vCenter Server so I downloaded and installed that.
When vCenter was done upgrading, ESXi 7.0 Update 2a was downloaded and installed.
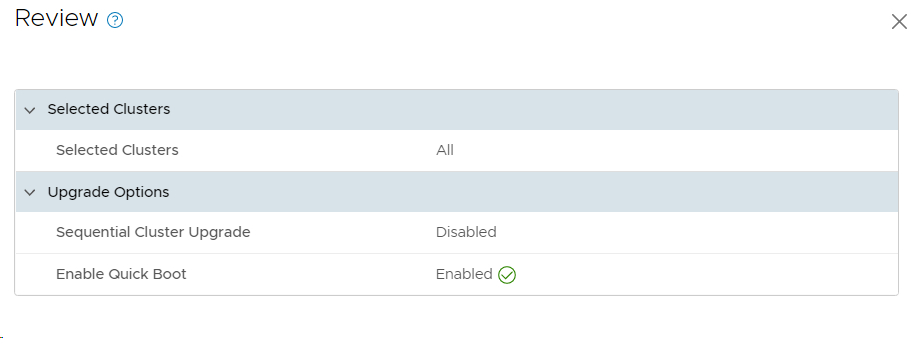
I selected to enable Quick Boot to speed up the upgrade of ESXi. Note that your hardware must support this feature if you are running on bare-metal instead of nested ESXi like I do.
The ESXi update got cancelled for some reason, so I retried to install it, but it got cancelled again.
I ran a new Precheck and found that VUM had problems uploading the patch files to the four ESXi hosts in AZ2.
Looking at the logs on one of the hosts showed me that it didn’t have enough memory. These four hosts only had 16 GB RAM each, so I increased this to 64 GB to make them equal to the hosts in AZ1.
I ran the Precheck again and this time it succeeded.
I tried to install the ESXi update again, but it got cancelled this time too. Rerunning the Precheck now showed that NTP was out of sync between my PSC and my SDDC Manager. However, when manually checking I found that this was not the case. The error didn’t specify which PSC so I started suspecting it could be due to my VI WLD vCenter appliance was down. After starting that up again, this NTP out of sync error disappeared and the Precheck went through all green. It would be nice if the Precheck was able to tell me which PSC it was complaining about, and also tell me that NTP wasn’t the problem, but that it didn’t have connectivity to it at all.
I tried to install the ESXi upgrade again, but it still got cancelled without giving me any reason. Digging through the /var/log/vmware/vcf/lcm/lcm.log file on SDDC Manager gave me this hint:
2021-09-01T09:36:55.684+0000 WARN [vcf_lcm,801535c71a337889,d768] [c.v.evo.sddc.lcm.orch.Orchestrator,pool-7-thread-6] Cannot start upgrades since there are pending or, failed workflows
I looked into my Tasks list in SDDC Manager and found several failed tasks, but one stood out as not being resolved. SDDC Manager had tried to rotate the passwords, but were unable to do so on my VI WLD vCenter and NSX Manager since they were turned off temporarily. I went into Password Management and found an error there saying the same thing, and hitting retry solved this issue without problems since all appliances were back up running now.
I went back to Updates/Patches for my Management WLD and retried to install the ESXi update, and this time it started running. So even though the Precheck is all green you can still have issues causing the upgrade to be cancelled without any useful message in the user interface. The Upgrade Prerequisites tells us to “Ensure that there are no failed workflows in your system”, but in my lab there is usually a few failed tasks which are stuck without blocking an upgrade. It is also not a good idea to shut down appliances in other WLDs to save resources during an upgrade.
None of these problems would happen in a production environment since they were all caused by lack of resources in my nested lab.
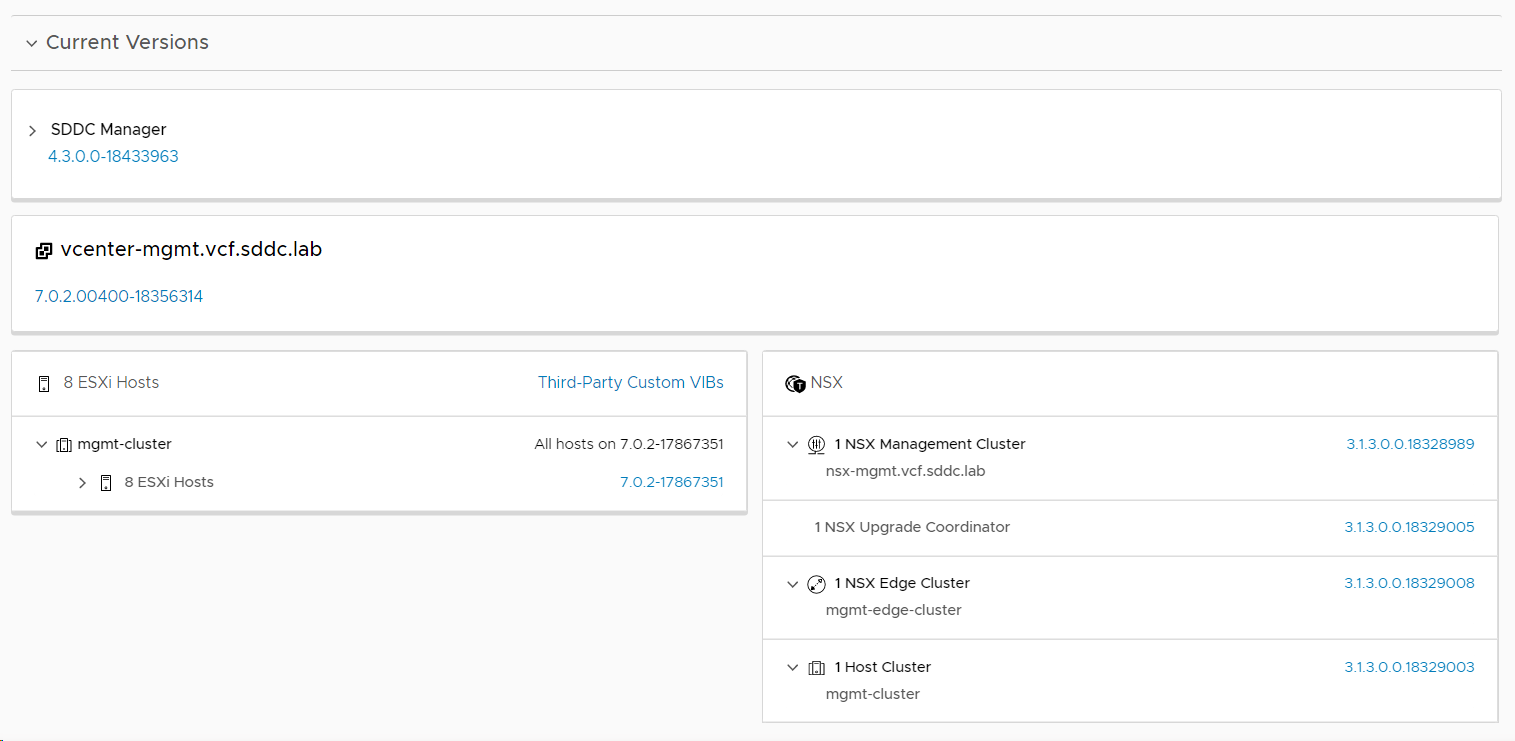
Checked the VCF version again, and this time it said 4.3!
The last two things to update was the vSAN Disk format version and the ESXi version on my vSAN Witness Appliance, which SDCC Manager doesn’t care about upgrading, which is a bit disappointing. I used vSphere Lifecycle Manager to patch the vSAN Witness Appliance to the same build as my ESXi hosts. vSAN Disk format is also upgraded in the vSphere Client.
I must admit that upgrading VCF in my lab usually gives me some trouble along they way, but most of the time it is caused by some component lacking resources. It tends to be fixed by increasing CPU, memory or disk resources for either vCenter or NSX-T Manager appliances. I have also had issues were ESXi hosts were unable to enter/exit maintenance mode, caused by admission control or a blocking VM.
If time permits, I will soon post about how I deploy VCF 4.3 from scratch with focus on what is new regarding the bring-up, as well as presenting some of the new features in VCF 4.3.
VCF 4.2 introduced support for NSX-T Federation which provides the ability to manage, control and synchronize multiple NSX-T deployments across different VCF instances which could be in a single region or deployed across regions. You can stretch Tier-0 and Tier-1 Gateways, Segments, and Groups used for Firewalling. Requirements between sites are maximum round-trip time of 150 ms, and 1500 bytes MTU is supported, however not recommended for best performance. NSX Managers and Edge Nodes need connectivity between them, but ESXi hosts don’t require connectivity across sites. Configuration is done on a new NSX Manager role called Global Manager and pushed out to the local NSX Managers in each site, but you can still also connect directly to the Local Managers in case you have a requirement not supported by the Global Manager.
This is not a detailed review of NSX-T Federation, but I will focus on showing you how I got NSX-T Federation working between two VFC instances in my lab. Sorry for the lack of a proper naming convention, but hopefully you are able to follow along.
Configuration Overview
Hostname
Role
VCF Instance
Location
Region
vcenter-mgmt.vcf.sddc.lab
vCenter Server
1
BGO
A
sddc-manager.vcf.sddc.lab
SDDC Manager
1
BGO
A
nsx-mgmt-1.vcf.sddc.lab
NSX-T Local Manager
1
BGO
A
nsx-global-mgmt.vcf.sddc.lab
NSX-T Global Manager
1
BGO
A
vcenter-mgmt.vcf.nils.lab
vCenter Server
2
OSL
B
sddc-manager.vcf.nils.lab
SDDC Manager
2
OSL
B
nsx-mgmt-1.vcf.nils.lab
NSX-T Local Manager
2
OSL
B
nsx-global-mgmt.vcf.nils.lab
NSX-T Global Manager
2
OSL
B
Steps Performed
Note that all images are clickable to make them bigger.
1. Deployed an NSX-T Global Manager appliance in VCF instance 1 (BGO). This is simply done by deploying the nsx-unified-appliance ova and selecting “NSX Global Manager” as Rolename. In a production environment I would also replace the certificate and deploy two additional appliances to create an NSX-T Global Manager Cluster. In my lab I was happy with deploying a single appliance.
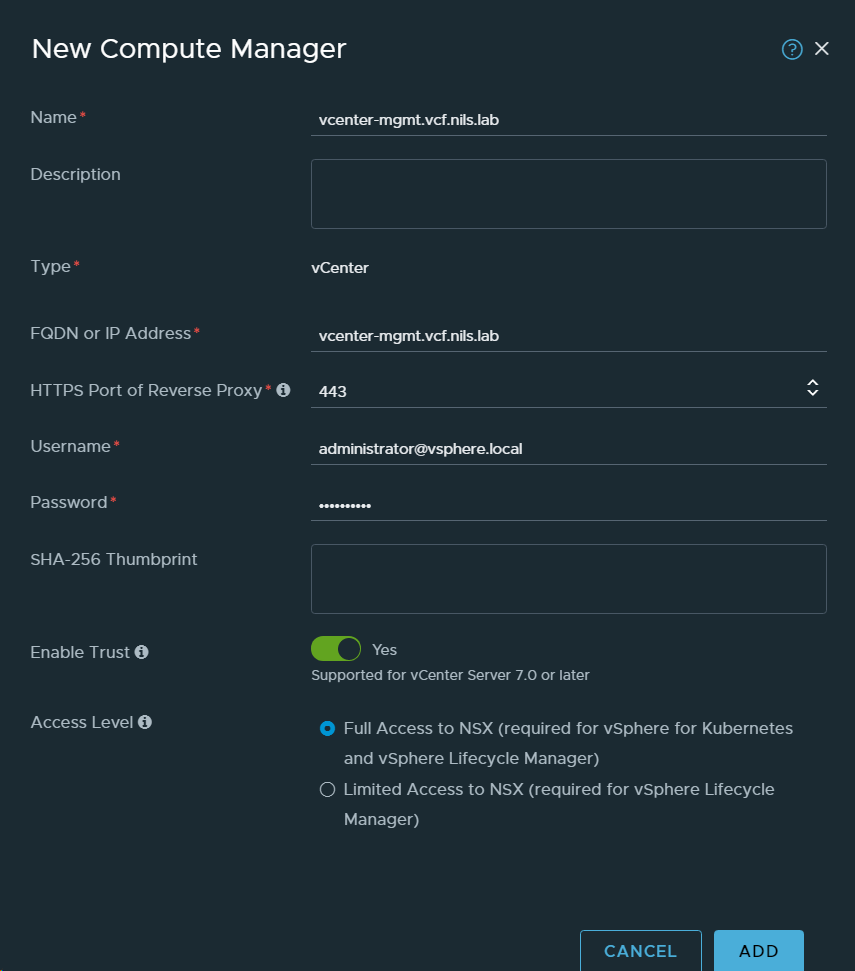
2. Added vCenter Server in VCF instance 1 (BGO) as a Compute Manager.
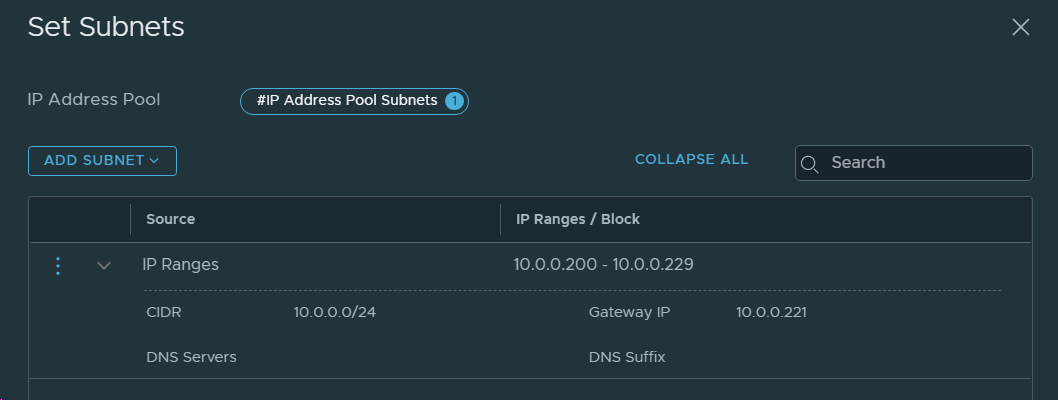
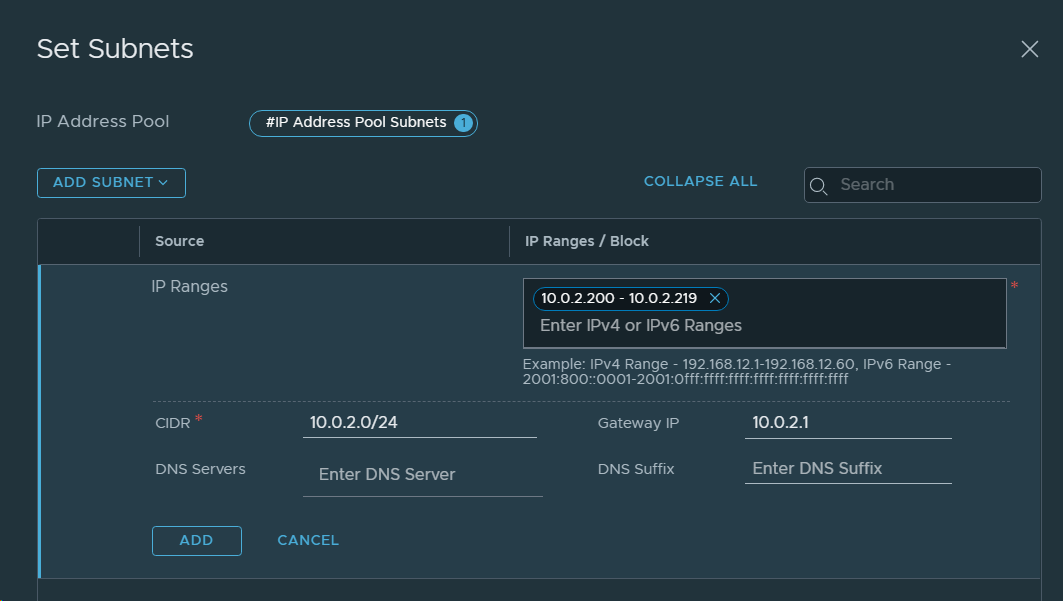
3. Created an IP Pool for Remote Tunnel Endpoints in the Local NSX-T Manager in VCF instance 1 (BGO).
4. Set the NSX-T Global Manager to Active.
5. Obtained the Certificate Thumbprint for the existing NSX-T Manager in VCF Instance 1 (BGO). This can be done by SSH to vCenter and run the following command:
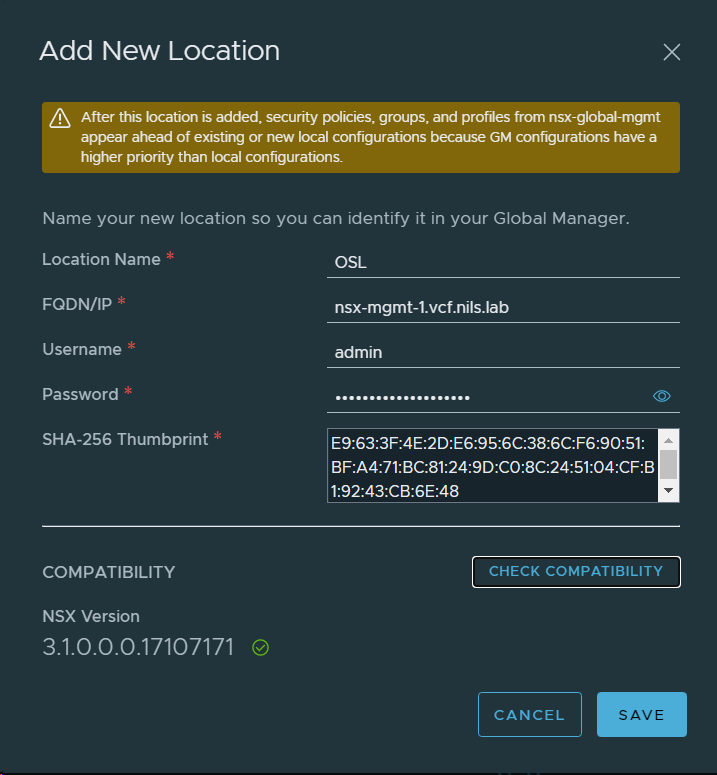
6. Enabled NSX-T Federation by adding the existing NSX-T Manager in VCF Instance 1 (BGO) as a location to the NSX-T Global Manager. Then it became a Local NSX-T Manager.
First attempt gave me this error message:
NSX-T Federation requires NSX Data Center Enterprise Plus license, so after upgrading my license it worked fine.
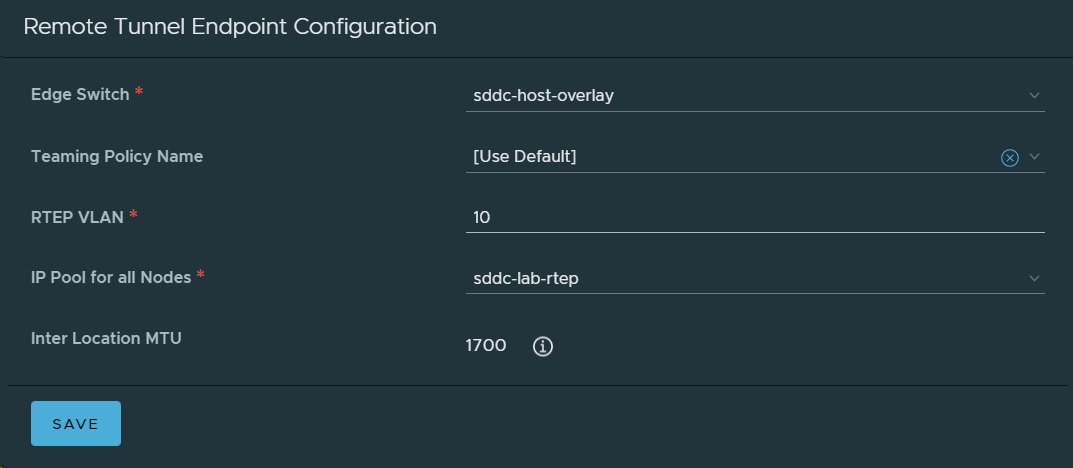
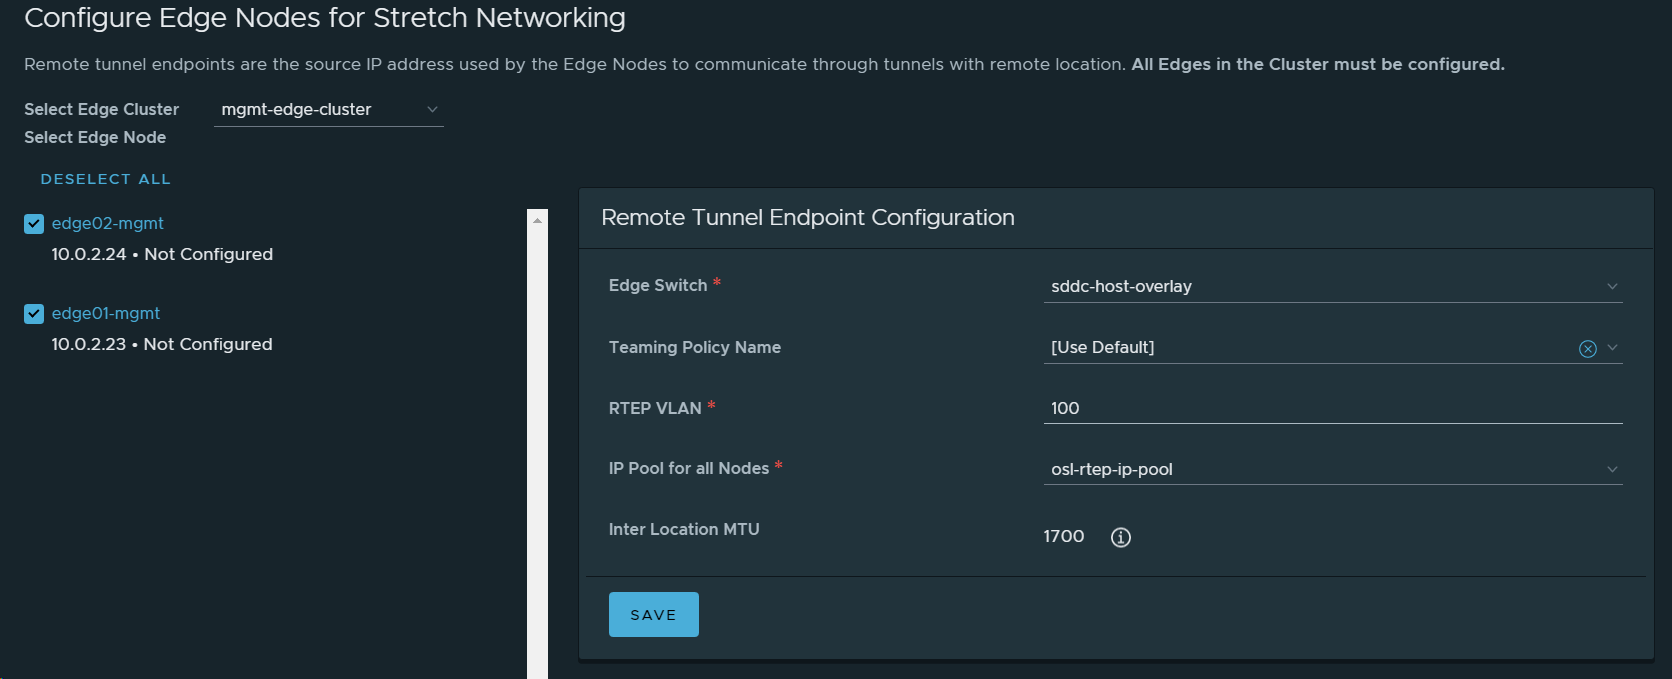
7. Configured networking for the NSX-T Local Manager node in VCF Instance 1 (BGO).
8. Imported the NSX-T Local Manager configurations for VCF Instance 1 (BGO) to the NSX-T Global Manager.
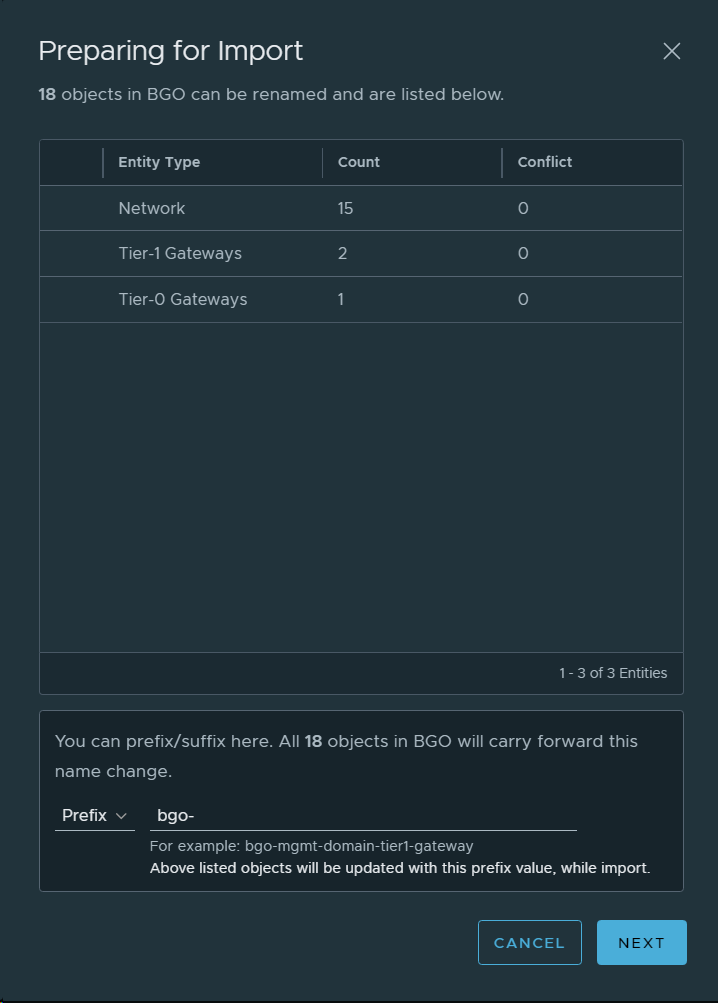
9. Created a Tier-1 Gateway to be stretched between both VCF instances.
10. Connected the existing Cross-Region Segment to the stretched Tier-1 Gateway.
11. Deployed an NSX-T Global Manager appliance in VCF instance 2 (OSL). This is simply done by deploying the nsx-unified-appliance ova and selecting “NSX Global Manager” as Rolename. In a production environment I would also replace the certificate and deploy two additional appliances to create an NSX-T Global Manager Cluster. In my lab I was happy with deploying a single appliance.
12. Connected the new NSX-T Global Manager Node to the vCenter Server in VCF instance 2 (OSL).
13. Created an IP Pool for Remote Tunnel Endpoints in NSX-T Data Center in VCF Instance 2 (OSL).
14. Obtained the Certificate Thumbprint for the existing NSX-T Manager in VCF Instance 2. This can be done by SSH to vCenter and run the following command:
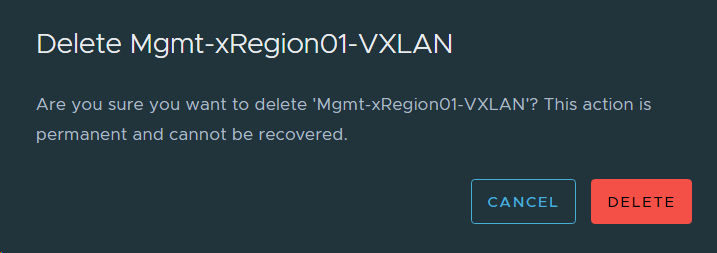
15. Deleted the existing Cross-Region Segment from the NSX-T Manager in VCF Instance 2 (OSL) since we will stretch the one deployed in VCF Instance 1 (BGO). The name in the image below contains “VXLAN”, but this name has stuck in the lab since VCF 3.x where NSX-V was used. It is in fact a regular NSX-T Overlay Segment.
16. Enabled NSX-T Federation by adding the existing NSX-T Manager in VCF Instance 2 (OSL) as a location to the NSX-T Global Manager. Then it became a Local NSX-T Manager. Note that this is done in the NSX-T Global Manager in VCF Instance 1 (BGO), which is the Active one.
17. Configured networking for the NSX-T Local Manager node in VCF Instance 2 (OSL).
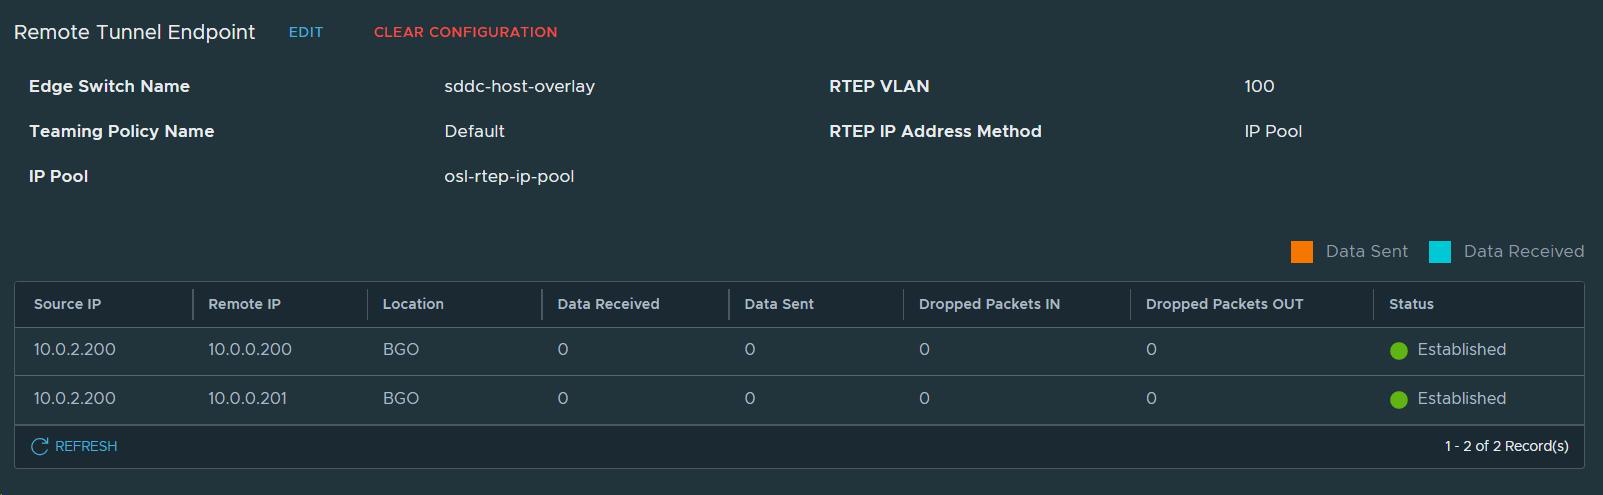
Remote Tunnel Endpoints in OSL looking good.
Remote Tunnel Endpoints in BGO also looking good.
18. Imported the NSX-T Local Manager configuration in VCF Instance 2 (OSL) to the NSX-T Global Manager.
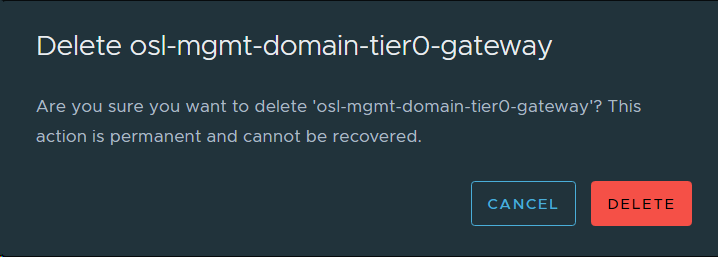
19. Deleted the Existing Tier-0 Gateway for the Management Domain in VCF Instance 2 (OSL). First I had to disconnect the Tier-1 Gateway from the Tier-0 Gateway.
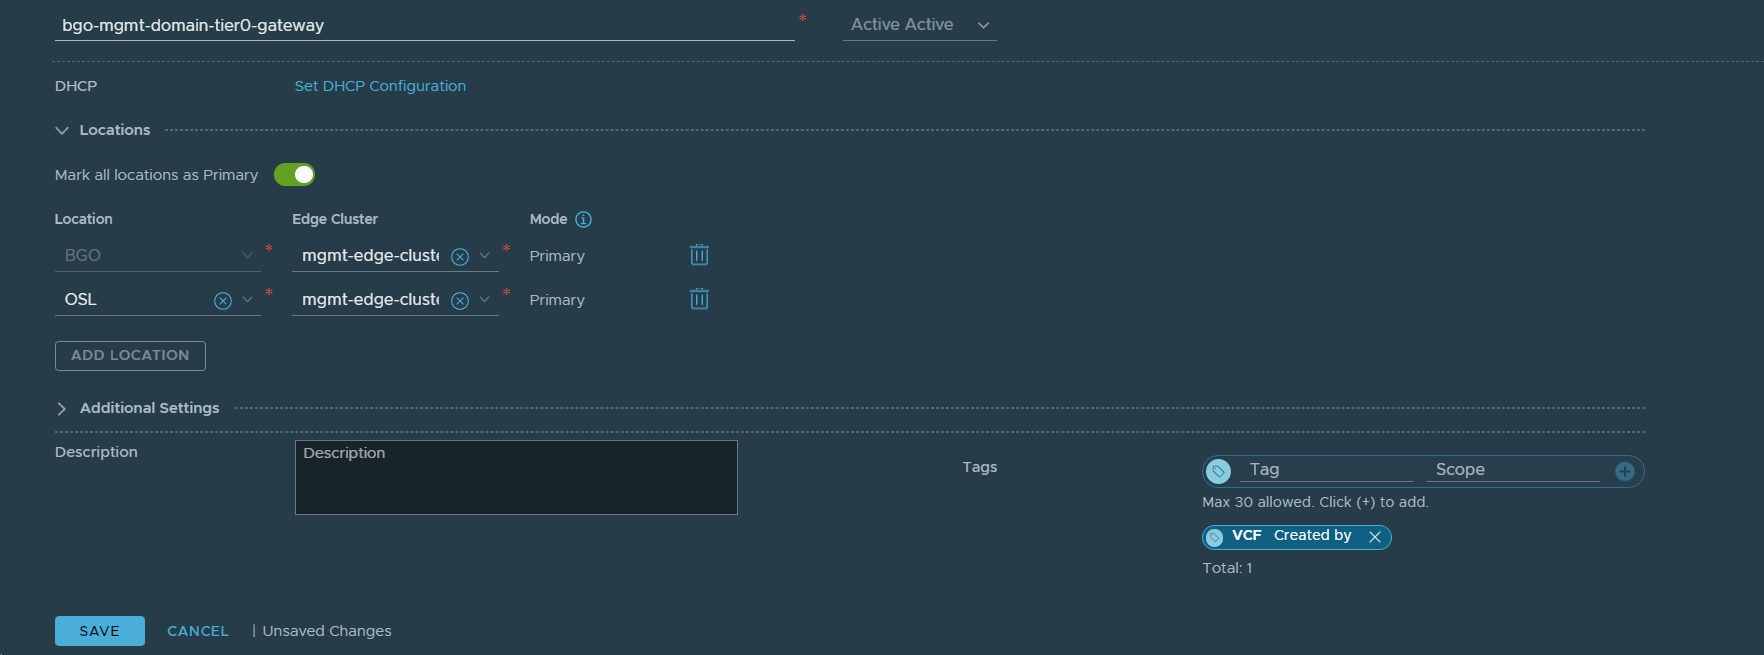
20. Reconfigured the Tier-0 Gateway in VCF Instance 1 (BGO) to stretch the network between VCF Instance 1 (BGO) and VCF Instance 2 (OSL). Added OSL as a Location to existing bgo-mgmt-domain-tier0-gateway.
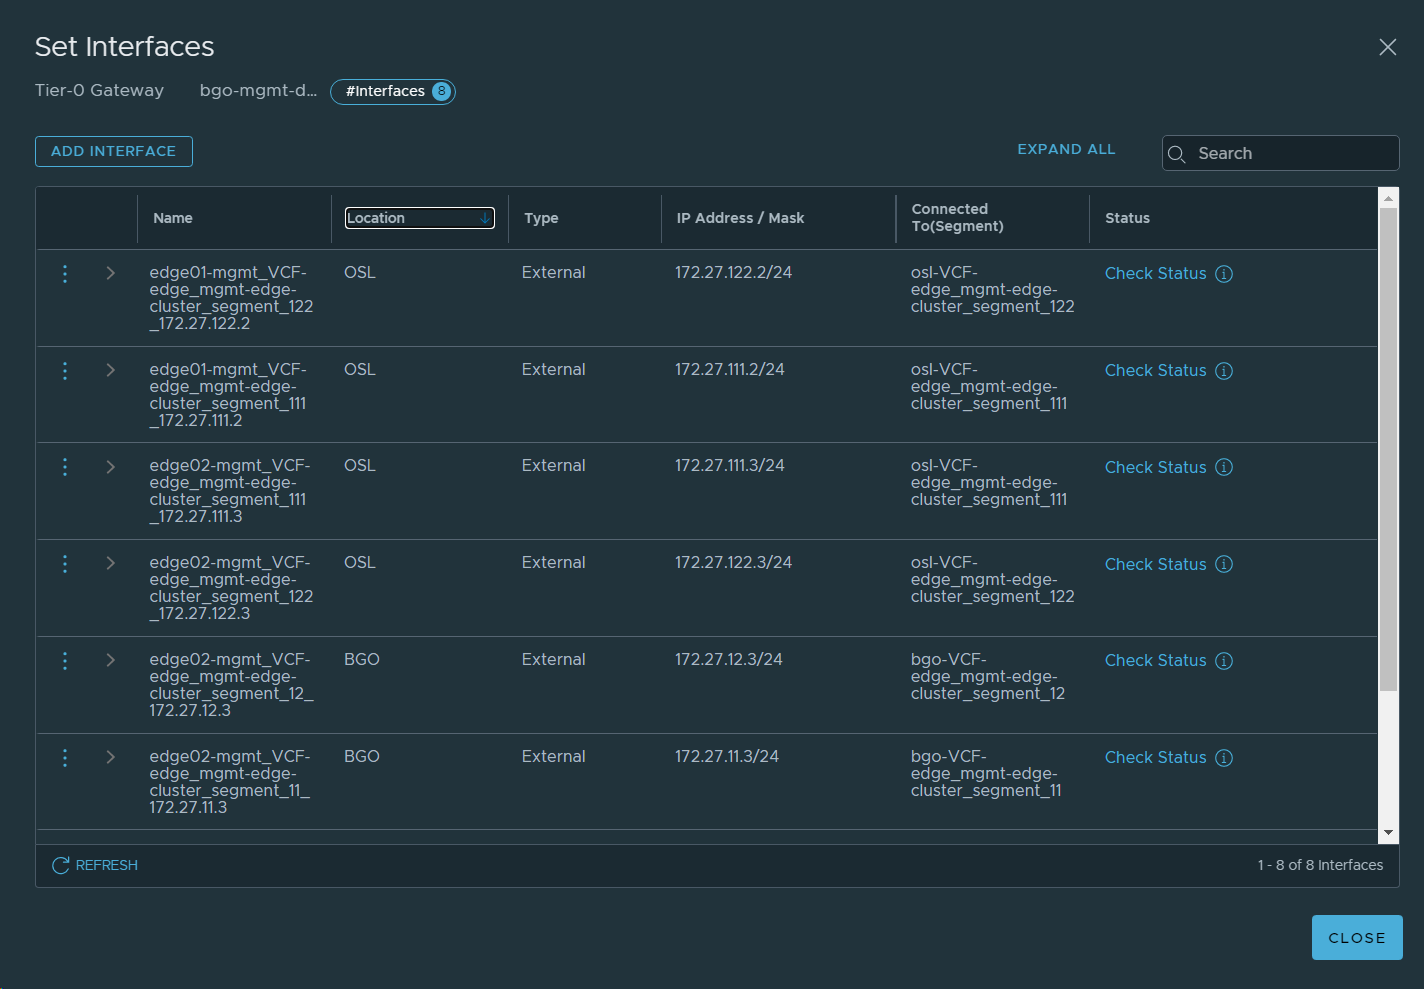
21. Set interfaces for VCF Instance 2 (OSL) on the Tier-0 Gateway.
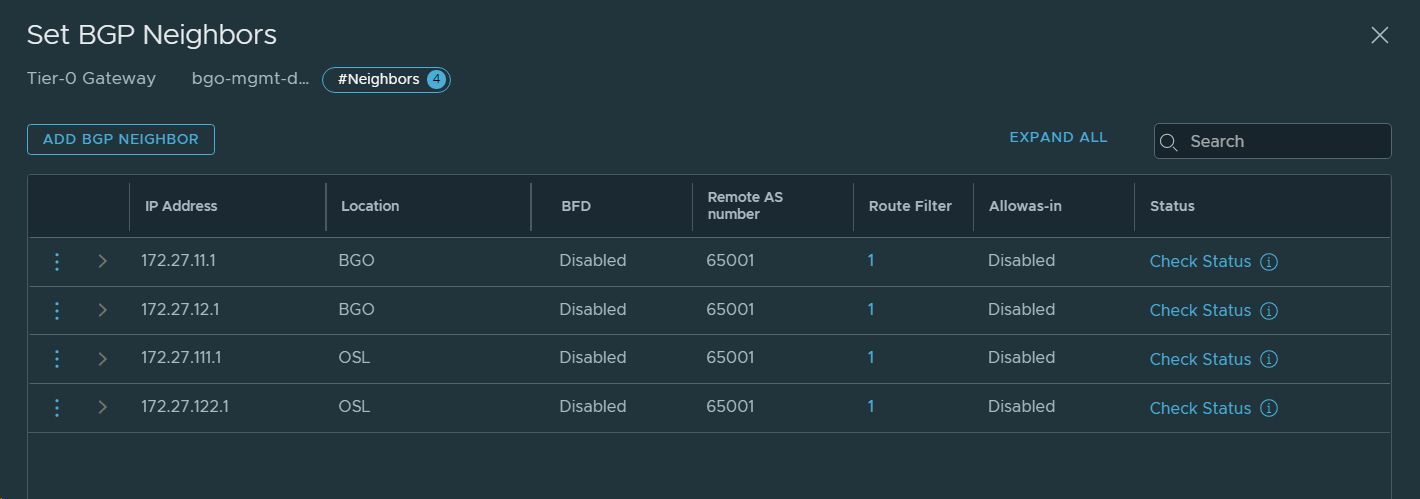
22. Configured BGP neighbors for VCF Instance 2 (OSL).
23. Configured an Any IP Prefix in the Tier-0 Gateway.
24. Created a Route Map for No Export Traffic in the Tier-0 Gateway.
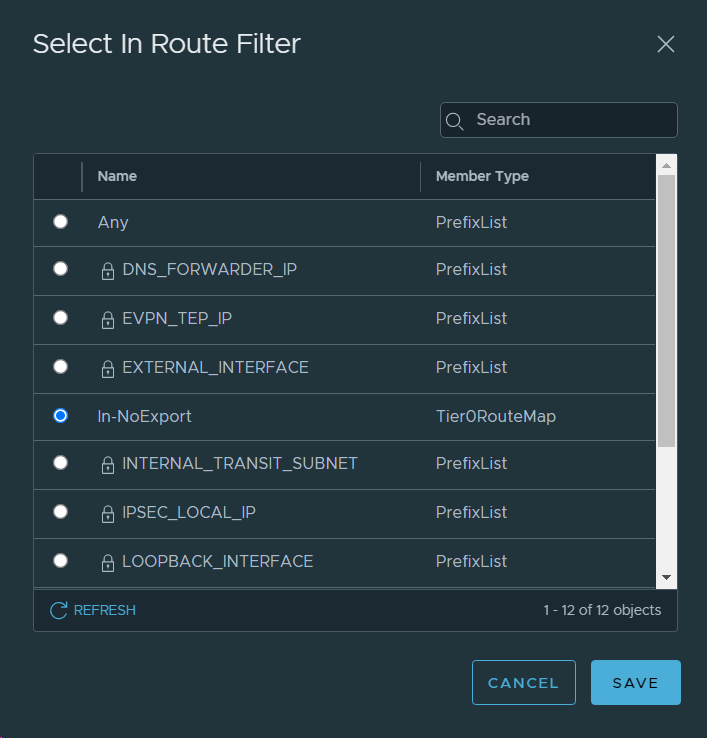
25. Configured Route Filters and Route Redistribution for BGP. Repeated for all four BGP neighbourships.
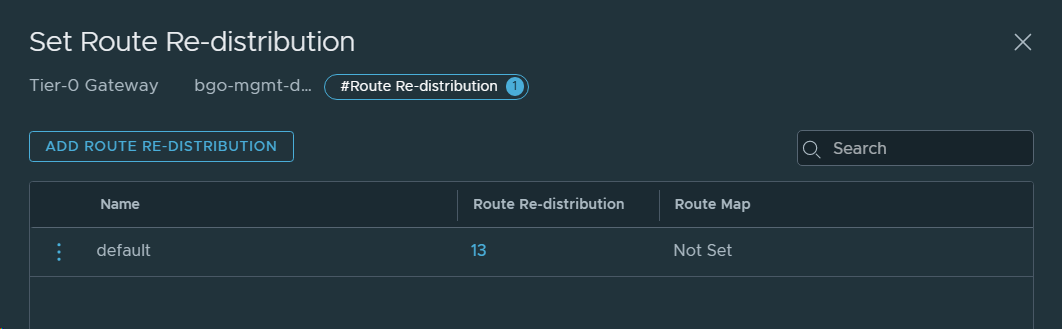
26. Configured route redistribution for VCF Instance 2 (OSL) on the Tier-0 Gateway.
27. Connected the Tier-1 Gateway in VCF Instance 2 (OSL) to the stretched Tier-0 Gateway.
28. Deleted VCF Instance 1 (BGO) as a Location for this Tier-1 Gateway since this is a local only Tier-1 Gateway.
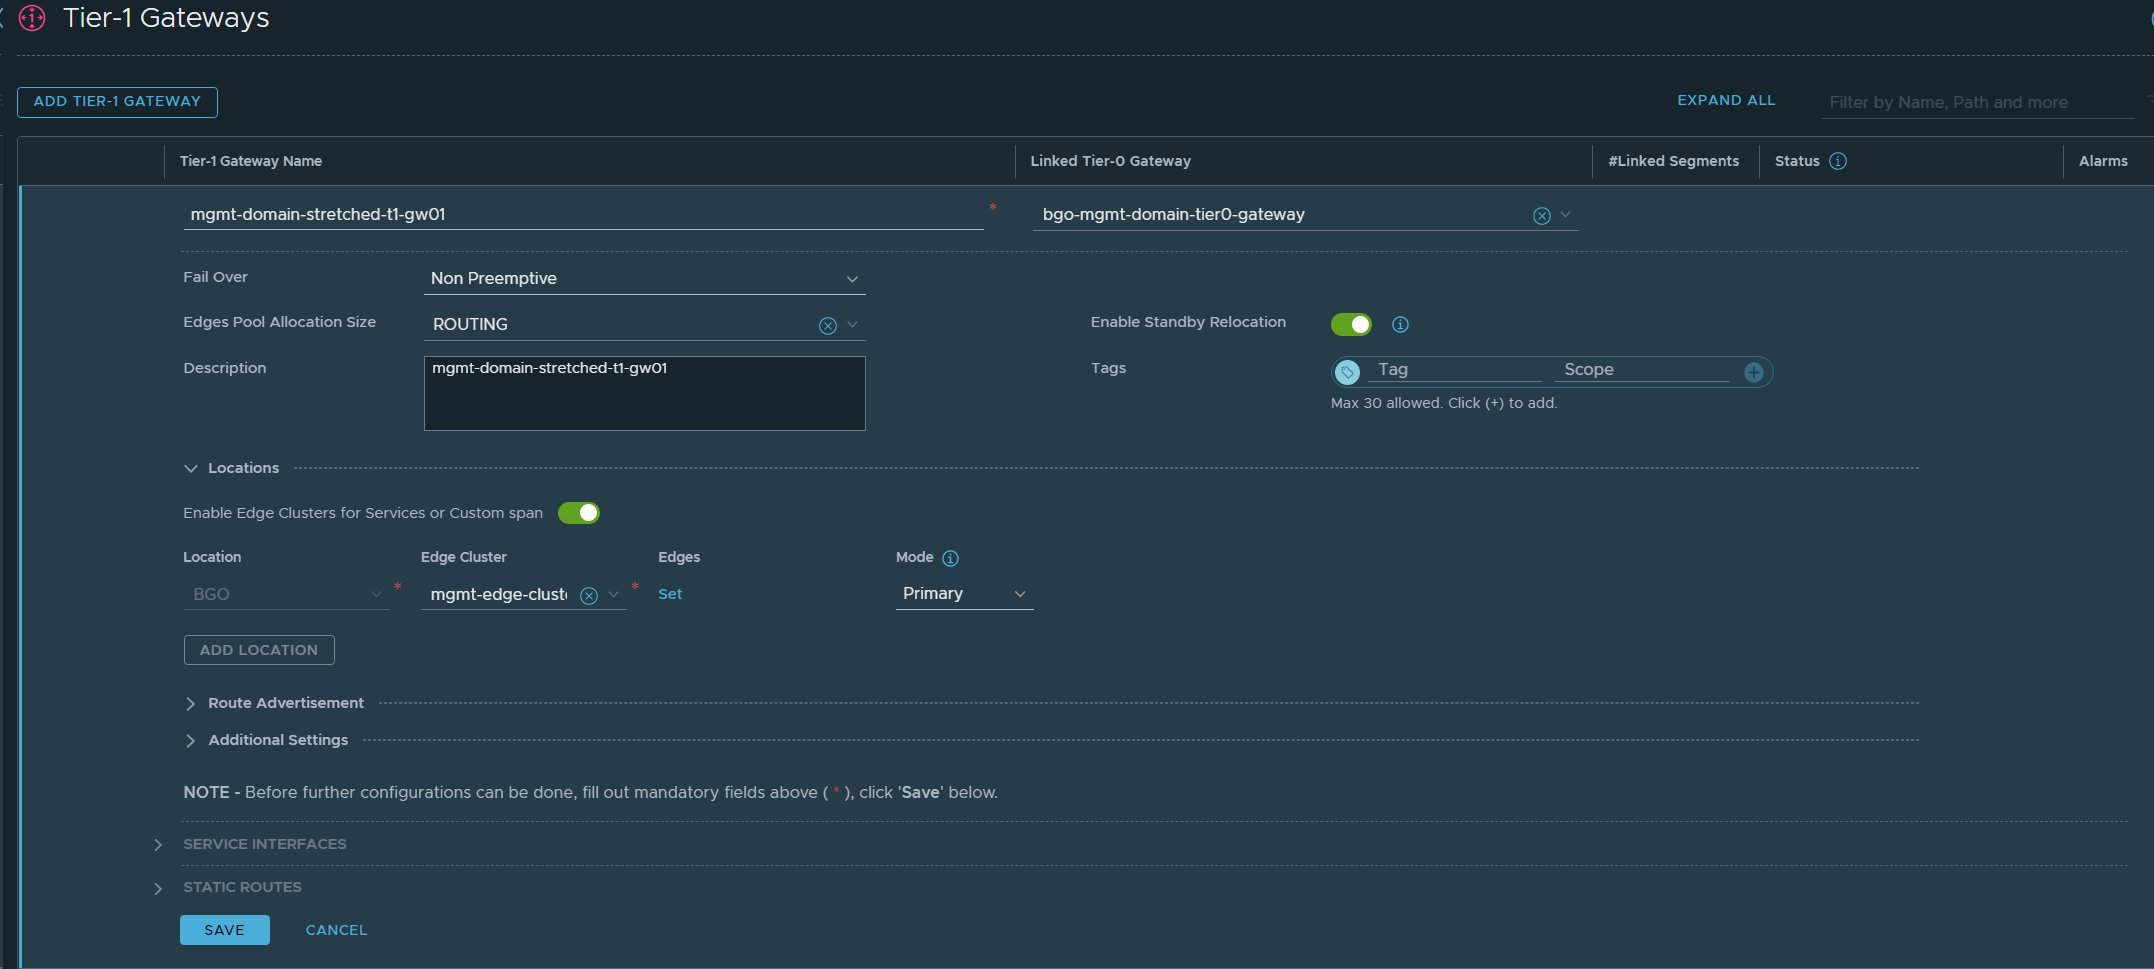
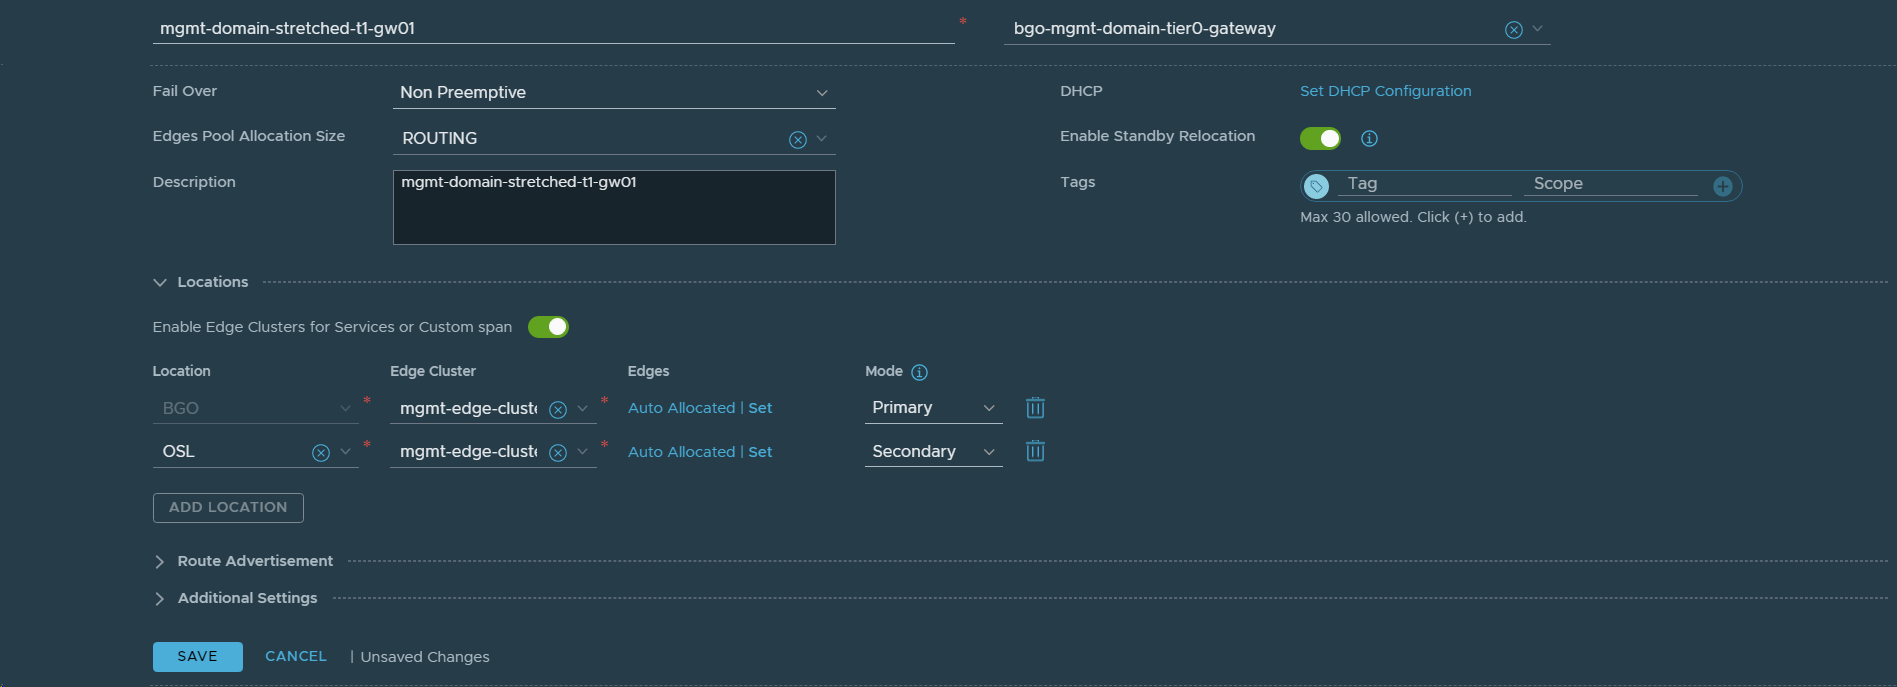
29. Added VCF Instance 2 (OSL) as a Location in the stretched Tier-1 Gateway (mgmt-domain-stretched-t1-gw01).
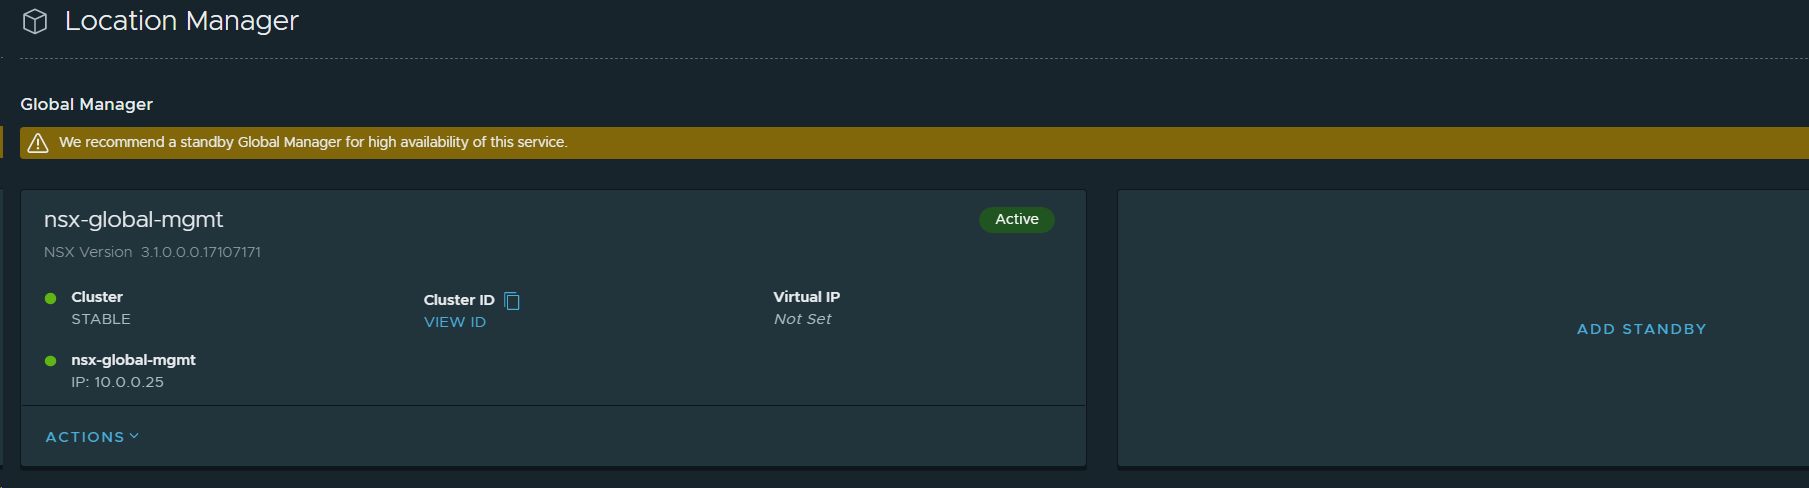
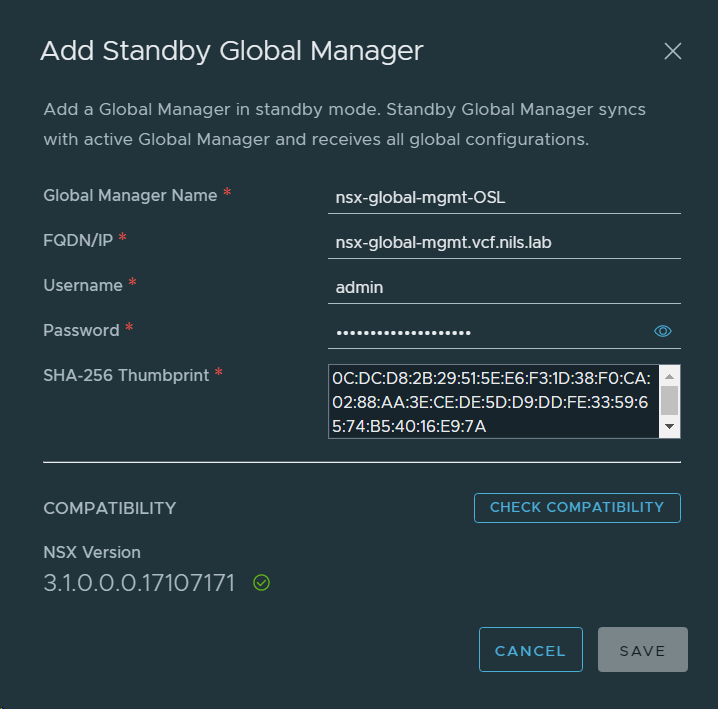
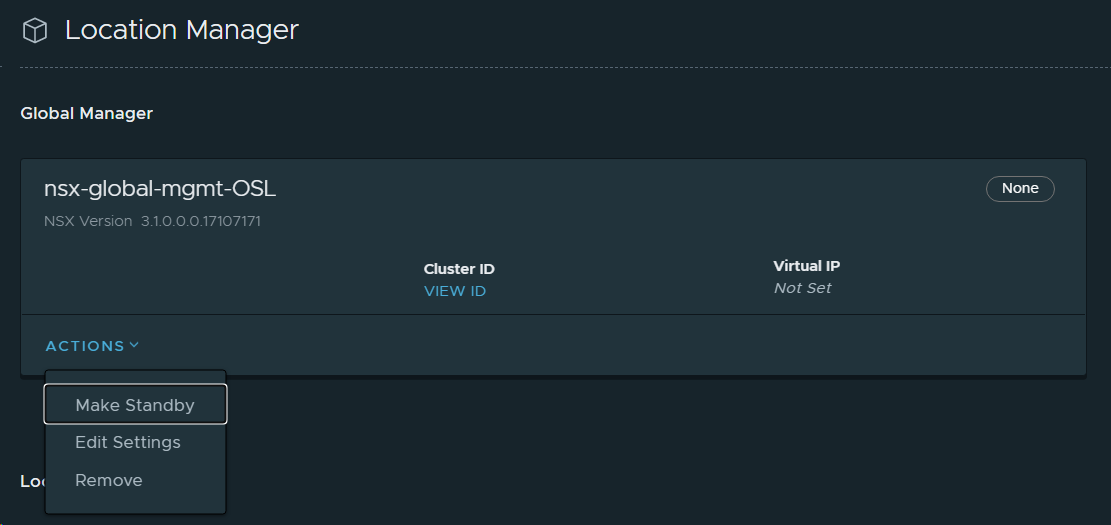
30. Set the NSX-T Global Manager in VCF Instance 2 (OSL) as Standby for the NSX-T Global Manager in VCF Instance 1 (BGO). This provides high availability of the active NSX-T Global Manager.
First step was to retreive the SHA-256 thumbprint of the NSX-T Global Manager certificate in VCF Instance 2 (OSL) using this command from the vCenter Server:
Then I added the NSX-T Global Manager in VCF Instance 2 (OSL) as standby.
That’s it! I now have NSX-T Federation between my two VCF Instances which I find very useful. I haven’t done everything required in the VVD to call my instances Region A and Region B, but I can still simulate a lot of cool use cases. Hopefully you found this useful and please let me know if you have any comments or questions.
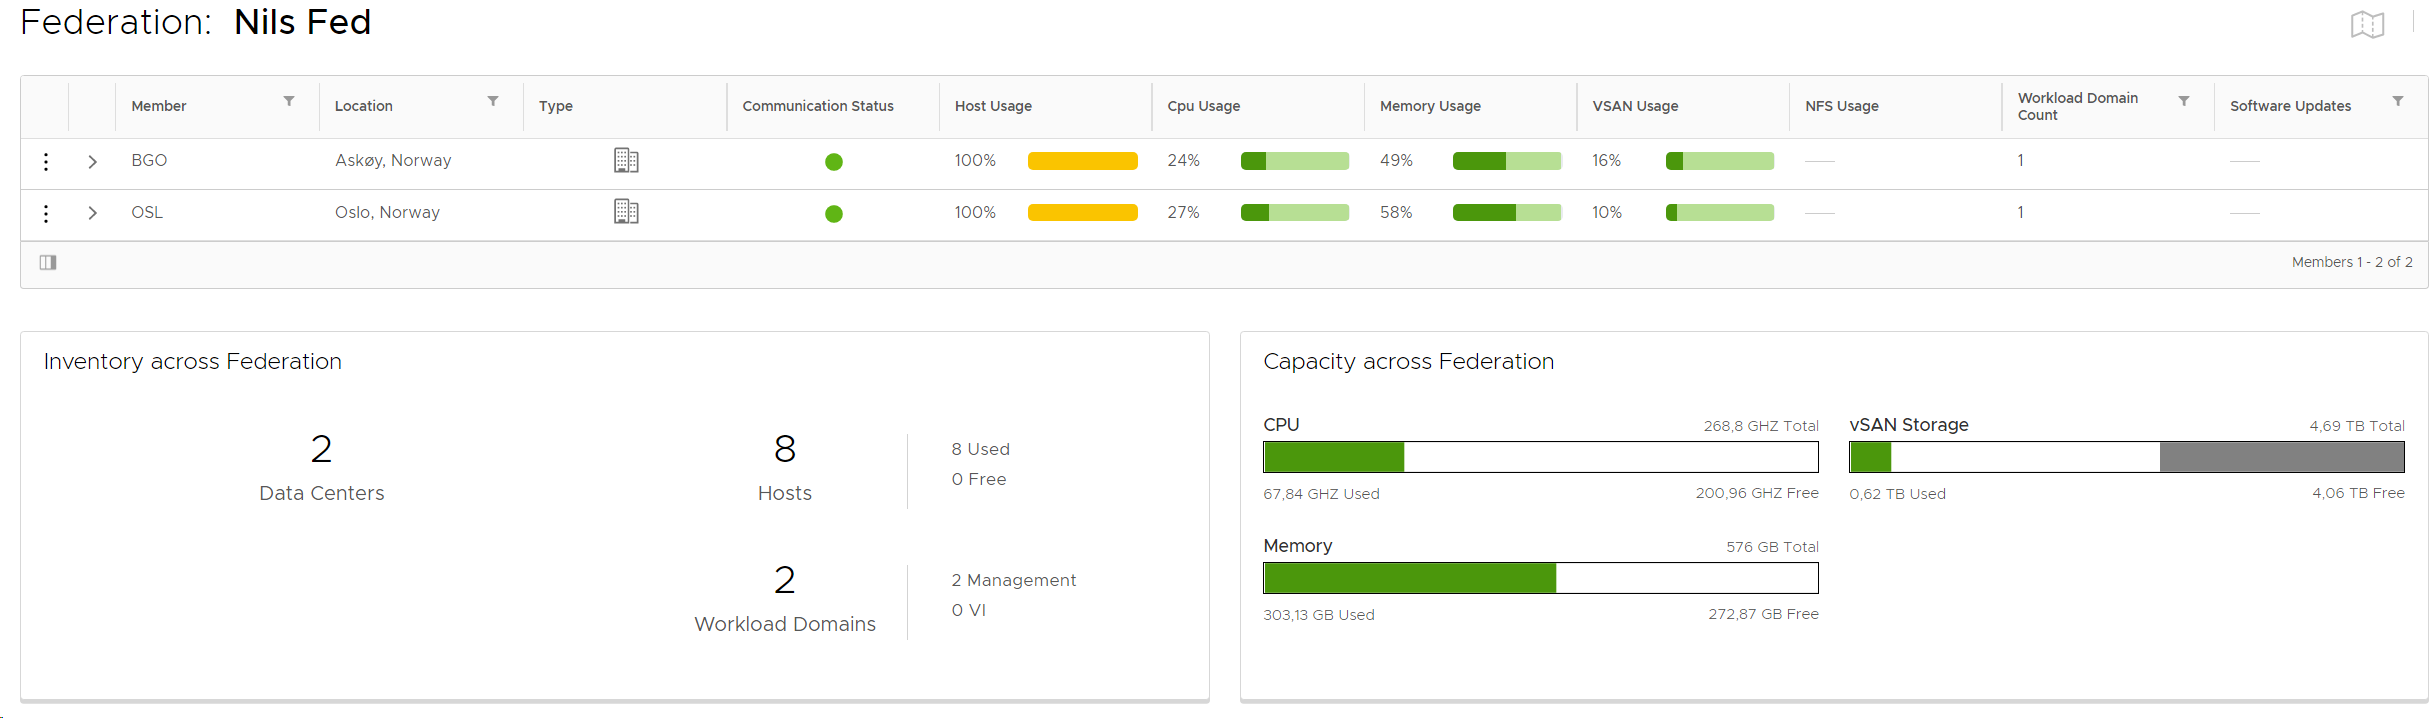
Multi-Instance Management (VCF Federation) allows you to monitor and manage multiple VMware Cloud Foundation instances from a single console. You can view inventory across the VMware Cloud Foundation instances in the federation as well as the available and used capacity. You can also see if any patches are ready to be installed in any of the instances.
I won’t go too much into details here but focus on showing you how I got this working in my lab.
Here are the steps I did to federate two VCF instances. Sorry for not using a proper naming convention, but hopefully you will be able to follow along.
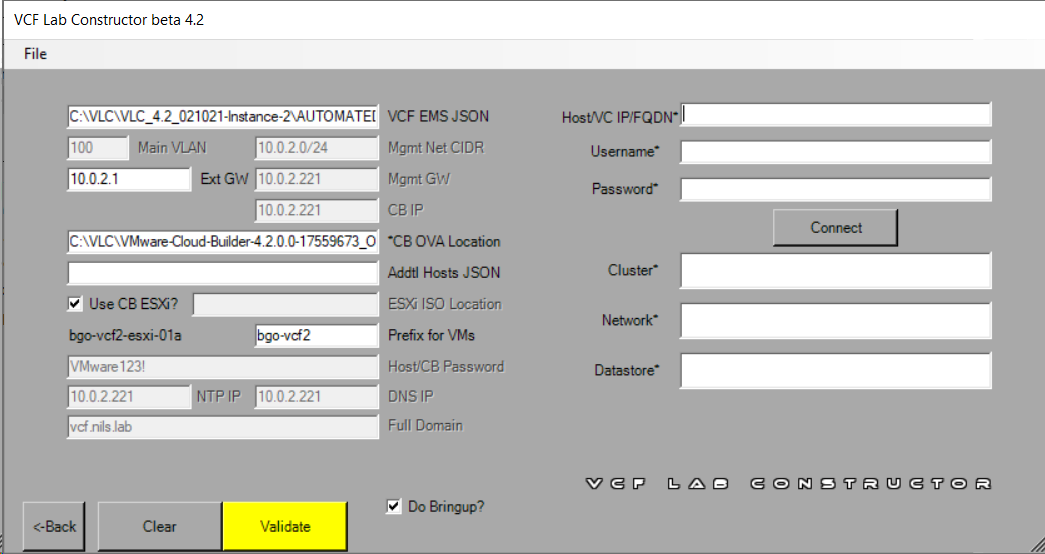
Deployed my first VCF instance using VLC Automated mode with the default settings.
2. Deployed my second VCF instance using VLC Automated mode but changed the following in AUTOMATED_AVN_VCF_VLAN_10-13_NOLIC_v42.json: IP addresses, VLAN IDs, domain, subdomain, and hostnames.
3. Added another vNIC to my Jump Host and tagged it with the Main VLAN ID for my second instance (100). Assigned it the Ext GW IP (10.0.2.1).
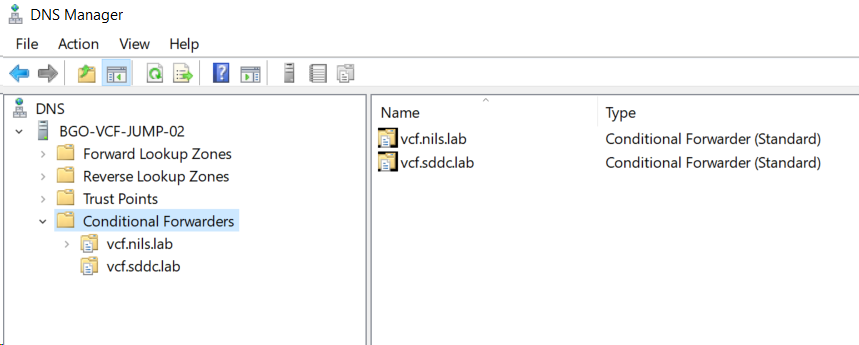
4. Installed the DNS Server Role on my Jump Host and configured one conditional forwarder pointing to each of my Cloud Builder appliances to allow name resolution across both instances.
5. Configured Deadwood, which is the recursive DNS daemon (service) for MaraDNS, to forward queries to my Jump Host. This was done by editing /etc/dwood3rc and then restarting the maradns.deadwood service on the Cloud Builder appliances in each VCF instance.
“VMware Professional Services, the largest services organization of experienced IT professionals focused solely on virtualization, provides industry-leading Consulting, Education, and Technical Account Manager services that enable customers to transform IT environments through virtualization and realize greater value from flexible, agile IT service delivery models sooner, with less risk.”
I have been a certified VMware PSO consultant for about two years, but just recently started my first assignment for them. I work for VMware PSO via my employer Proact who is a VMware Principal Partner. I have had many inquiries from PSO during these years, but either I have been too busy with existing customers, or my skills haven’t aligned with the project requirements, like Cloud Director or Horizon. My first assignment is designing a 22 node VMware Cloud Foundation (VCF) deployment for a company in Finland. It will contain two Workload Domains and two Stretched Clusters. I will also assist them installing the solution when the design is completed. Advantages doing this with PSO is that I get access to internal VMware resources like documentation and experts. The project is also lead by an experienced project manager from VMware which makes it easier for me to focus on the technical parts.
If your company would like to know how they can use VMware PSO, please reach out to me, or contact VMware.
If you are a VMware expert thinking it sounds like fun to be a VMware PSO consultant, I may be able to help you with that as well 🙂
You may already have VMware Professional Services Credits as part of your agreement with VMware, so please check if you should use these to start a project with PSO before they expire.
More information about VMware PSO can be found here.
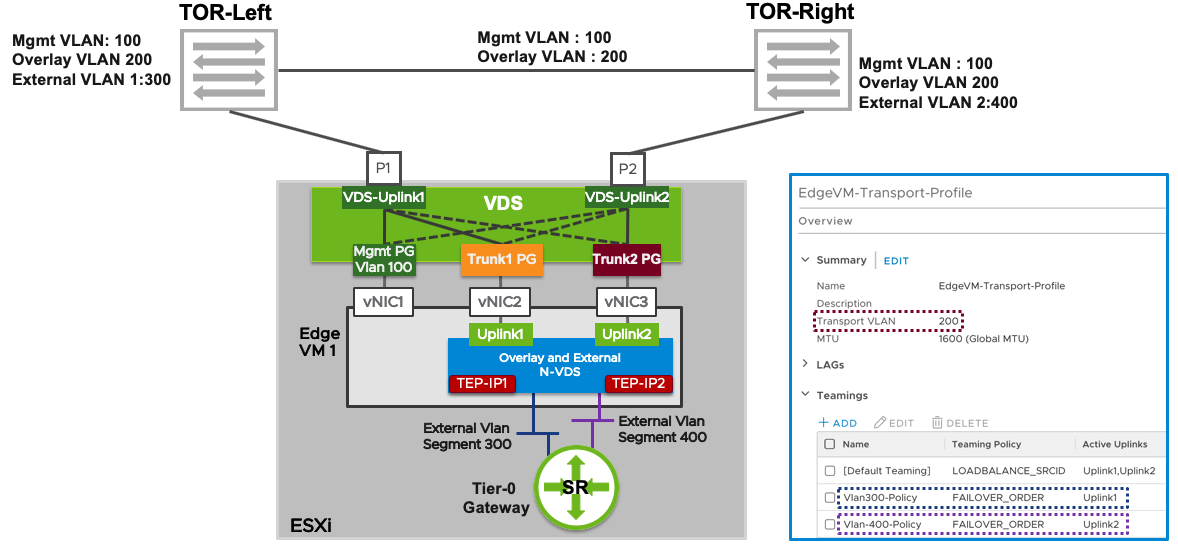
I have been working a lot with NSX-T the last few years and I have come across a misconfiguration that may cause massive packet loss for the workloads connected to Overlay segments. Since NSX-T 2.5, the recommended Edge Node design has been the “Single N-VDS – Multi-TEP” design which looks like this:
Image from NSX-T Reference Design Guide 3.0.
What people, and VCF, sometimes get wrong when implementing this design, is that they configure Trunk1 PG and Trunk2 PG with a Teaming and failover policy of Active/Unused instead of Active/Standby. Note that there are two TEP-IPs, each using a separate vNIC, Trunk PG and physical NIC. When one of the physical NICs or one of the Top of Rack (ToR) switches fail, the TEP-IP using that connection will go offline instead of failing over. This causes long lasting packet loss for any VM connected to a Segment that is using that TEP. I thought the Host Transport Nodes eventually would stop using the failed Edge Node TEP IP after some time, but I waited 20 minutes without any correction.
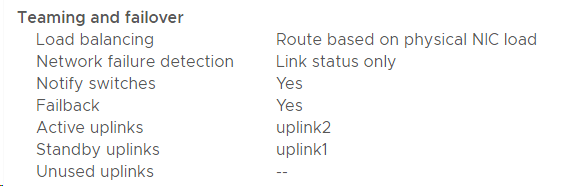
This is what the Teaming and failover Policy should look like:
Trunk1 PG
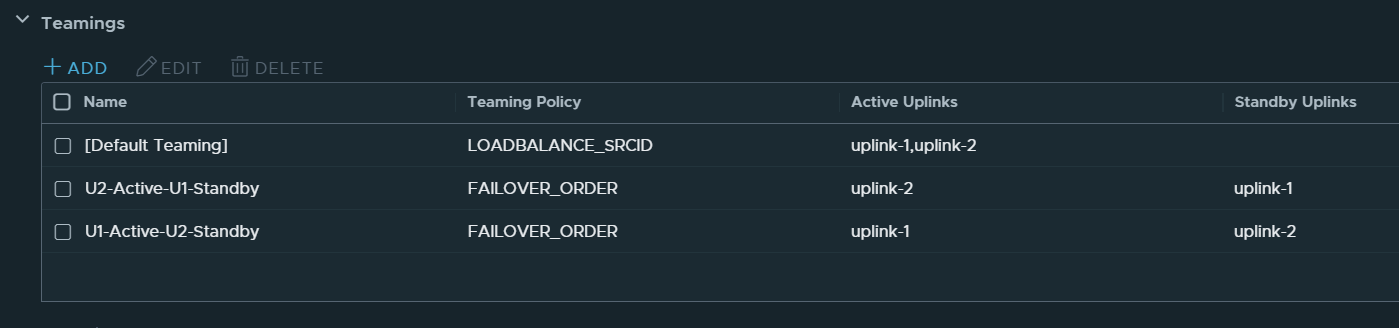
Trunk2 PGWhat if you have a fully collapsed cluster with only two physical NICs per host? Meaning NSX Manager, Host Transport Nodes, and NSX Edge VMs are running on a single cluster. You don’t have any regular Trunk PGs on a VDS since you run everything on a single N-VDS. Then you have to create Trunk Segments in NSX-T instead and configure them with an Active/Standby Teaming Policy like this:
I recommend using meaningful names for the Teamings so that you can easily see on the Segments what policy will be used. Note that the opposite uplink is Standby for each Active uplink.
If you run everything on a single VDS 7.0 you may have a mix of regular Trunk PGs and NSX-T Segments on the same VDS. Same rules still apply. In NSX-T 3.1 and later you can use the same VLAN ID for both your Edge Node TEPs and your Host TEPs, but then you need to use Trunk Segments in NSX-T. So there are several options and easy to get it wrong.
One of the reasons people mess this up, is because they want to achieve deterministic peering for their uplink interfaces, meaning they want to peer with ToR Left using physical NIC 1 and peer with ToR Right using physical NIC 2, and they misunderstand how to achieve that. Named Teaming Policies in the Edge Nodes Uplink Profile will handle that and I will link to a document and a few blog posts below that will show you step-by-step how to do this, so don’t worry if you are more confused than ever 🙂
The Edge Nodes Uplink Policy should look similar to this:
Note that there are no Standby Uplinks for the Named Teamings.
VCF 4.x and VVD 6.x also use this design, but it is documented a bit vague, so people still get it wrong. The wording has been improved in VVD 6.2 after me complaining about it, so kudos to VMware for actually reading the feedback given on docs.vmware.com and updating accordingly.
What about VCF where all of this is deployed automatically? Unfortunately, VCF 4.0 also got this wrong, but it was fixed in VCF 4.1, but only when installing it from scratch. If you upgrade an existing VCF 4.0 environment to VCF 4.1 or 4.2, the error remains. Ouch! So, if you have any VCF 4.x installations, please verify the teaming policy before it’s too late. The fix is to manually change the Teaming Policy on both Port Groups.
Simulating a physical NIC failure without involving your Networking team can be done like this:
[root@bgo-lab-esx-01:~] esxcli network nic list
Name    PCI Device    Driver  Admin Status  Link Status  Speed
------  ------------  ------  ------------  -----------  -----
vmnic0  0000:06:00.0  nenic   Up            Up           10000
vmnic1  0000:07:00.0  nenic   Up            Up           10000
vmnic2  0000:08:00.0  nenic   Up            Up           10000
vmnic3  0000:09:00.0  nenic   Up            Up           10000
[root@bgo-lab-esx-01:~] esxcli network nic down -n vmnic2
[root@bgo-lab-esx-01:~] esxcli network nic list
Name    PCI Device    Driver  Admin Status  Link Status  Speed
------  ------------  ------  ------------  -----------  -----
vmnic0  0000:06:00.0  nenic   Up            Up           10000
vmnic1  0000:07:00.0  nenic   Up            Up           10000
vmnic2  0000:08:00.0  nenic   Down          Down             0
vmnic3  0000:09:00.0  nenic   Up            Up           10000
[root@bgo-lab-esx-01:~] esxcli network nic up -n vmnic2
[root@bgo-lab-esx-01:~] esxcli network nic list
Name    PCI Device    Driver  Admin Status  Link Status  Speed
------  ------------  ------  ------------  -----------  -----
vmnic0  0000:06:00.0  nenic   Up            Up           10000
vmnic1  0000:07:00.0  nenic   Up            Up           10000
vmnic2  0000:08:00.0  nenic   Up            Up           10000
vmnic3  0000:09:00.0  nenic   Up            Up           10000
Esxtop can be used to see if the Edge Nodes vNIC fails over or not when taking down vmnic2.
Here it shows eth1 not failing over to vmnic3 when having an Active/Unused Teaming Policy:
Here it shows eth1 failed over to vmnic3 when having an Active/Standby Policy:Here we can see that eth1 failed back to vmnic2 when taking vmnic2 back up:
While speaking of failover and failback testing, I would like to mention another issue that keeps coming up. When taking down one Top of Rack switch, everything fails over to the other physical NIC and we usually see one lost ping. When the switch is taken back up, everything fails back to the recovered physical NIC again, but this time we get a huge amount of packet loss. Why? Because when the switch brings the link back up, ESXi starts failing back after 100 ms, but the switch isn’t ready to forward traffic. How long this takes varies depending on vendor and switch type. We can change the network teaming failback delay to avoid this problem. Normally we change it to 30 000 or 40 000 ms.
To modify the TeamPolicyUpDelay, from the vSphere Client go to each ESXi host, Configure > Advanced System Settings > Edit. Change Net.TeamPolicyUpDelay to 30 000 and test again to see if it works better in your environment.
I hope this post was more helpful than confusing and thanks for reading.
Recently I had a customer calling me with panic in his voice. He had managed to create a rule in NSX where sources and destinations were both any, and action was set to drop. This rule was added high up in the rule set so almost all their workloads were blocked from the network, including their vCenter Server. This environment was still running NSX for vSphere (NSX-V) where firewall rules are managed using the NSX plugin in vCenter Server, so he couldn’t fix the rule.
Since I have been working with NSX for many years, I am aware of this risk and knew exactly how to solve it. VMware has a KB (2079620) addressing this issue so we followed that and got the problem fixed in a few minutes. We used a REST API client and ran a call against their NSX Manager to roll back the distributed firewall to its default firewall rule set. This means one default Layer3 section with three default allow rules and one default Layer2 section with one default allow rule. This restored access to the network for all workloads including the vCenter Server appliances. Then we simply logged into vCenter Server and loaded an autosaved firewall configuration from a time before they made the error. We also made sure to add their vCenter Server appliances to the Exclusion List in NSX to avoid getting into this situation again in the future. The NSX Manager appliance is added to the Exclusion List automatically, but you can’t log in directly to NSX Manager GUI in NSX-V to edit the firewall configuration. Note that it may be a good idea to keep vCenter Server off the Exclusion List to be able to secure it with the firewall, but then you need to make sure you don’t make the same mistake as this customer did.
It is possible to retrieve the existing firewall configuration using the following API call:
GET /api/4.0/firewall/globalroot-0/config
This can be useful if you don’t trust that you have a valid autosaved firewall configuration to restore after resetting it. You can also use this to fix the exact rule locking you out instead of resetting the entire configuration, but I will not go into details on how to do that here.
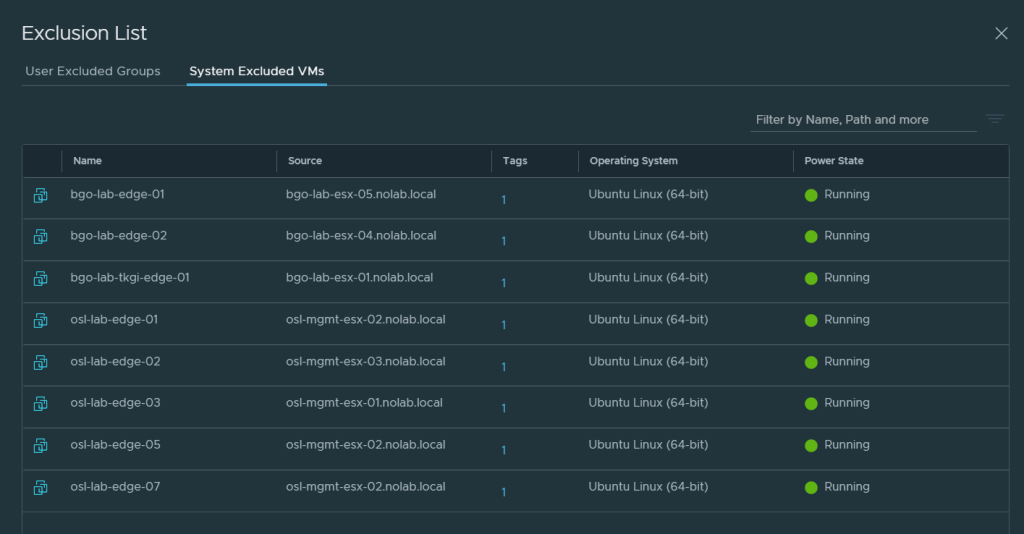
This problem could also happen with NSX-T, but vCenter Server is not where you manage firewall rules in NSX-T, that is done directly in NSX Manager. According to VMware, NSX-T automatically adds NSX Manager and NSX Edge Node virtual machines to the firewall exclusion list. I have been checking all my NSX Managers, currently three separate instances, and none of them display the NSX Managers in the System Excluded VMs list, only the Edge Nodes like you can see in the screen shot below.
I have been trying to retrieve the exclusion list from the REST API, to see if the Managers are listed there, but so far, I have not been successful. My API calls keeps getting an empty list every time, so I am still investigating how to do this.
I also tried the following CLI command on the NSX Managers, but it lists the same content as the GUI:
get firewall exclude-list
I have been able to confirm that none of the NSX Manager VMs have any firewall rules applied by using the following commands on the ESXi hosts running the VMs, so they seem to be excluded, but I think it would be nice to actually see them on the list.
This is how we can verify if a VM is excluded from the distributed firewall. As you can see my NSX Manager appliance VM has no rules applied.
[root@bgo-mgmt-esx-01:~] summarize-dvfilter | grep -A 3 vmm
world 2130640 vmm0:bgo-mgmt-nsxmgr-01 vcUuid:'50 2b fe 43 98 6f d5 be-fe fd e3 eb 36 3e 17 1d'
 port 33554441 bgo-mgmt-nsxmgr-01.eth0
  vNic slot 2
   name: nic-2130640-eth0-vmware-sfw.2
--
world 4700303 vmm0:bgo-vrops-arc-01 vcUuid:'50 2b 40 6d 17 22 e0 48-d1 5b 31 c7 d6 30 48 04'
 port 33554442 bgo-vrops-arc-01.eth0
  vNic slot 2
   name: nic-4700303-eth0-vmware-sfw.2
--
world 8752832 vmm0:bgo-runecast-01 vcUuid:'50 2b 60 41 6b 35 e9 ca-e5 10 a6 57 95 2e f9 f7'
 port 33554443 bgo-runecast-01.eth0
  vNic slot 2
   name: nic-8752832-eth0-vmware-sfw.2
[root@bgo-mgmt-esx-01:~] vsipioctl getrules -f nic-2130640-eth0-vmware-sfw.2
No rules.
[root@bgo-mgmt-esx-01:~]
For comparison, this is how it looks like for a VM not being on the exclusion list:
[root@esxi-1:~] vsipioctl getrules -f nic-2105799-eth0-vmware-sfw.2
ruleset mainrs {
  # generation number: 0
  # realization time : 2021-03-11T12:58:27
  # FILTER (APP Category) rules
  rule 3 at 1 inout inet6 protocol ipv6-icmp icmptype 135 from any to any accept;
  rule 3 at 2 inout inet6 protocol ipv6-icmp icmptype 136 from any to any accept;
  rule 4 at 3 inout protocol udp from any to any port {67, 68} accept;
  rule 2 at 4 inout protocol any from any to any accept;
}

ruleset mainrs_L2 {
  # generation number: 0
  # realization time : 2021-03-11T12:58:27
  # FILTER rules
  rule 1 at 1 inout ethertype any stateless from any to any accept;
}
Since I have been talking about both NSX-V and NSX-T here I would like to remind you that NSX-V has end of general support 2022-01-16. It can be complex and time consuming to migrate from NSX-V to NSX-T so start planning today.