Upgrading to VMware Cloud Foundation 4.3 in my Lab

VMware just released VMware Cloud Foundation (VCF) 4.3 and I have several customers planning to upgrade in the near future, so I decided to upgrade my lab to get some experience. I also have two customers planning to deploy VCF 4.3 on new hardware so I will also soon deploy it from scratch to see what’s new with the bring-up procedure. VCF 4.3 comes with a lot of fixes and new features that you can read about in the Release Notes.

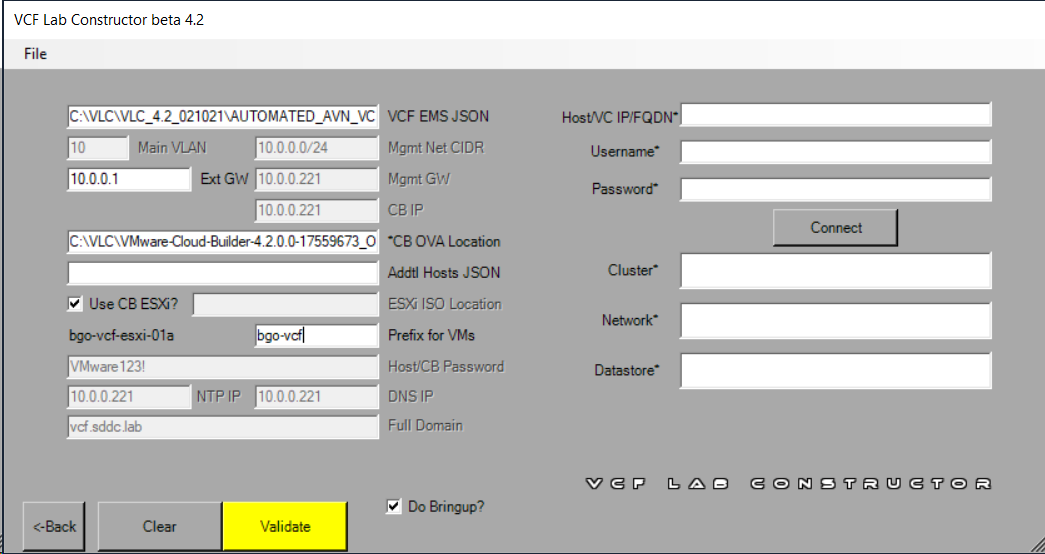
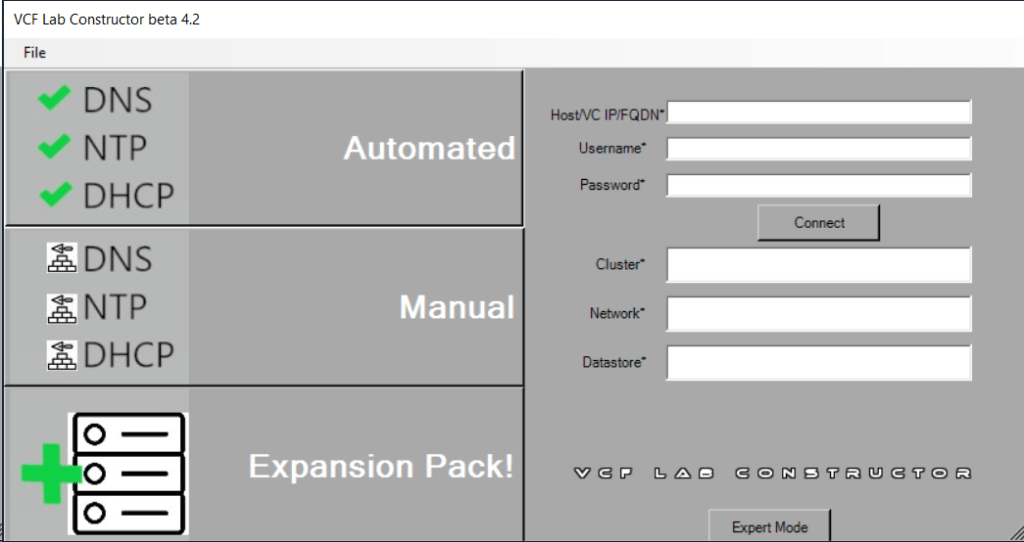
My current VCF lab is running version 4.2 and consist of one Management Workload Domain (WLD) with one Stretched Cluster. That is two Availability Zones with four ESXi hosts in each and a vSAN Witness running in a third independent site. In addition, I have one VI Workload Domain (WLD) containing three ESXi hosts in a non-stretched Cluster. Currently I don’t run vRealize Suite, Tanzu or anything else than what is included in the VCF base-platform. Everything is deployed using VLC.

I started by reading the Release Notes and the Upgrading to VMware Cloud Foundation 4.3 docs, as well as a few blog posts about what is new in this release.

The following steps were then performed to upgrade VCF to version 4.3. Note that all images are clickable to make them bigger.

First I did a quick health check of my environment by logging into the vSphere Client and SDDC Manager and looked for any alarms or warnings. It was surprisingly healthy.

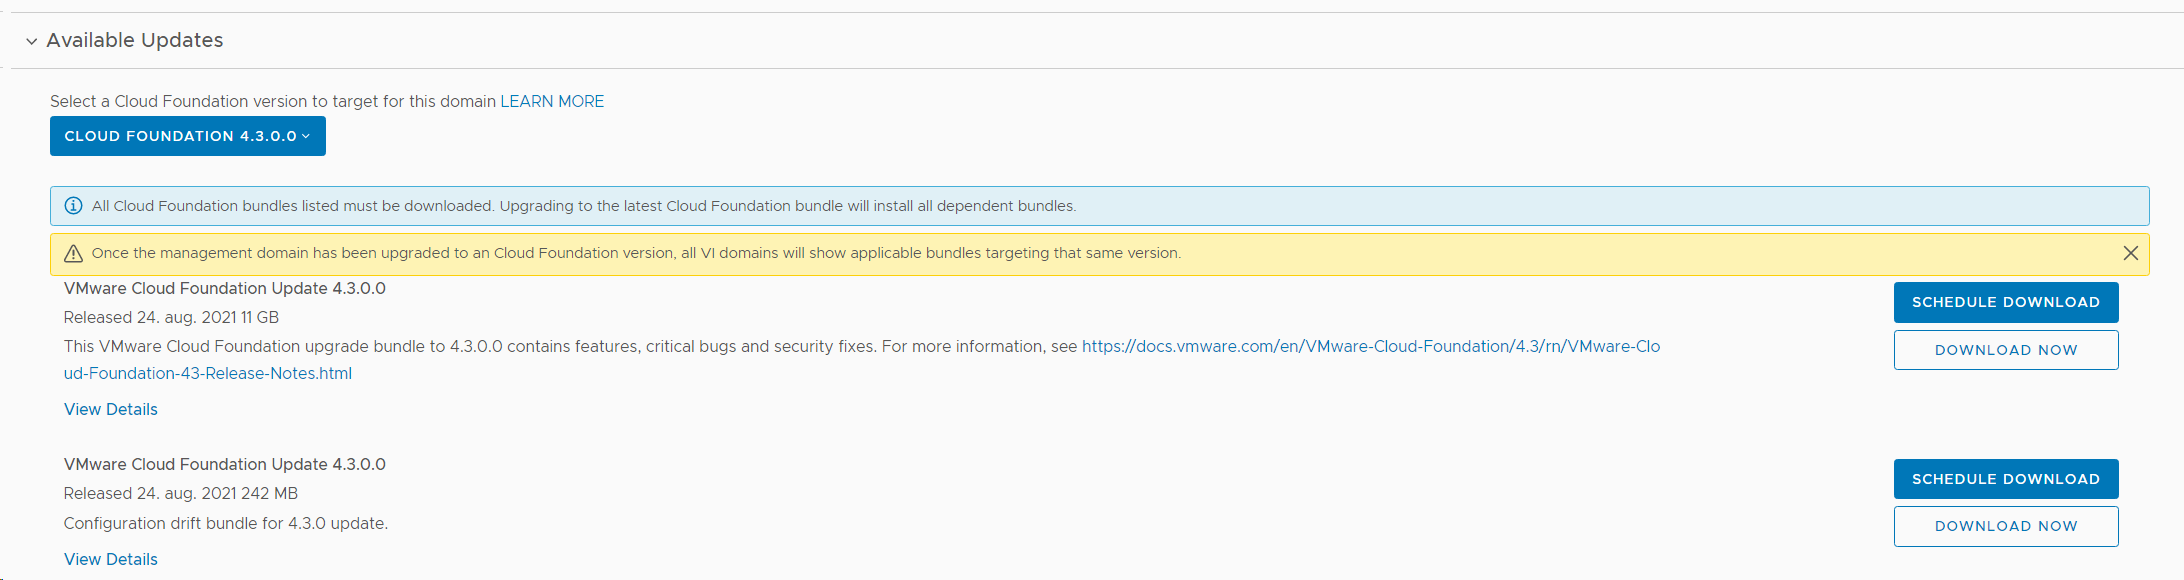
Then I checked that I was actually running on version 4.2, and verified that there was an update available for the Management WLD. I also selected to download both required upgrade bundles.
 

Ran an Update Precheck to ensure that my environment was ready for the update. It passed successfully, but I had already implemented a fix to skip vSAN HCL Checks for ESXi Upgrades since I am running on nested ESXi hosts, or else it would have failed.

Installed the VCF 4.3 update.

Went back to the Patches/Updates section for the Management WLD and found that the NSX-T 3.1.3 update was available, so I chose to download and install that.

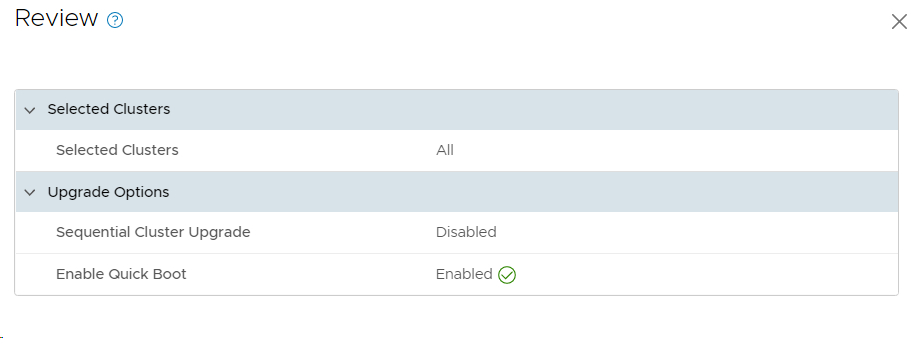
I chose to upgrade both my Edge Clusters and my Host Clusters in one go, but there is an option to upgrade them separately starting with the Edge Clusters. You can also choose between parallell or sequential upgrades, and I went for the default which is parallell even though it wouldn’t matter in my case since I only have one cluster of each type.

When the update starts, you can see status on each component it is updating.

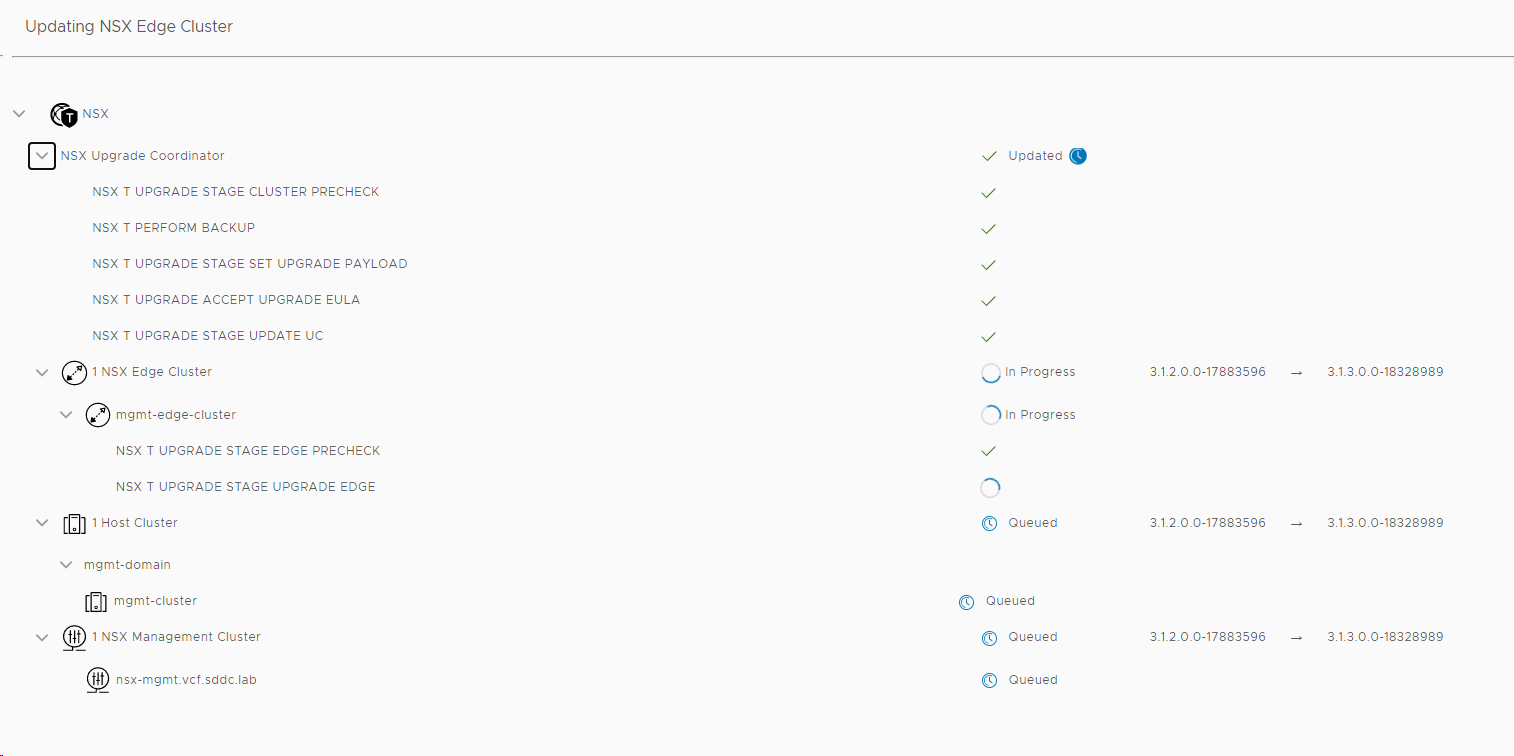
You can also select VIEW UPDATE ACTIVITY to get more details on what it is doing.

Next available update was for vCenter Server so I downloaded and installed that.

When vCenter was done upgrading, ESXi 7.0 Update 2a was downloaded and installed.

I selected to enable Quick Boot to speed up the upgrade of ESXi. Note that your hardware must support this feature if you are running on bare-metal instead of nested ESXi like I do.

The ESXi update got cancelled for some reason, so I retried to install it, but it got cancelled again.

I ran a new Precheck and found that VUM had problems uploading the patch files to the four ESXi hosts in AZ2.

Looking at the logs on one of the hosts showed me that it didn’t have enough memory. These four hosts only had 16 GB RAM each, so I increased this to 64 GB to make them equal to the hosts in AZ1.

I ran the Precheck again and this time it succeeded.

I tried to install the ESXi update again, but it got cancelled this time too. Rerunning the Precheck now showed that NTP was out of sync between my PSC and my SDDC Manager. However, when manually checking I found that this was not the case. The error didn’t specify which PSC so I started suspecting it could be due to my VI WLD vCenter appliance was down. After starting that up again, this NTP out of sync error disappeared and the Precheck went through all green. It would be nice if the Precheck was able to tell me which PSC it was complaining about, and also tell me that NTP wasn’t the problem, but that it didn’t have connectivity to it at all.

I tried to install the ESXi upgrade again, but it still got cancelled without giving me any reason. Digging through the /var/log/vmware/vcf/lcm/lcm.log file on SDDC Manager gave me this hint:

2021-09-01T09:36:55.684+0000 WARN  [vcf_lcm,801535c71a337889,d768] [c.v.evo.sddc.lcm.orch.Orchestrator,pool-7-thread-6] Cannot start upgrades since there are pending or, failed workflows

I looked into my Tasks list in SDDC Manager and found several failed tasks, but one stood out as not being resolved. SDDC Manager had tried to rotate the passwords, but were unable to do so on my VI WLD vCenter and NSX Manager since they were turned off temporarily. I went into Password Management and found an error there saying the same thing, and hitting retry solved this issue without problems since all appliances were back up running now.

I went back to Updates/Patches for my Management WLD and retried to install the ESXi update, and this time it started running. So even though the Precheck is all green you can still have issues causing the upgrade to be cancelled without any useful message in the user interface. The Upgrade Prerequisites tells us to “Ensure that there are no failed workflows in your system”, but in my lab there is usually a few failed tasks which are stuck without blocking an upgrade. It is also not a good idea to shut down appliances in other WLDs to save resources during an upgrade.

None of these problems would happen in a production environment since they were all caused by lack of resources in my nested lab.

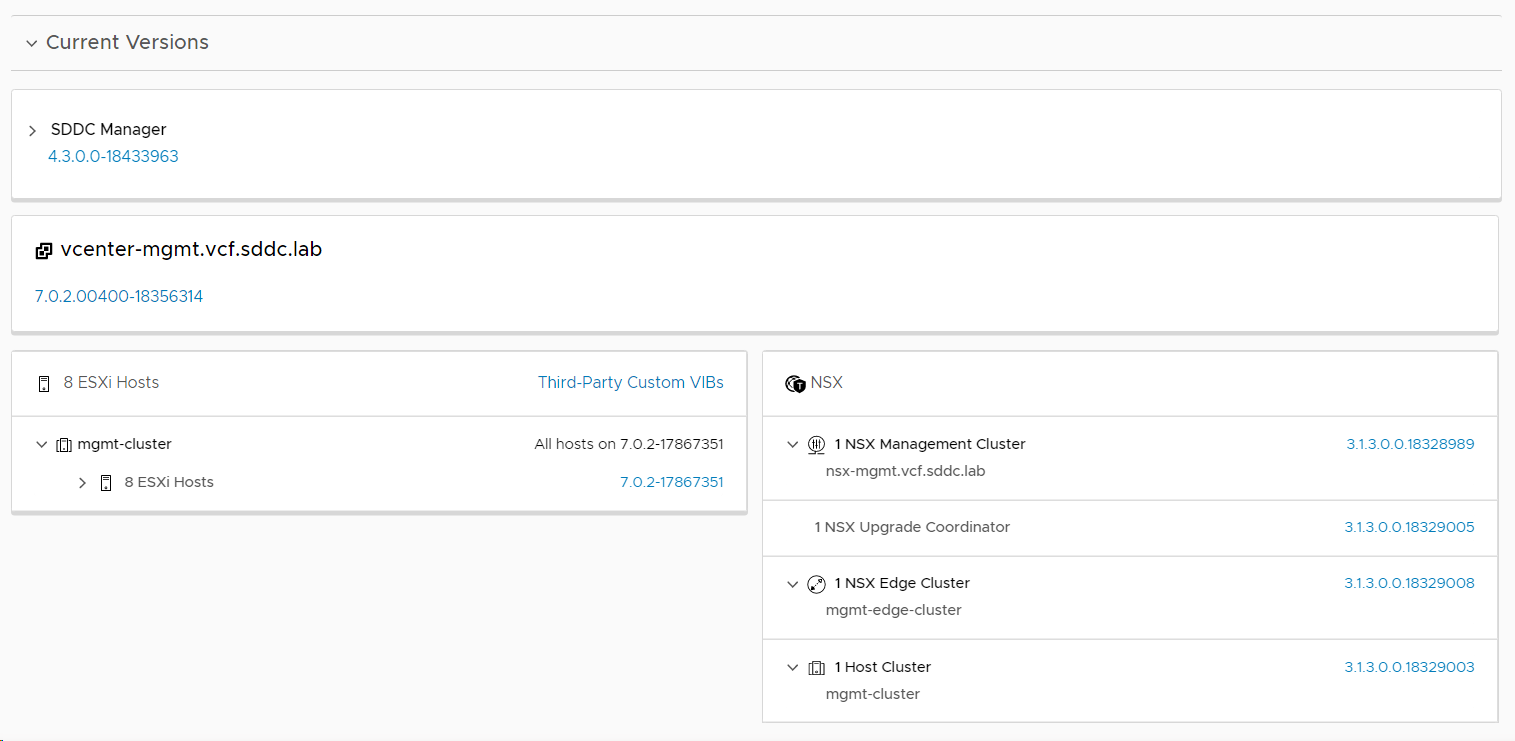
Checked the VCF version again, and this time it said 4.3!

The last two things to update was the vSAN Disk format version and the ESXi version on my vSAN Witness Appliance, which SDCC Manager doesn’t care about upgrading, which is a bit disappointing. I used vSphere Lifecycle Manager to patch the vSAN Witness Appliance to the same build as my ESXi hosts. vSAN Disk format is also upgraded in the vSphere Client.

I must admit that upgrading VCF in my lab usually gives me some trouble along they way, but most of the time it is caused by some component lacking resources. It tends to be fixed by increasing CPU, memory or disk resources for either vCenter or NSX-T Manager appliances. I have also had issues were ESXi hosts were unable to enter/exit maintenance mode, caused by admission control or a blocking VM.

If time permits, I will soon post about how I deploy VCF 4.3 from scratch with focus on what is new regarding the bring-up, as well as presenting some of the new features in VCF 4.3.

NSX-T Federation in my VMware Cloud Foundation (VCF) Lab

VCF 4.2 introduced support for NSX-T Federation which provides the ability to manage, control and synchronize multiple NSX-T deployments across different VCF instances which could be in a single region or deployed across regions. You can stretch Tier-0 and Tier-1 Gateways, Segments, and Groups used for Firewalling. Requirements between sites are maximum round-trip time of 150 ms, and 1500 bytes MTU is supported, however not recommended for best performance. NSX Managers and Edge Nodes need connectivity between them, but ESXi hosts don’t require connectivity across sites. Configuration is done on a new NSX Manager role called Global Manager and pushed out to the local NSX Managers in each site, but you can still also connect directly to the Local Managers in case you have a requirement not supported by the Global Manager.

This is not a detailed review of NSX-T Federation, but I will focus on showing you how I got NSX-T Federation working between two VFC instances in my lab. Sorry for the lack of a proper naming convention, but hopefully you are able to follow along.

Configuration Overview

HostnameRoleVCF InstanceLocationRegion
vcenter-mgmt.vcf.sddc.labvCenter Server1BGOA
sddc-manager.vcf.sddc.labSDDC Manager1BGOA
nsx-mgmt-1.vcf.sddc.labNSX-T Local Manager1BGOA
nsx-global-mgmt.vcf.sddc.labNSX-T Global Manager1BGOA
vcenter-mgmt.vcf.nils.labvCenter Server2OSLB
sddc-manager.vcf.nils.labSDDC Manager2OSLB
nsx-mgmt-1.vcf.nils.labNSX-T Local Manager2OSLB
nsx-global-mgmt.vcf.nils.labNSX-T Global Manager2OSLB

Steps Performed

Note that all images are clickable to make them bigger.

1. Deployed an NSX-T Global Manager appliance in VCF instance 1 (BGO). This is simply done by deploying the nsx-unified-appliance ova and selecting “NSX Global Manager” as Rolename. In a production environment I would also replace the certificate and deploy two additional appliances to create an NSX-T Global Manager Cluster. In my lab I was happy with deploying a single appliance.

2. Added vCenter Server in VCF instance 1 (BGO) as a Compute Manager.

3. Created an IP Pool for Remote Tunnel Endpoints in the Local NSX-T Manager in VCF instance 1 (BGO).

4. Set the NSX-T Global Manager to Active.

5. Obtained the Certificate Thumbprint for the existing NSX-T Manager in VCF Instance 1 (BGO). This can be done by SSH to vCenter and run the following command:

echo -n | openssl s_client -connect nsx-mgmt-1.vcf.sddc.lab:443 2>/dev/null | openssl x509 -noout -fingerprint -sha256

6. Enabled NSX-T Federation by adding the existing NSX-T Manager in VCF Instance 1 (BGO) as a location to the NSX-T Global Manager. Then it became a Local NSX-T Manager.

First attempt gave me this error message:

NSX-T Federation requires NSX Data Center Enterprise Plus license, so after upgrading my license it worked fine.

7. Configured networking for the NSX-T Local Manager node in VCF Instance 1 (BGO).

8. Imported the NSX-T Local Manager configurations for VCF Instance 1 (BGO) to the NSX-T Global Manager.

9. Created a Tier-1 Gateway to be stretched between both VCF instances.

10. Connected the existing Cross-Region Segment to the stretched Tier-1 Gateway.

11. Deployed an NSX-T Global Manager appliance in VCF instance 2 (OSL). This is simply done by deploying the nsx-unified-appliance ova and selecting “NSX Global Manager” as Rolename. In a production environment I would also replace the certificate and deploy two additional appliances to create an NSX-T Global Manager Cluster. In my lab I was happy with deploying a single appliance.

12. Connected the new NSX-T Global Manager Node to the vCenter Server in VCF instance 2 (OSL).

13. Created an IP Pool for Remote Tunnel Endpoints in NSX-T Data Center in VCF Instance 2 (OSL).

14. Obtained the Certificate Thumbprint for the existing NSX-T Manager in VCF Instance 2. This can be done by SSH to vCenter and run the following command:

echo -n | openssl s_client -connect nsx-mgmt-1.vcf.nils.lab:443 2>/dev/null | openssl x509 -noout -fingerprint -sha256

15. Deleted the existing Cross-Region Segment from the NSX-T Manager in VCF Instance 2 (OSL) since we will stretch the one deployed in VCF Instance 1 (BGO). The name in the image below contains “VXLAN”, but this name has stuck in the lab since VCF 3.x where NSX-V was used. It is in fact a regular NSX-T Overlay Segment.

16. Enabled NSX-T Federation by adding the existing NSX-T Manager in VCF Instance 2 (OSL) as a location to the NSX-T Global Manager. Then it became a Local NSX-T Manager. Note that this is done in the NSX-T Global Manager in VCF Instance 1 (BGO), which is the Active one.

17. Configured networking for the NSX-T Local Manager node in VCF Instance 2 (OSL).

Remote Tunnel Endpoints in OSL looking good.

Remote Tunnel Endpoints in BGO also looking good.

18. Imported the NSX-T Local Manager configuration in VCF Instance 2 (OSL) to the NSX-T Global Manager.

19. Deleted the Existing Tier-0 Gateway for the Management Domain in VCF Instance 2 (OSL). First I had to disconnect the Tier-1 Gateway from the Tier-0 Gateway.

20. Reconfigured the Tier-0 Gateway in VCF Instance 1 (BGO) to stretch the network between VCF Instance 1 (BGO) and VCF Instance 2 (OSL). Added OSL as a Location to existing bgo-mgmt-domain-tier0-gateway.

21. Set interfaces for VCF Instance 2 (OSL) on the Tier-0 Gateway.

22. Configured BGP neighbors for VCF Instance 2 (OSL).

23. Configured an Any IP Prefix in the Tier-0 Gateway.

24. Created a Route Map for No Export Traffic in the Tier-0 Gateway.

25. Configured Route Filters and Route Redistribution for BGP. Repeated for all four BGP neighbourships.

26. Configured route redistribution for VCF Instance 2 (OSL) on the Tier-0 Gateway.

27. Connected the Tier-1 Gateway in VCF Instance 2 (OSL) to the stretched Tier-0 Gateway.

28. Deleted VCF Instance 1 (BGO) as a Location for this Tier-1 Gateway since this is a local only Tier-1 Gateway.

29. Added VCF Instance 2 (OSL) as a Location in the stretched Tier-1 Gateway (mgmt-domain-stretched-t1-gw01).

30. Set the NSX-T Global Manager in VCF Instance 2 (OSL) as Standby for the NSX-T Global Manager in VCF Instance 1 (BGO). This provides high availability of the active NSX-T Global Manager.

First step was to retreive the SHA-256 thumbprint of the NSX-T Global Manager certificate in VCF Instance 2 (OSL) using this command from the vCenter Server:

echo -n | openssl s_client -connect nsx-global-mgmt.vcf.nils.lab:443 2>/dev/null | openssl x509 -noout -fingerprint -sha256

Then I added the NSX-T Global Manager in VCF Instance 2 (OSL) as standby.

That’s it! I now have NSX-T Federation between my two VCF Instances which I find very useful. I haven’t done everything required in the VVD to call my instances Region A and Region B, but I can still simulate a lot of cool use cases. Hopefully you found this useful and please let me know if you have any comments or questions.

References

Introducing NSX-T Federation support in VMware Cloud Foundation

Deploy NSX-T Federation for the Management Domain in the Dual-Region SDDC

Multi-Instance Management in my VCF Lab

Multi-Instance Management (VCF Federation) allows you to monitor and manage multiple VMware Cloud Foundation instances from a single console. You can view inventory across the VMware Cloud Foundation instances in the federation as well as the available and used capacity. You can also see if any patches are ready to be installed in any of the instances.

I won’t go too much into details here but focus on showing you how I got this working in my lab.

Here are the steps I did to federate two VCF instances.
Sorry for not using a proper naming convention, but hopefully you will be able to follow along.

  1. Deployed my first VCF instance using VLC Automated mode with the default settings.

2. Deployed my second VCF instance using VLC Automated mode but changed the following in AUTOMATED_AVN_VCF_VLAN_10-13_NOLIC_v42.json: IP addresses, VLAN IDs, domain, subdomain, and hostnames.

3. Added another vNIC to my Jump Host and tagged it with the Main VLAN ID for my second instance (100). Assigned it the Ext GW IP (10.0.2.1). 

4. Installed the DNS Server Role on my Jump Host and configured one conditional forwarder pointing to each of my Cloud Builder appliances to allow name resolution across both instances.

5. Configured Deadwood, which is the recursive DNS daemon (service) for MaraDNS, to forward queries to my Jump Host. This was done by editing /etc/dwood3rc and then restarting the maradns.deadwood service on the Cloud Builder appliances in each VCF instance.

bind_address = "10.0.0.221"
chroot_dir = "/etc/maradns"
upstream_servers = {}
upstream_servers["."]="8.8.8.8, 8.8.4.4"
upstream_servers["0.0.10.in-addr.arpa."] = "127.0.0.1"
upstream_servers["0.50.10.in-addr.arpa."] = "127.0.0.1"
upstream_servers["0.60.10.in-addr.arpa."] = "127.0.0.1"
upstream_servers["vcf.sddc.lab."] = "127.0.0.1"
upstream_servers["2.0.10.in-addr.arpa."] = "10.0.0.1"
upstream_servers["vcf.nils.lab."] = "10.0.0.1"
recursive_acl = "10.0.0.0/24,10.50.0.0/24,10.60.0.0/24"
filter_rfc1918 = 0


bind_address = "10.0.2.221"
chroot_dir = "/etc/maradns"
upstream_servers = {}
upstream_servers["."]="8.8.8.8, 8.8.4.4"
upstream_servers["2.0.10.in-addr.arpa."] = "127.0.0.1"
upstream_servers["0.55.10.in-addr.arpa."] = "127.0.0.1"
upstream_servers["0.66.10.in-addr.arpa."] = "127.0.0.1"
upstream_servers["vcf.nils.lab."] = "127.0.0.1"
upstream_servers["0.0.10.in-addr.arpa."] = "10.0.2.1"
upstream_servers["vcf.sddc.lab."] = "10.0.2.1"
recursive_acl = "10.0.2.0/24,10.55.0.0/24,10.66.0.0/24"
filter_rfc1918 = 0

6. Replaced the certificates for SDDC Manager in both instances.

7. Followed VMware’s doc on how to create and join a federation in VCF.

More information about Multi-Instance Management in VMware Cloud Foundation can be found here.

Next up is to get NSX-T Federation working between my VCF instances, but that will be another blog post.

My first VMware PSO Project

Who is VMware Professional Services (PSO)?

“VMware Professional Services, the largest services organization of experienced IT professionals focused solely on virtualization, provides industry-leading Consulting, Education, and Technical Account Manager services that enable customers to transform IT environments through virtualization and realize greater value from flexible, agile IT service delivery models sooner, with less risk.”

I have been a certified VMware PSO consultant for about two years, but just recently started my first assignment for them. I work for VMware PSO via my employer Proact who is a VMware Principal Partner. I have had many inquiries from PSO during these years, but either I have been too busy with existing customers, or my skills haven’t aligned with the project requirements, like Cloud Director or Horizon. My first assignment is designing a 22 node VMware Cloud Foundation (VCF) deployment for a company in Finland. It will contain two Workload Domains and two Stretched Clusters. I will also assist them installing the solution when the design is completed. Advantages doing this with PSO is that I get access to internal VMware resources like documentation and experts. The project is also lead by an experienced project manager from VMware which makes it easier for me to focus on the technical parts.

If your company would like to know how they can use VMware PSO, please reach out to me, or contact VMware.

If you are a VMware expert thinking it sounds like fun to be a VMware PSO consultant, I may be able to help you with that as well 🙂

You may already have VMware Professional Services Credits as part of your agreement with VMware, so please check if you should use these to start a project with PSO before they expire.

More information about VMware PSO can be found here.

Avoid Packet Loss in NSX-T

I have been working a lot with NSX-T the last few years and I have come across a misconfiguration that may cause massive packet loss for the workloads connected to Overlay segments. Since NSX-T 2.5, the recommended Edge Node design has been the “Single N-VDS – Multi-TEP” design which looks like this:

Image from NSX-T Reference Design Guide 3.0.

What people, and VCF, sometimes get wrong when implementing this design, is that they configure Trunk1 PG and Trunk2 PG with a Teaming and failover policy of Active/Unused instead of Active/Standby. Note that there are two TEP-IPs, each using a separate vNIC, Trunk PG and physical NIC. When one of the physical NICs or one of the Top of Rack (ToR) switches fail, the TEP-IP using that connection will go offline instead of failing over. This causes long lasting packet loss for any VM connected to a Segment that is using that TEP. I thought the Host Transport Nodes eventually would stop using the failed Edge Node TEP IP after some time, but I waited 20 minutes without any correction.

This is what the Teaming and failover Policy should look like:

Trunk1 PG

Trunk2 PG
What if you have a fully collapsed cluster with only two physical NICs per host? Meaning NSX Manager, Host Transport Nodes, and NSX Edge VMs are running on a single cluster. You don’t have any regular Trunk PGs on a VDS since you run everything on a single N-VDS. Then you have to create Trunk Segments in NSX-T instead and configure them with an Active/Standby Teaming Policy like this:

I recommend using meaningful names for the Teamings so that you can easily see on the Segments what policy will be used. Note that the opposite uplink is Standby for each Active uplink.

If you run everything on a single VDS 7.0 you may have a mix of regular Trunk PGs and NSX-T Segments on the same VDS. Same rules still apply. In NSX-T 3.1 and later you can use the same VLAN ID for both your Edge Node TEPs and your Host TEPs, but then you need to use Trunk Segments in NSX-T. So there are several options and easy to get it wrong.

One of the reasons people mess this up, is because they want to achieve deterministic peering for their uplink interfaces, meaning they want to peer with ToR Left using physical NIC 1 and peer with ToR Right using physical NIC 2, and they misunderstand how to achieve that. Named Teaming Policies in the Edge Nodes Uplink Profile will handle that and I will link to a document and a few blog posts below that will show you step-by-step how to do this, so don’t worry if you are more confused than ever 🙂

The Edge Nodes Uplink Policy should look similar to this:

Note that there are no Standby Uplinks for the Named Teamings.

VCF 4.x and VVD 6.x also use this design, but it is documented a bit vague, so people still get it wrong. The wording has been improved in VVD 6.2 after me complaining about it, so kudos to VMware for actually reading the feedback given on docs.vmware.com and updating accordingly.

What about VCF where all of this is deployed automatically? Unfortunately, VCF 4.0 also got this wrong, but it was fixed in VCF 4.1, but only when installing it from scratch. If you upgrade an existing VCF 4.0 environment to VCF 4.1 or 4.2, the error remains. Ouch! So, if you have any VCF 4.x installations, please verify the teaming policy before it’s too late. The fix is to manually change the Teaming Policy on both Port Groups.

Simulating a physical NIC failure without involving your Networking team can be done like this:

[root@bgo-lab-esx-01:~] esxcli network nic list
Name    PCI Device    Driver  Admin Status  Link Status  Speed  
------  ------------  ------  ------------  -----------  -----  
vmnic0  0000:06:00.0  nenic   Up            Up           10000  
vmnic1  0000:07:00.0  nenic   Up            Up           10000  
vmnic2  0000:08:00.0  nenic   Up            Up           10000  
vmnic3  0000:09:00.0  nenic   Up            Up           10000  
[root@bgo-lab-esx-01:~] esxcli network nic down -n vmnic2
[root@bgo-lab-esx-01:~] esxcli network nic list
Name    PCI Device    Driver  Admin Status  Link Status  Speed  
------  ------------  ------  ------------  -----------  -----  
vmnic0  0000:06:00.0  nenic   Up            Up           10000  
vmnic1  0000:07:00.0  nenic   Up            Up           10000  
vmnic2  0000:08:00.0  nenic   Down          Down             0  
vmnic3  0000:09:00.0  nenic   Up            Up           10000  
[root@bgo-lab-esx-01:~] esxcli network nic up -n vmnic2
[root@bgo-lab-esx-01:~] esxcli network nic list
Name    PCI Device    Driver  Admin Status  Link Status  Speed  
------  ------------  ------  ------------  -----------  -----  
vmnic0  0000:06:00.0  nenic   Up            Up           10000  
vmnic1  0000:07:00.0  nenic   Up            Up           10000  
vmnic2  0000:08:00.0  nenic   Up            Up           10000  
vmnic3  0000:09:00.0  nenic   Up            Up           10000  

Esxtop can be used to see if the Edge Nodes vNIC fails over or not when taking down vmnic2.

Here it shows eth1 not failing over to vmnic3 when having an Active/Unused Teaming Policy:

Here it shows eth1 failed over to vmnic3 when having an Active/Standby Policy:
Here we can see that eth1 failed back to vmnic2 when taking vmnic2 back up:

While speaking of failover and failback testing, I would like to mention another issue that keeps coming up. When taking down one Top of Rack switch, everything fails over to the other physical NIC and we usually see one lost ping. When the switch is taken back up, everything fails back to the recovered physical NIC again, but this time we get a huge amount of packet loss. Why? Because when the switch brings the link back up, ESXi starts failing back after 100 ms, but the switch isn’t ready to forward traffic. How long this takes varies depending on vendor and switch type. We can change the network teaming failback delay to avoid this problem. Normally we change it to 30 000 or 40 000 ms.
 
To modify the TeamPolicyUpDelay, from the vSphere Client go to each ESXi host, Configure > Advanced System Settings > Edit.  Change Net.TeamPolicyUpDelay to 30 000 and test again to see if it works better in your environment.

I hope this post was more helpful than confusing and thanks for reading.
 
Useful links for more information
 
NSX-T Reference Design Guide 3.0
 
NSX-T 3.0 – Edge Design Step-by-Step UI WorkFlow
 
Network Design for the NSX-T Edge Nodes in VMware Validated Design 6.2
 
Single N-VDS per Edge VM
NSX-T Single NVDS Multi-TEP Edge VM Deployment & Configuration on vSphere DVS
NSX-T Single NVDS Multi-TEP Edge VM Deployment & Configuration on Host NVDS Networking
Achieving Deterministic Peering using NSX-T Named Teaming Policies

VMware Cloud Foundation in a Lab

VMware Cloud Foundation (VCF) is basically a package containing vSphere, vSAN, NSX-T, and vRealize Suite elegantly managed by something called SDDC Manager. Everything is installed, configured and upgraded automatically without much user intervention. VCF is based on VMware Validated Design, so you get a well-designed, thoroughly tested and consistent deployment. Upgrading is also a lot easier as you don’t have to check interoperability matrices and upgrade order of the individual components – Just click on the upgrade button when a bundle is available. For someone who has implemented all these products manually many times, VCF is a blessing. Tanzu and Horizon are also supported to run on VCF, and almost everything else you can run on vSphere. Many cloud providers are powered by VCF, for instance VMware Cloud on AWS.

VCF requires at least four big vSAN ReadyNodes and 10 gigabit networking with multiple VLANs and routing, so how can you deploy this is in a lab without investing in a lot of hardware? VMware Cloud Foundation Lab Constructor (VLC) to the rescue! VLC is a script that deploys a complete nested VCF environment onto a single physical host. It can even set up a DHCP server, DNS server, NTP server and a router running BGP. It is also very easy to use, with a GUI and excellent support from its creators and other users in their Slack workspace. It is created by Ben Sier and Heath Johnson.

Here is a nice overview taken from the VLC Install Guide:

VLC requires a single physical host with 12 CPU cores, 128 GB RAM, and 2 TB of SSD. I am lucky enough to have a host with dual Xeon CPUs (20 cores) and 768 GB RAM. I don’t use directly attached SSD, but run it on an NFS Datastore on a NetApp FAS2240-4 over 10 gig networking. I can deploy VCF 4.2 with 7 nested ESXi hosts in 3 hours and 10 minutes on this host.
 
VLC lets you choose between three modes: Automated, Manual and Expansion Pack. Automated will deploy VCF including all dependencies, while Manual will deploy VCF, but you will have to provide DNS, DHCP, NTP and BGP. Expansion Pack can be used to add additional ESXi hosts to your deployment after you have installed VCF, for instance when you want to create more clusters or expand existing ones.
 
This is what the VLC GUI looks like:

So far, I have only used the Automated and the Expansion Pack modes, and they both worked flawlessly without any issues. Just make sure you have added valid licenses to the json file like the documentation tells you to do. Some people also mess up the networking requirements, so please spend some extra time studying that in the Installation Guide and reach out if you have any questions regarding that.

It can also be challenging for some to get the nested VCF environment to access the Internet. This is essential to be able to download software bundles used to upgrade the deployment, or to install software like vRealize Suite. Since VLC already requires a Windows jump host which is connected to both my Management network as well as the VCF network, I chose to install “Routing and Remote Access” which is included in Windows Server. Then I set the additional IP address 10.0.0.1 on the VCF network adapter. This IP is used as the default gateway for the router deployed in VCF if you also typed it into the “Ext GW” field in VLC GUI. The last step was to configure NAT in “Routing and Remote Access” to give all VCF nodes access to the Internet. I could then connect SDDC Manager to My VMware Account and start downloading software bundles.

Here are some of the things I have used VLC to do:

Deployed VCF 3.10, 4.0, 4.1 and 4.2 with up to 11 ESXi hosts

Being able to deploy earlier versions of VCF has been very useful to test something on the same version my customers are running in production. Many customers don’t have proper lab gear to run VCF. It has also been great to be able to test upgrading VCF from one version to another.

Experimented with the Cloud Foundation Bring-Up Process using both json and Excel files

The bring-up process is automated, but it requires the configuration, like host names, cluster names, IP addresses and so on, to be provided in an Excel or json file. All required details can be found in the Planning and Preparation Workbook.

Stretched a cluster between two Availability Zones

All my VCF customers are running stretched clusters so beings able to run this in my lab is very useful. This requires at least 8 vSAN nodes, 4 per availability zone. Currently this must be configured using the VCF API, but it is not that difficult, and SDDC Manager includes a built in API explorer which can be used to do this directly in the GUI if you want to.

Created additional Clusters and Workload Domains

Creating more clusters and workload domains will be required by most large customers and also by some smaller ones. It is supported to run regular production workloads in the management workload domain, but this is only recommended for smaller deployments and special use cases.

Commissioned and decommissioned hosts in VCF

Adding and removing ESXi hosts in VCF requires us to follow specific procedures called commissioning and decommissioning. The procedures validate that the hosts meet the criteria to be used in VCF so that it is less likely that you run into problems later. I have had some issues decommissioning hosts from my Stretched Cluster, and VMware has filed a bug to engineering to get this resolved in a future release. The problem was that the task failed at “Remove local user in ESXi host”, which makes sense since the host went up in flames. Workaround was to deploy a new host with the same name and IP, then decommissioning worked. Not a great solution. It is also possible to remove the host directly from the VCF database, but that is not supported. If you run into this issue in production, please call VMware Support.

Expanded and shrunk Clusters – including Stretched Clusters

Adding ESXi hosts to existing clusters, or removing hosts, requires you to follow specific procedures. Again, stretched clusters must be expanded and shrunk using the VCF API.

Upgraded all VCF components using the built-in Lifecycle Management feature

Upgrading VCF is a fun experience for someone used to upgrade all the individual VMware products manually. The process is highly automated, and you don’t have to plan the upgrade order or check which product version is compatible with the others. This is taken care of by SDDC Manager. I have successfully upgraded all the products in VCF including the vRealize Suite.

Tested the Password and Certificate Management features

VCF can automate changing the passwords on all its components. This includes root passwords on ESXi hosts, vCenter SSO accounts and administrative users for the various appliances. You can choose to set your own password or have VCF set random passwords. All passwords are stored in SDDC Manager and you can look them up using the API or from the command line. This requires that you know SDDC Manager’s root password and a special privileged user name and the privileged password. These are obviously not rotated by SDDC Manager.

Changing SSL certificates is a daunting task, especially when you have many products and appliances like you do in VCF. SDDC Manager has the option to replace these for you automatically. You can connect SDDC Manager directly to a Microsoft Certificate Authority or you can use an OpenSSL CA which is built in. If you don’t want to use either of those, there is also support for any third-part CA, but then you have to generate CSR files, copy those over to the CA, generate the certificate files, copy those back and install them. This also requires all the files to be present in a very specific folder structure inside a tar.gz file, so it can be a bit cumbersome to get it right. Also note that all the methods seems to generate the CSR for NSX-T Manager without a SAN, so unless you force your CA to include a SAN, the certificate for NSX-T will not be trusted by your web browser. This has been an issue for several years, so I am puzzled that it still hasn’t been resolved. When generating CSRs for NSX-T in environments without VCF, I never use the CSR generator in NSX-T Manager to avoid this issue. vSphere Certificate Manager in VCSA works fine for this purpose.

Tested the NSX-T Edge Cluster deployment feature

SDDC Manager has a wizard to assist in deploying NSX-T Edge Clusters including the Edge Transport Nodes and the Tier-1 and Tier-0 Gateways required to provide north-south routing and network services. The wizard makes sure you fulfil all the prerequisites, then it will ask you to provide all the required settings like names, MTU values, passwords, IP addresses and so on. This helps you to get a consistent Edge Cluster configuration. Note that VCF is not forcing you to deploy all NSX-T Edge Clusters using this wizard, so please reach out if you want to discuss alternative designs.

Deployed vRealize Suite on Application Virtual Networks (AVN)

All the vRealize Suite products are downloaded in SDDC Manager like any VCF software bundle. You then have to deploy vRealize Suite Lifecycle Manager, which will be integrated with SDDC Manager. VMware Workspace ONE Access must then be installed before you can deploy any of the vRealize Suite products. It is used to provide identity and access management services. It is downloaded as an install bundle in SDDC Manager, but it is actually deployed from vRealize Suite Lifecycle Manager, same as the rest of the products like vRealize Log Insight, vRealize Operations and vRealize Automation. Application Virtual Networks (AVN) is just NSX-T Overlay networks designed and automatically deployed for running the vRealize Suite. This gives you all the NSX-T benefits like load balancing, mobility, improved security and disaster recovery. AVN is optional as you can choose to deploy the vRealize Suite on VLAN backed networks as well.

Deployed Workload Management and Tanzu Kubernetes Cluster

Deploying Tanzu in VCF is not an automated process, but there is a wizard helping you to fulfil the following prerequisites:

  • Proper vSphere for Kubernetes licensing to support Workload Management
  • An NSX-T based workload domain deployed
  • At least one NSX-T Edge cluster
  • IP addresses for pod networking, Services, Ingress and Egress traffic
  • At least one Content Library

You have to select an NSX-T based, non-vLCM enabled workload domain, and the wizard will then search for any compatible clusters in this domain. It will then validate the cluster, and if it is ok you are directed to complete the deployment in the vSphere Client manually. The VCF docs have specific instructions on how to do this.

VLC has been very helpful when troubleshooting certain issues for my VCF customers, and when preparing for the VMware Cloud Foundation Specialist exam.

You can download the latest version of VLC, which is 4.2, from here.

Please make sure to read the Install Guide included in the zip file.

It is also possible to download earlier versions of VLC, which can be really useful for testing upgrades, or if you want to simulate a customer’s environment.

VLC VersionDownload Link
4.10https://tiny.cc/getVLC410bits
4.0.1https://tiny.cc/getVLC401bits
4.0http://tiny.cc/getVLC40bits
3.91-3.10http://tiny.cc/getVLC310bits
3.8.1-3.9http://tiny.cc/getVLC38bits

If you give VLC a go and successfully deploy a VCF instance, please send a screen shot of your installation to SDDC Commander in the VLC Support Slack workspace, and he will send you some awesome stickers!

I highly recommend the following articles for more information about VLC:

Deep dive into VMware Cloud Foundation – Part 1 Building a Nested Lab

Deep dive into VMware Cloud Foundation – Part 2 Nested Lab deployment

If you don’t have licenses for VCF, I recommend signing up for a VMUG Advantage membership which gives you a 365 days evaluation license, and a lot more.

Cheers.