Yes, I intentionally wrote Labs, as this post will introduce you to both my home lab and to the lab environment running in my employers data centers.
I have just built a small home lab for the first time in many years. A lab is very important for someone like me who is testing new technology on a daily basis. During the last few years, my employers have provided lab equipment, or I have rented lab environments in the cloud, so the need for an actual lab running in my house was not there. My current employer, Proact, has an awesome lab which I will tell you more about later.
There are two reasons why I built a small lab at home now:
- I want to be able to destroy and rebuild the lab whenever I want to without impacting anything in the corporate lab which we run almost like an enterprise production environment with lots of dependencies. This is a good thing most of the time, but can be limiting some times, for example when I want run the very latest version of something without having time to do much planning and coordination. And since it is a lab after all, something may break from time to time, and that usually happens when I urgently need to test something.
- I want to set up Layer 2 VPN from my home lab to the corporate lab to test and demonstrate real hybrid cloud use-cases. I can then migrate workloads back and forth using vMotion. We have this already set up in the corporate lab and my colleague Espen is using the free NSX-T Autonomous Edge as an L2 VPN Client to stretch several VLANs between his home lab and the corporate lab.
I didn’t spend a lot of time investigating what gear to get for my home lab, and I also wanted to keep cost at a sensible level. I came up with the following bill of materials after doing some research on what equipment would be able to run ESXi 7.0 without too much hassle.

- 2 x – NUC Kit i7-10710U Frost Canyon , NUC10i7FNH
- 2 x – Impact Black SO-DIMM DDR4 2666MHz 2x32GB
- 2 x – SSD 970 EVO PLUS 500GB
- 2 x – 860 EVO Series 1TB
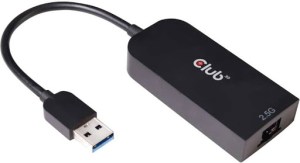
- 2 x – CLUB 3D CAC-1420 – USB network adapter 2.5GBase-T
- 2 x – SanDisk Ultra Fit USB 3.1 – 32GB
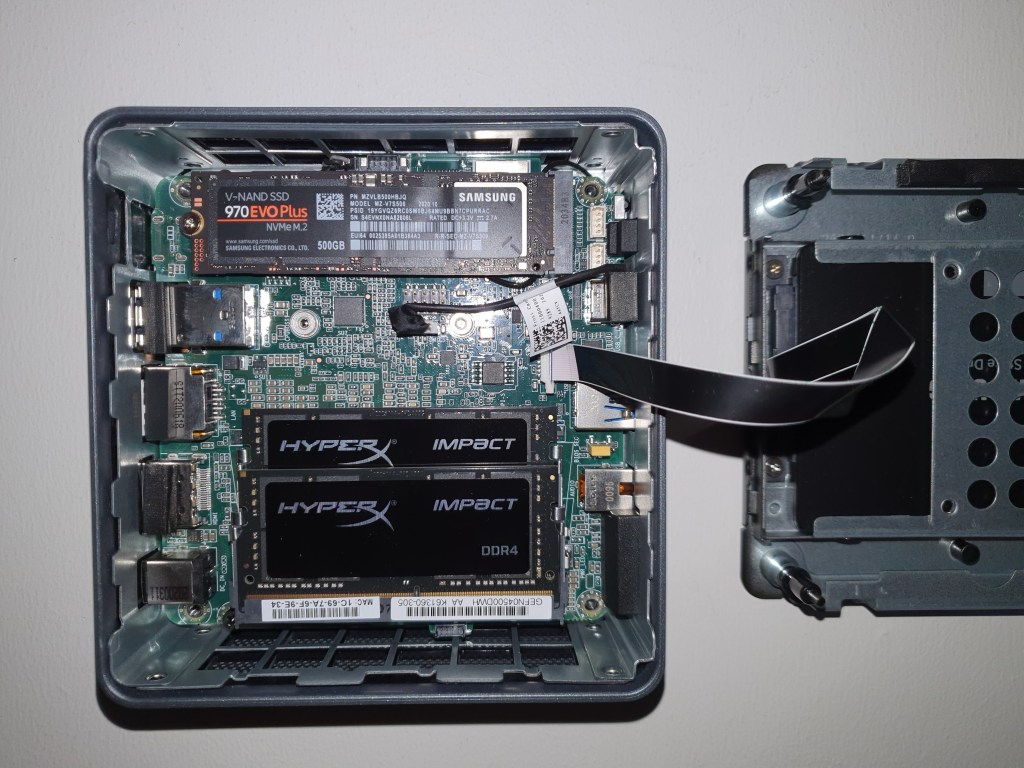
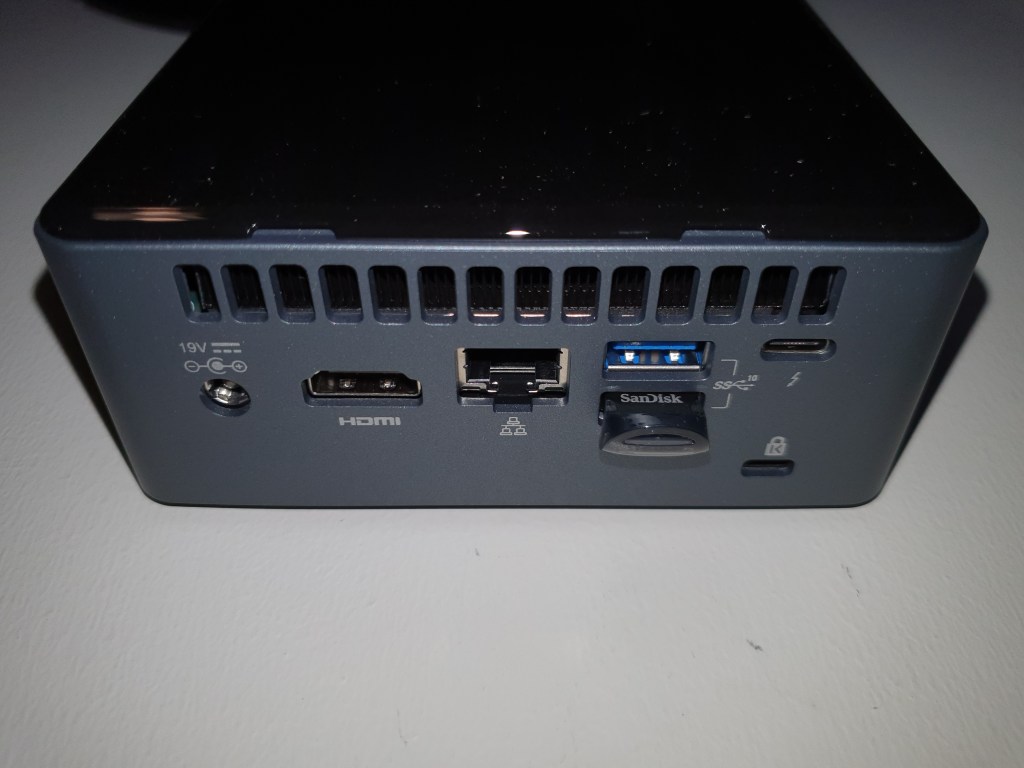
First I had to install the disk drives, the memory, and upgrade the NUCs firmware. All that went smoothly, and the hardware seemed to be solid, except for the SATA cable which is proprietary and flimsy. Be careful when opening and closing these NUCs to avoid breaking this cable. Then ESXi 7.0 was installed on the SanDisk Ultra Fits from another bootable USB drive. The Ultra Fits are nice to use for boot drives since they are very small physically. After booting ESXi for the first time, I installed the “USB Network Native Driver for ESXi” to get the 2.5 Gbps USB NICs to work. The NICs were directly connected without using a switch, since my switch doesn’t support 2.5GBase-T. This was repeated on both my NUCs as I wanted to set them up in a two node cluster.
vCenter Server 7.0 was installed using “Easy Install” which creates a new vSAN Datastore and places the VCSA there. Quickstart was used to configure DRS, HA and vSAN, since I felt lazy and hadn’t tested this feature before. vSAN was configured as a 2-Node Cluster and the Witness Host was already installed in VMware Workstation running on my laptop. I configured Witness Traffic Separation (WTS) to use the Management network for Witness traffic.
I configured the vSAN Port Group to use the 2.5 Gbps NICs and then used iperf in ESXi to measure the throughput. They managed to push more than 2 Gbps so I am satisfied with that, but latency was a bit higher than expected at round-trip min/avg/max = 0.244/0.748/1.112 ms. I was also not able to increase the MTU higher than the standard 1500 bytes which is a bit disappointing, but these NICs were almost half the price of other 2.5GBase-T USB NICs so I guess I can live with this for now since I only plan to use them for vSAN traffic. I will buy different cards if I need to use them with NSX in the future, since Geneve requires at least 1600 bytes MTU. There are several USB cards which have been proven to work with ESXi 7.0 supporting 4000 and even 9000 MTU.
This is all I have had time to do with the new home lab so far, but will post updates here when new tings are implemented, like NSX-T with L2VPN.
I have spent a lot more time in the corporate lab running in Proact’s data centers, and here are some details on what we have running there. This is just a short introduction, but I plan to post more details later. This lab is shared with the rest of the SDDC Team at Proact, like Christian, Rudi, Espen, and a few others.
Hardware
- 16 x Cisco UCS B200 M3 blade servers, each with dual socket Intel(R) Xeon(R) CPU E5-2680 v2 @ 2.80GHz and 768 GB RAM.
- 3 x Dell vSAN Ready Nodes (currently borrowed by a customer, but Espen will soon return them to the lab).
- Cisco Nexus 10 Gigabit networking.
- 32 TB of storage provided by NFS on NetApp FAS2240-4.
- Two physical sites with routed connectivity (1500 MTU).
Software
- vSphere 7.
- 3 x vCenter Server 7.
- vRealize Log Insight 8.1.1.
- vRealize Suite Lifecycle Manager.
- vRealize Operations 8.1.1.
- vRealize Automation 7.6 with blueprints to deploy stand-alone test servers, as well as entire nested lab deployments including ESXi hosts, vCenter and vSAN.
- phpIPAM for IP address management.
- Microsoft Active Directory Domain Services, DNS and Certificate Services.
- NSX-T Data Center 3.1.
- Logical Switching with both VLAN backed and Overlay backed Segments.
- 2-tier Logical routing.
- Load Balancing, including Distributed Load Balancer to support Tanzu.
- Distributed Firewall.
- Layer 2 VPN to stretch L2 networks between home labs and the corporate lab.
- IPSec VPN to allow one site to access Overlay networks on the other site.
- NAT to allow connectivity between public and private networks.
- Containers configured with Tanzu.
- vSphere with Tanzu running awesome modern containerized apps like Pacman.
- Horizon 8 providing access to the lab from anywhere.
- Veeam Backup & Replication 10.
- VMware Cloud Foundation (VCF) 4.2 – 8 nodes Stretched Cluster.
That’s it for now – Thanks for reading, and please go to the Contact page to reach out to me.

One thought on “Introduction to my Labs”