VMware Cloud Foundation (VCF) is basically a package containing vSphere, vSAN, NSX-T, and vRealize Suite elegantly managed by something called SDDC Manager. Everything is installed, configured and upgraded automatically without much user intervention. VCF is based on VMware Validated Design, so you get a well-designed, thoroughly tested and consistent deployment. Upgrading is also a lot easier as you don’t have to check interoperability matrices and upgrade order of the individual components – Just click on the upgrade button when a bundle is available. For someone who has implemented all these products manually many times, VCF is a blessing. Tanzu and Horizon are also supported to run on VCF, and almost everything else you can run on vSphere. Many cloud providers are powered by VCF, for instance VMware Cloud on AWS.

Here is a nice overview taken from the VLC Install Guide:

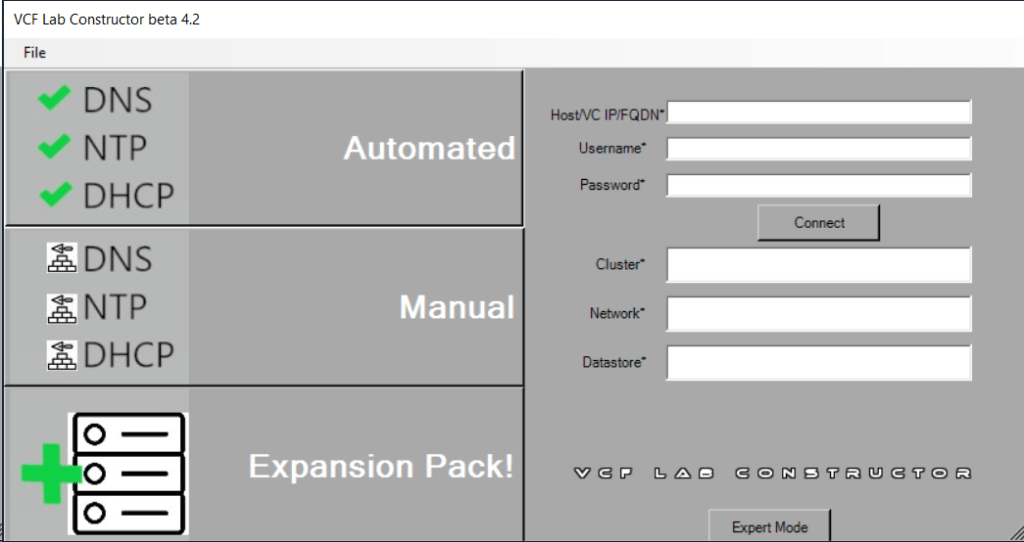
VLC lets you choose between three modes: Automated, Manual and Expansion Pack. Automated will deploy VCF including all dependencies, while Manual will deploy VCF, but you will have to provide DNS, DHCP, NTP and BGP. Expansion Pack can be used to add additional ESXi hosts to your deployment after you have installed VCF, for instance when you want to create more clusters or expand existing ones.
This is what the VLC GUI looks like:
So far, I have only used the Automated and the Expansion Pack modes, and they both worked flawlessly without any issues. Just make sure you have added valid licenses to the json file like the documentation tells you to do. Some people also mess up the networking requirements, so please spend some extra time studying that in the Installation Guide and reach out if you have any questions regarding that.
It can also be challenging for some to get the nested VCF environment to access the Internet. This is essential to be able to download software bundles used to upgrade the deployment, or to install software like vRealize Suite. Since VLC already requires a Windows jump host which is connected to both my Management network as well as the VCF network, I chose to install “Routing and Remote Access” which is included in Windows Server. Then I set the additional IP address 10.0.0.1 on the VCF network adapter. This IP is used as the default gateway for the router deployed in VCF if you also typed it into the “Ext GW” field in VLC GUI. The last step was to configure NAT in “Routing and Remote Access” to give all VCF nodes access to the Internet. I could then connect SDDC Manager to My VMware Account and start downloading software bundles.
Here are some of the things I have used VLC to do:
Deployed VCF 3.10, 4.0, 4.1 and 4.2 with up to 11 ESXi hosts
Being able to deploy earlier versions of VCF has been very useful to test something on the same version my customers are running in production. Many customers don’t have proper lab gear to run VCF. It has also been great to be able to test upgrading VCF from one version to another.
Experimented with the Cloud Foundation Bring-Up Process using both json and Excel files
The bring-up process is automated, but it requires the configuration, like host names, cluster names, IP addresses and so on, to be provided in an Excel or json file. All required details can be found in the Planning and Preparation Workbook.
Stretched a cluster between two Availability Zones
All my VCF customers are running stretched clusters so beings able to run this in my lab is very useful. This requires at least 8 vSAN nodes, 4 per availability zone. Currently this must be configured using the VCF API, but it is not that difficult, and SDDC Manager includes a built in API explorer which can be used to do this directly in the GUI if you want to.
Created additional Clusters and Workload Domains
Creating more clusters and workload domains will be required by most large customers and also by some smaller ones. It is supported to run regular production workloads in the management workload domain, but this is only recommended for smaller deployments and special use cases.
Commissioned and decommissioned hosts in VCF
Adding and removing ESXi hosts in VCF requires us to follow specific procedures called commissioning and decommissioning. The procedures validate that the hosts meet the criteria to be used in VCF so that it is less likely that you run into problems later. I have had some issues decommissioning hosts from my Stretched Cluster, and VMware has filed a bug to engineering to get this resolved in a future release. The problem was that the task failed at “Remove local user in ESXi host”, which makes sense since the host went up in flames. Workaround was to deploy a new host with the same name and IP, then decommissioning worked. Not a great solution. It is also possible to remove the host directly from the VCF database, but that is not supported. If you run into this issue in production, please call VMware Support.
Expanded and shrunk Clusters – including Stretched Clusters
Adding ESXi hosts to existing clusters, or removing hosts, requires you to follow specific procedures. Again, stretched clusters must be expanded and shrunk using the VCF API.
Upgraded all VCF components using the built-in Lifecycle Management feature
Upgrading VCF is a fun experience for someone used to upgrade all the individual VMware products manually. The process is highly automated, and you don’t have to plan the upgrade order or check which product version is compatible with the others. This is taken care of by SDDC Manager. I have successfully upgraded all the products in VCF including the vRealize Suite.
Tested the Password and Certificate Management features
VCF can automate changing the passwords on all its components. This includes root passwords on ESXi hosts, vCenter SSO accounts and administrative users for the various appliances. You can choose to set your own password or have VCF set random passwords. All passwords are stored in SDDC Manager and you can look them up using the API or from the command line. This requires that you know SDDC Manager’s root password and a special privileged user name and the privileged password. These are obviously not rotated by SDDC Manager.
Changing SSL certificates is a daunting task, especially when you have many products and appliances like you do in VCF. SDDC Manager has the option to replace these for you automatically. You can connect SDDC Manager directly to a Microsoft Certificate Authority or you can use an OpenSSL CA which is built in. If you don’t want to use either of those, there is also support for any third-part CA, but then you have to generate CSR files, copy those over to the CA, generate the certificate files, copy those back and install them. This also requires all the files to be present in a very specific folder structure inside a tar.gz file, so it can be a bit cumbersome to get it right. Also note that all the methods seems to generate the CSR for NSX-T Manager without a SAN, so unless you force your CA to include a SAN, the certificate for NSX-T will not be trusted by your web browser. This has been an issue for several years, so I am puzzled that it still hasn’t been resolved. When generating CSRs for NSX-T in environments without VCF, I never use the CSR generator in NSX-T Manager to avoid this issue. vSphere Certificate Manager in VCSA works fine for this purpose.
Tested the NSX-T Edge Cluster deployment feature
SDDC Manager has a wizard to assist in deploying NSX-T Edge Clusters including the Edge Transport Nodes and the Tier-1 and Tier-0 Gateways required to provide north-south routing and network services. The wizard makes sure you fulfil all the prerequisites, then it will ask you to provide all the required settings like names, MTU values, passwords, IP addresses and so on. This helps you to get a consistent Edge Cluster configuration. Note that VCF is not forcing you to deploy all NSX-T Edge Clusters using this wizard, so please reach out if you want to discuss alternative designs.
Deployed vRealize Suite on Application Virtual Networks (AVN)
All the vRealize Suite products are downloaded in SDDC Manager like any VCF software bundle. You then have to deploy vRealize Suite Lifecycle Manager, which will be integrated with SDDC Manager. VMware Workspace ONE Access must then be installed before you can deploy any of the vRealize Suite products. It is used to provide identity and access management services. It is downloaded as an install bundle in SDDC Manager, but it is actually deployed from vRealize Suite Lifecycle Manager, same as the rest of the products like vRealize Log Insight, vRealize Operations and vRealize Automation. Application Virtual Networks (AVN) is just NSX-T Overlay networks designed and automatically deployed for running the vRealize Suite. This gives you all the NSX-T benefits like load balancing, mobility, improved security and disaster recovery. AVN is optional as you can choose to deploy the vRealize Suite on VLAN backed networks as well.
Deployed Workload Management and Tanzu Kubernetes Cluster
Deploying Tanzu in VCF is not an automated process, but there is a wizard helping you to fulfil the following prerequisites:
- Proper vSphere for Kubernetes licensing to support Workload Management
- An NSX-T based workload domain deployed
- At least one NSX-T Edge cluster
- IP addresses for pod networking, Services, Ingress and Egress traffic
- At least one Content Library
You have to select an NSX-T based, non-vLCM enabled workload domain, and the wizard will then search for any compatible clusters in this domain. It will then validate the cluster, and if it is ok you are directed to complete the deployment in the vSphere Client manually. The VCF docs have specific instructions on how to do this.
VLC has been very helpful when troubleshooting certain issues for my VCF customers, and when preparing for the VMware Cloud Foundation Specialist exam.
You can download the latest version of VLC, which is 4.2, from here.
Please make sure to read the Install Guide included in the zip file.
It is also possible to download earlier versions of VLC, which can be really useful for testing upgrades, or if you want to simulate a customer’s environment.
| VLC Version | Download Link |
| 4.10 | https://tiny.cc/getVLC410bits |
| 4.0.1 | https://tiny.cc/getVLC401bits |
| 4.0 | http://tiny.cc/getVLC40bits |
| 3.91-3.10 | http://tiny.cc/getVLC310bits |
| 3.8.1-3.9 | http://tiny.cc/getVLC38bits |
If you give VLC a go and successfully deploy a VCF instance, please send a screen shot of your installation to SDDC Commander in the VLC Support Slack workspace, and he will send you some awesome stickers!
I highly recommend the following articles for more information about VLC:
Deep dive into VMware Cloud Foundation – Part 1 Building a Nested Lab
Deep dive into VMware Cloud Foundation – Part 2 Nested Lab deployment
If you don’t have licenses for VCF, I recommend signing up for a VMUG Advantage membership which gives you a 365 days evaluation license, and a lot more.
Cheers.