Many people are looking into using multiple physical hosts to run their VMware Cloud Foundation (VCF) labs, especially after VCF 9 was released with increased demand for resources, but may be intimidated by requirement to have a managed network switch supporting VLAN trunking since VCF require many VLANs that have to be available across all the physical hosts. It can also be a great advantage to have at least 10 or 25 GbE since a lot of traffic will travel between the nested hosts. This post will show you how you can add 25 GbE between two physical hosts running nested VCF without requiring a network switch at all. Your nested environment can still reach the outside world through a VM acting as a router, like the Holorouter if you are using Holodeck.
If you need to use more than two physical hosts you need a managed switch supporting 802.1Q VLAN trunking as you can only directly connect two servers.
I use two Mellanox ConnectX-4 LX Dual Port 25 GbE NICs which is supported by both ESXi 8 and ESX 9, and to connect them togheter I use a pair of SFP28 to SFP28 25G DAC cables.
ESXi automatically detects the cards and link speed is auto negotiated to 25 Gbit/s.
To be able to use the NICs with nested VCF we must create a port group with VLAN Trunking enabled. I also use Forged transmits and MAC Learning for much better performance than promiscuous mode can deliver. There is no configuration required to be done on the NICs themselves.
Another thing that can simplify the setup is to skip using shared storage between the physical ESX hosts. You can deploy the nested ESX hosts on local storage, preferably NVMe devices. By creating two single host vSphere clusters with one ESX host in each and enabling the same EVC mode on both clusters you can still do live migration between the physical hosts to distribute load between them. DRS and vSphere HA will not be possible though. Inside your nested VCF environment everything will still be possible: vSAN ESA, DRS, HA, and so on.
I hope this post saved you some money and frustration.
For a long time, access to personal-use VCF licenses have been available to anyone with a VMUG Advantage membership as long as they also pass a VCP-VCF certification. However, until recently these licenses were only available for VCF 5.x, but now we also get licenses for VCF 9. I have tested them in my lab and they work fine.
For the vSphere Supervisor that I deployed in my last post to work I needed to deploy an NSX Edge Cluster. This can now be done in the vSphere Client so that is what I chose to do to get some experience with this process.
This is done by going to the vCenter for the Workload Domain and select Networks, Network Connectivity and click on Configure Network Connectivity.
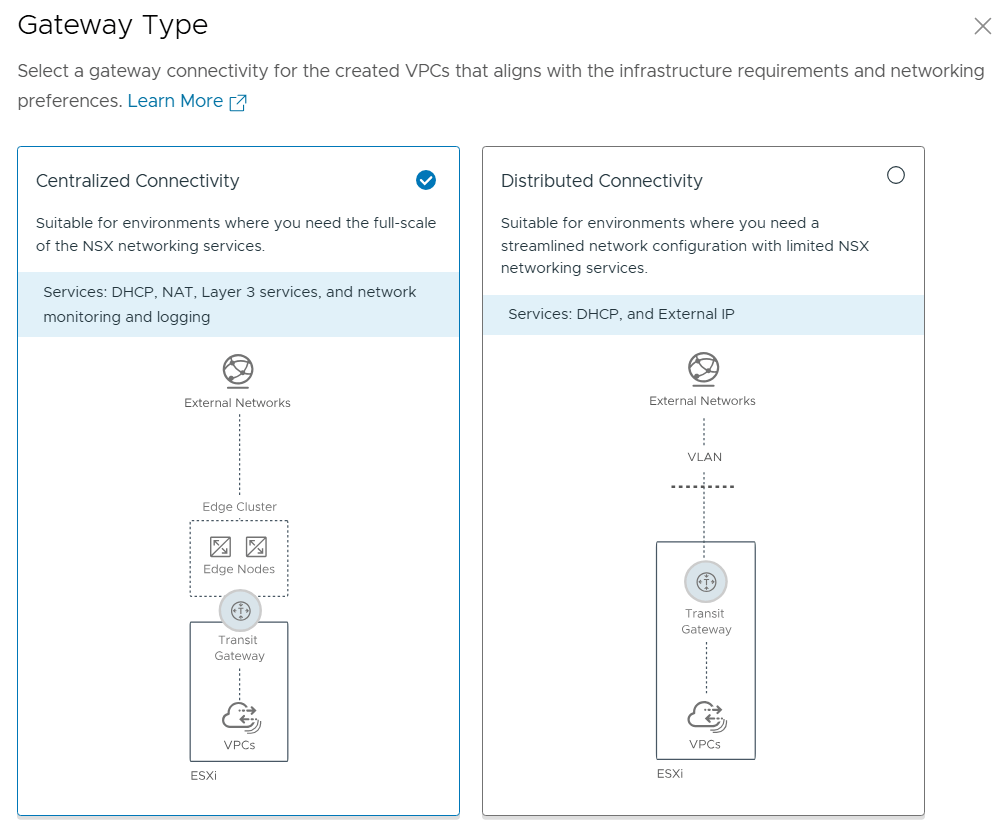
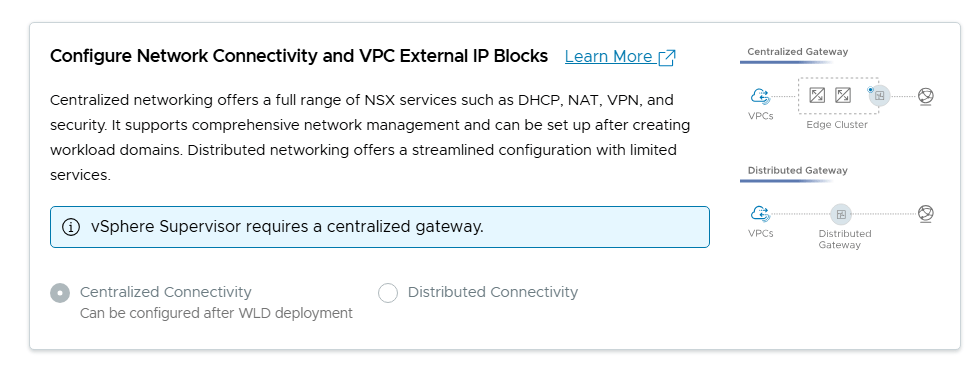
We get the choice between Centralized Connectivity and Distributed Connectivity. Centralized Connectivity is required to use VCF Automation All Apps and vSphere Supervisor so that is what I chose.
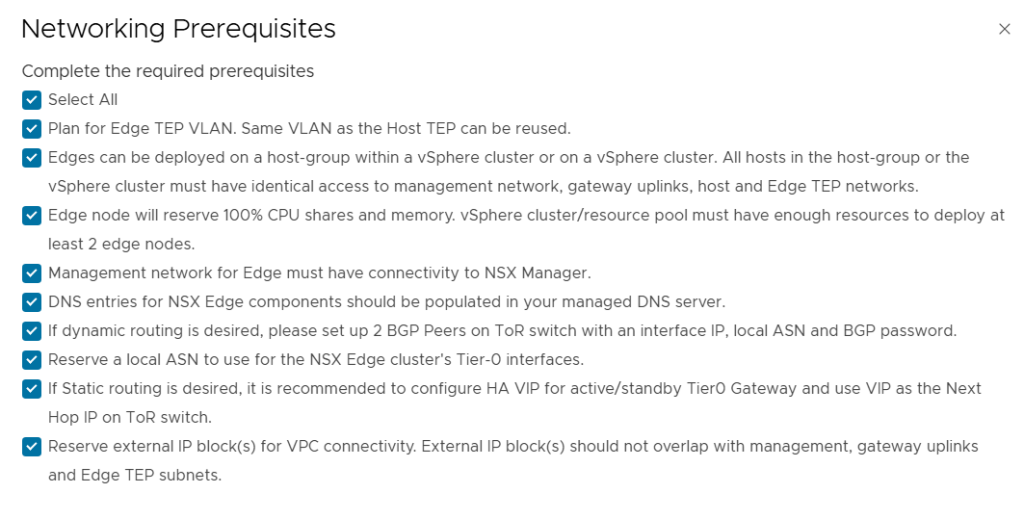
I reviewed and accepted all the prerequisites and clicked on continue.
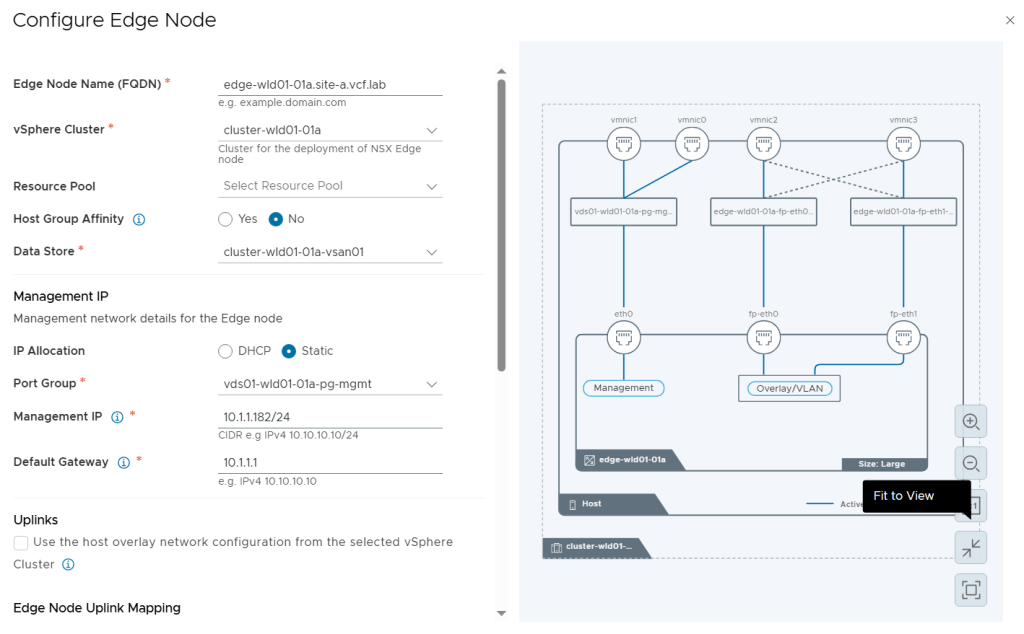
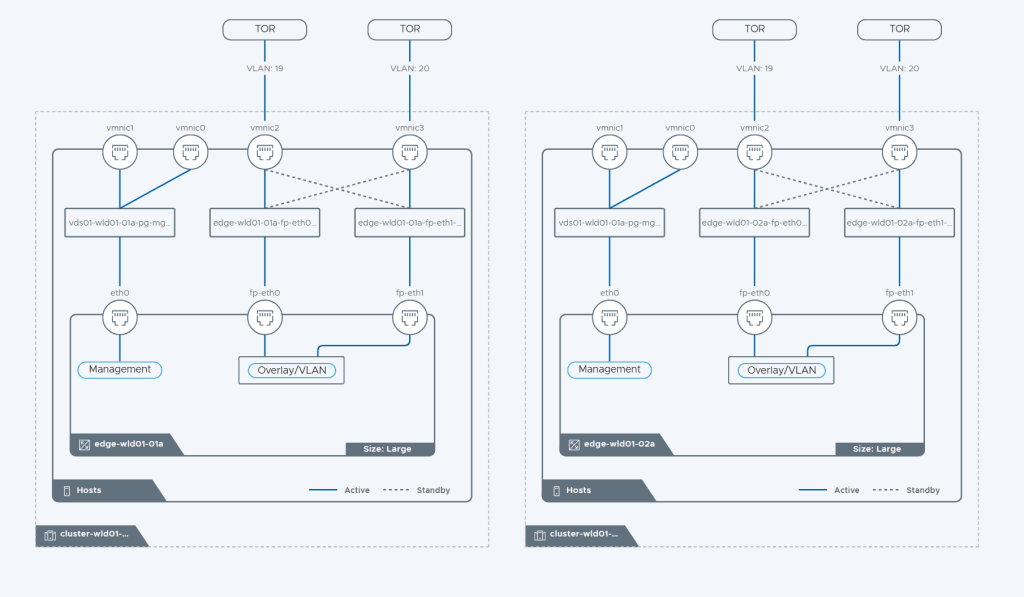
While configuring the Edge Nodes we get this nice diagram view on the right side showing us what it will look like.
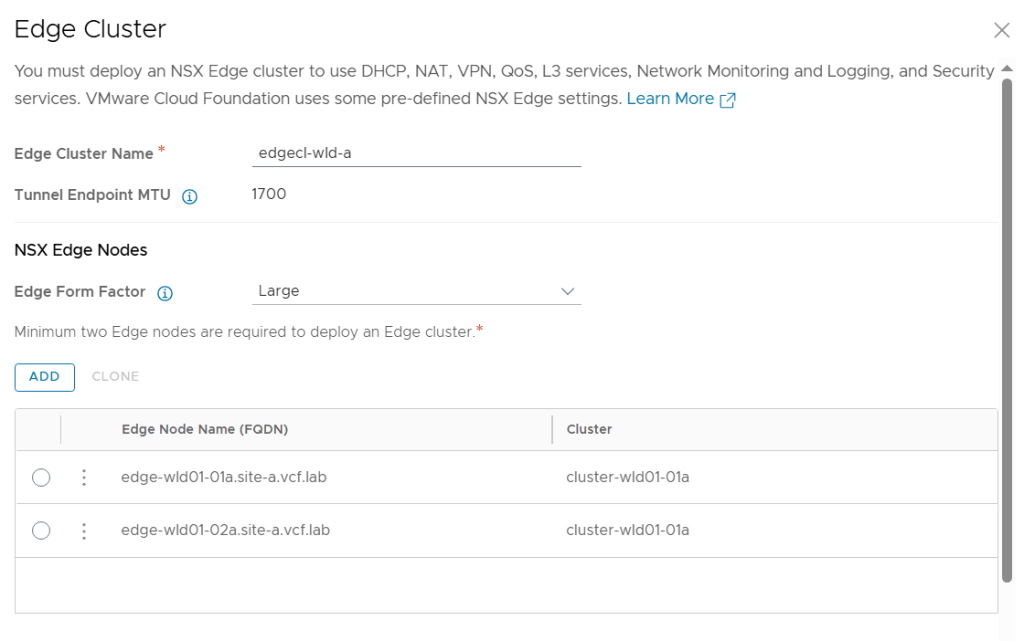
I configured two Large Edge Nodes.
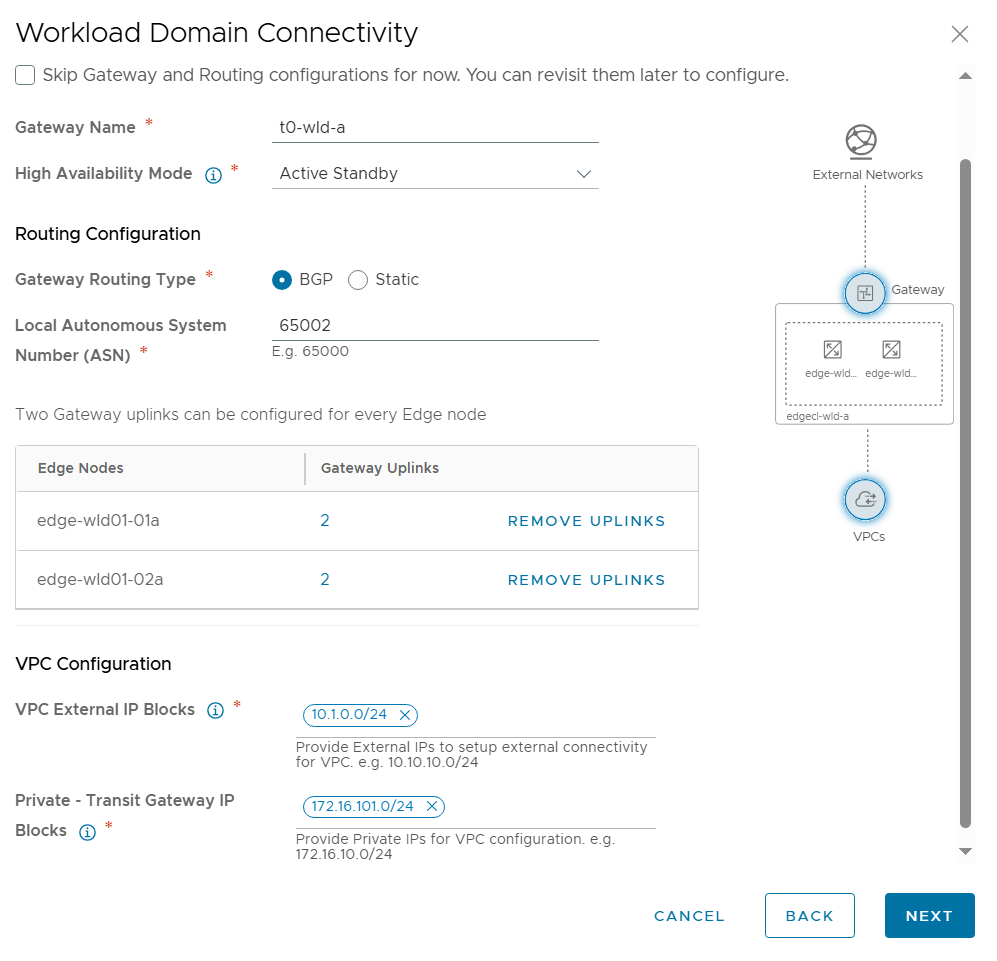
Next was to configure Workload Domain Connectivity. The Gateway Name here is the name of the Tier-0 Gateway in NSX to be created. Note that I selected Active Standby since that is also a requirement to use VCF Automation All Apps and the vSphere Supervisor.
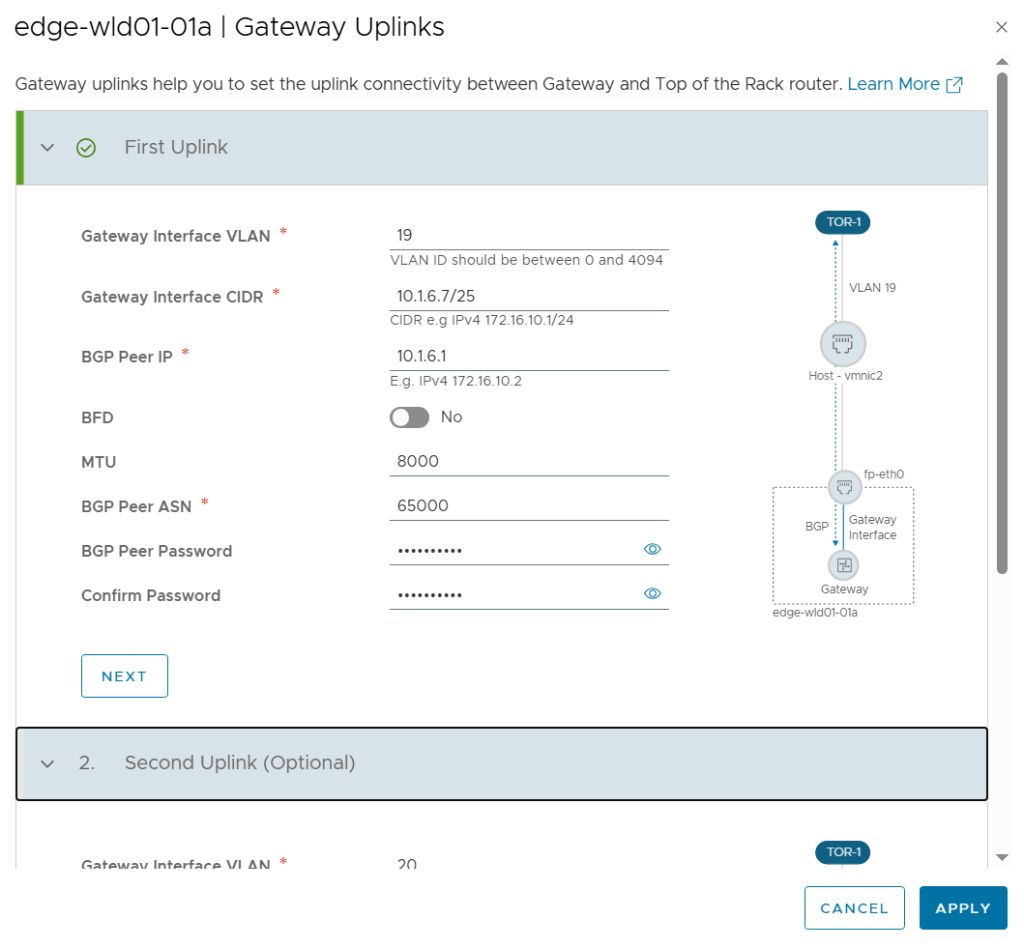
I also had to configure the Gateway Uplinks. This was pretty much the same as doing the configuration from SDDC Manager or from NSX Manager, but the terminology is a bit different. Gateway Interface was used to be called Uplink interface.
On the review page of the wizard we get this beautiful diagram showing us how the Edge Cluster will be built.
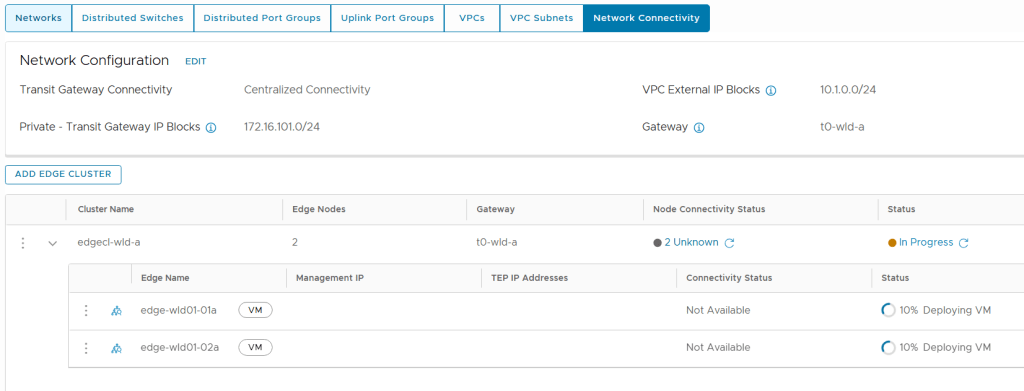
During deployment we can follow the status directly in the vSphere Client. But it is still NSX Manager who is doing all the heavy lifting here so we can also check status there.
After a while the Edge Cluster deployment finished successfully and when checking Supervisor Management in the vSphere Client I could see that it was still configuring, but after some time that also completed successfully.
This post will show you how I deployed a new Workload Domain in VMware Cloud Foundation 9 (VCF 9) with the vSphere Supervisor enabled. vSphere Supervisor lets me provision and manage virtual machines, containers and full Kubernetes clusters through vSphere Kubernetes Service (VKS) on my VCF platform.
Broadcom’s documentation has a nice summary of what vSphere Supervisor provides:
“Having a Kubernetes control plane on the vSphere clusters enables the following capabilities in vSphere:
As a vSphere administrator, you can create namespaces on the Supervisor, called vSphere Namespaces, and configure them with specified amount of memory, CPU, and storage. You provide vSphere Namespaces to DevOps engineers.
As a DevOps engineer, you can run Kubernetes workloads on the same platform with shared resource pools within a vSphere Namespace. You can deploy and manage multiple upstream Kubernetes clusters created by using vSphere Kubernetes Service. You can also deploy Kubernetes containers directly on the Supervisor inside a special type of VM called vSphere Pod. You can also deploy regular VMs.
As a vSphere administrator, you can manage and monitor vSphere Pods, VMs, and VKS clusters by using the vSphere Client.
As a vSphere administrator, you have full visibility over vSphere Pods, VMs, and VKS clusters running within different namespaces, their placement in the environment, and how they consume resources.
Having Kubernetes running on vSphere clusters also eases the collaboration between vSphere administrators and DevOps teams, because both roles are working with the same objects.”
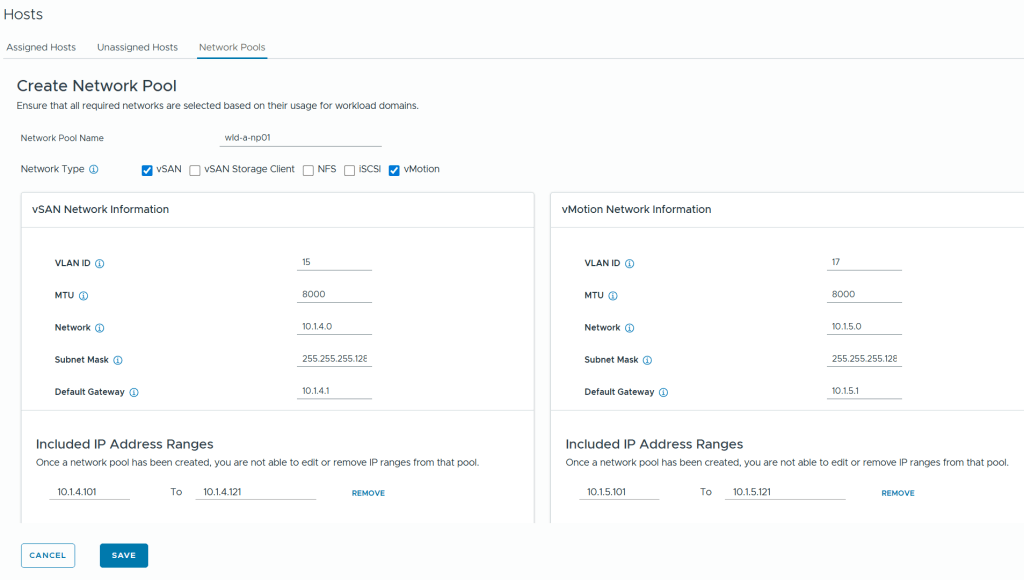
Then I had to create a new Network Pool to be used by the hosts in the new Workload Domain. This used to be done in SDDC Manager but now it is done in the vSphere Client by going to Global Inventory Lists, Hosts, Network Pools.
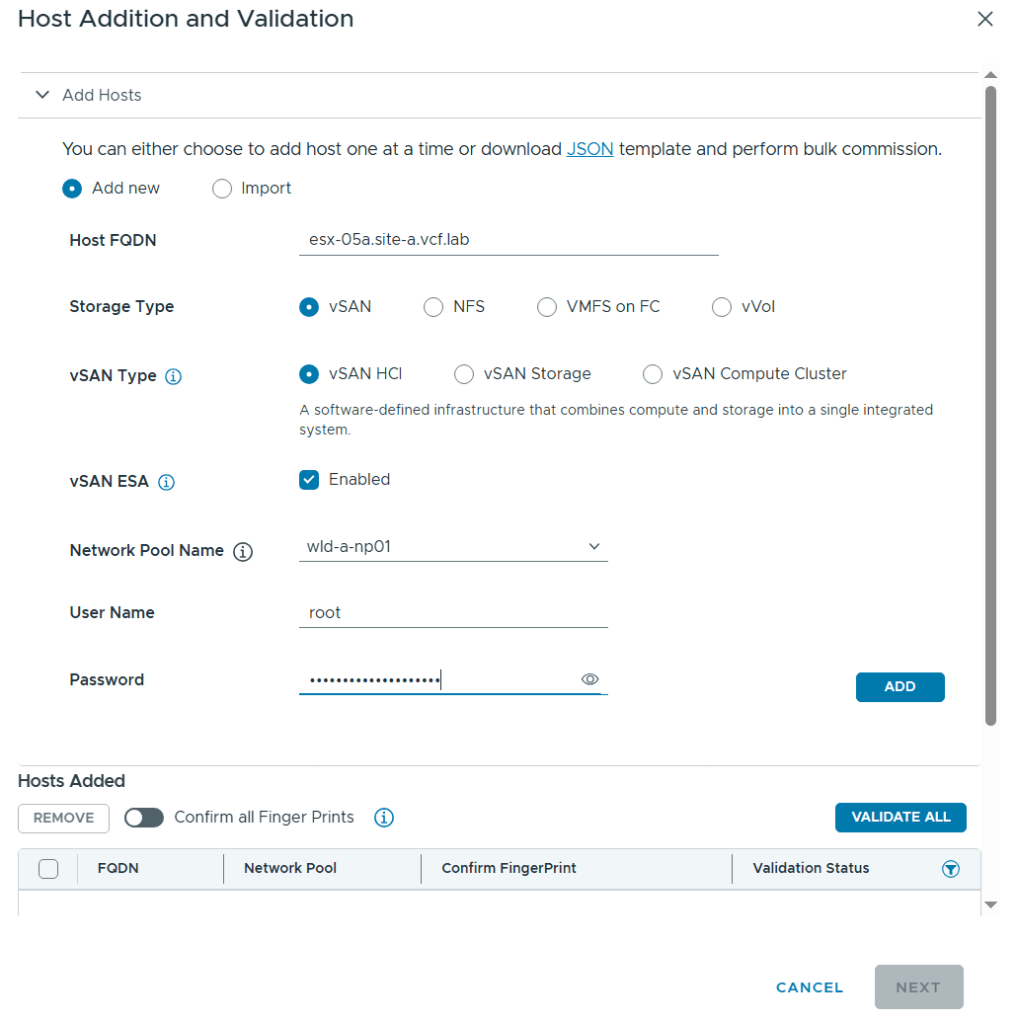
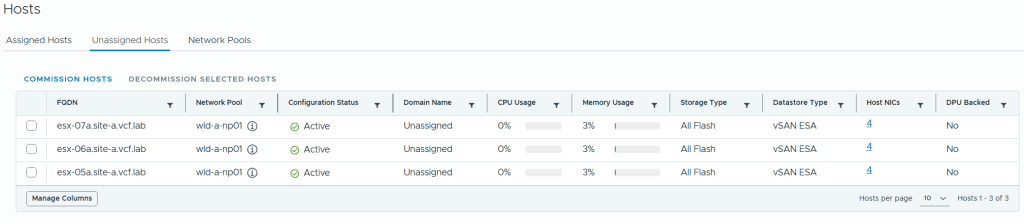
Host commissioning is also done in the vSphere Client now by going to Global Inventory Lists, Hosts, Unassigned Hosts.
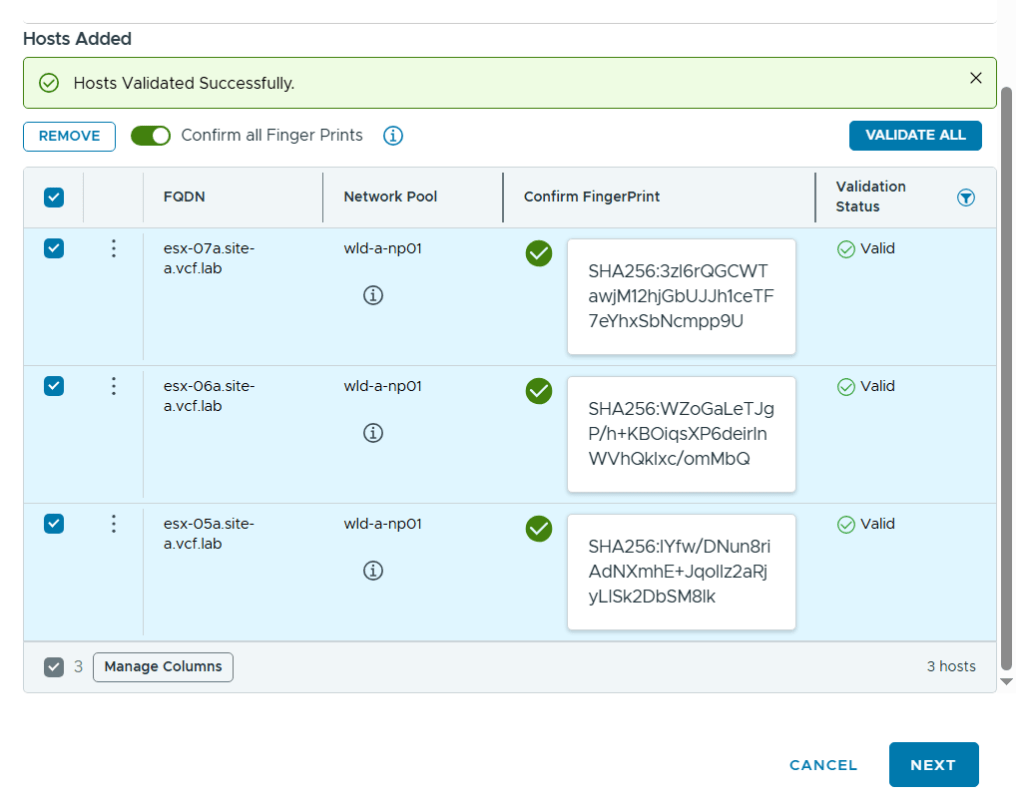
After adding all my hosts in the wizard I had to confirm their fingerprints and choose to validate them by clicking on Validate All.
After clicking Next, and then Commission after reviewing the configuration, it kicks off a task that can be monitored in the vSphere Client, in the VCF Operations user interface and in the SDDC Manager user interface. The vSphere Client gives you the least amount of details as you can’t see all the subtasks.
After the task completed successfully I could see my new hosts under Unassigned Hosts in the vSphere Client.
Creating a new Workload Domain is done in VCF Operations by going to Inventory, Detailed View, expand VCF Instances and browse to the VCF instance in which you want to create a new workload domain, then click on Add Workload Domain and Create New.
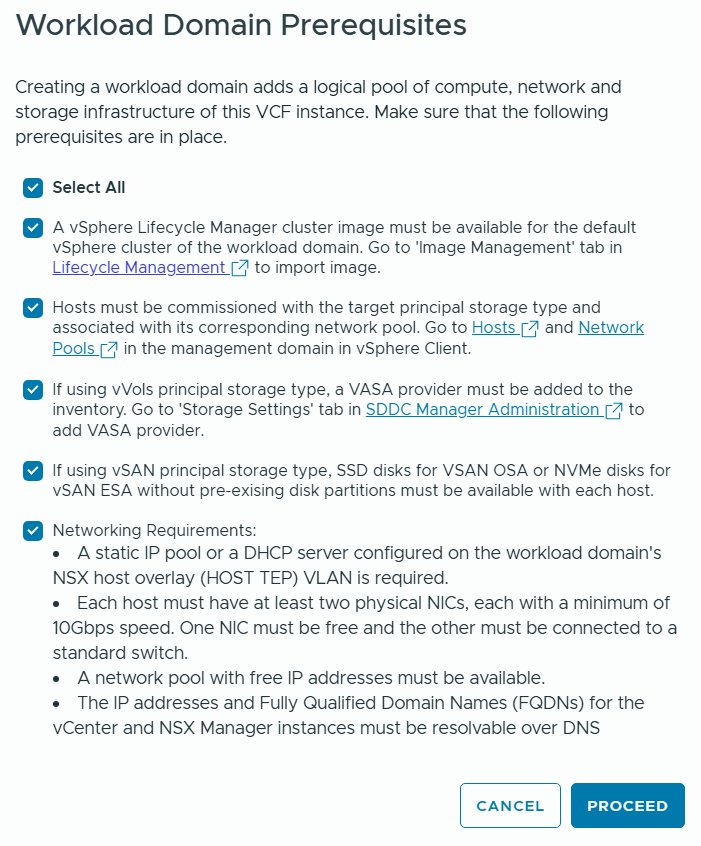
I was then presented with the following prerequisites checklist which I reviewed and chose to proceed.
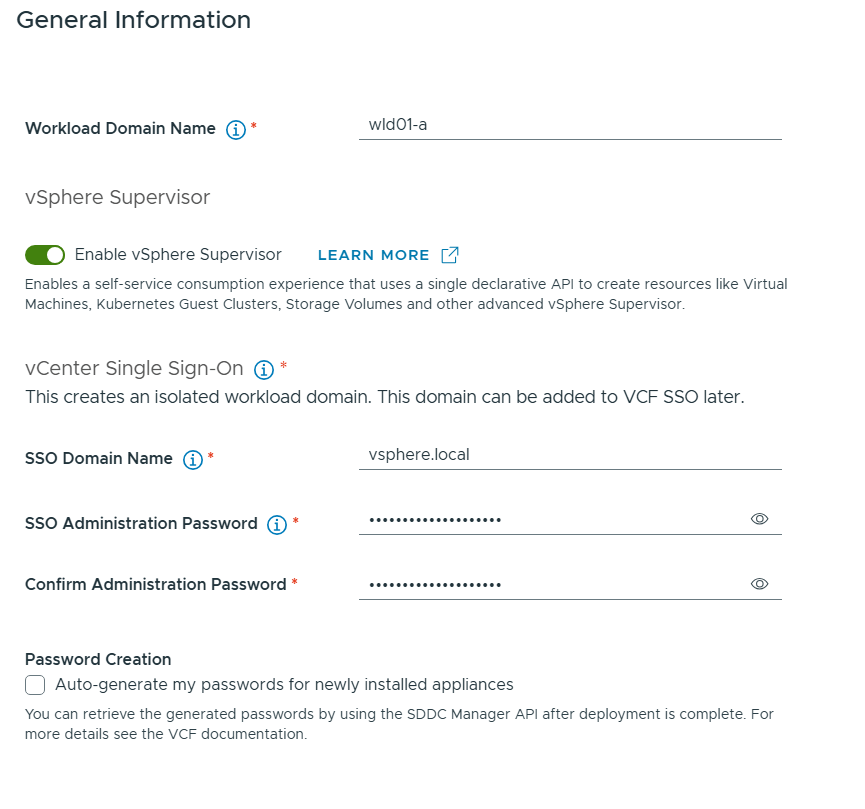
Then I had to enter some general information about my new Workload Domain.
Note that I have selected to enable vSphere Supervisor which will provide a platform for running Kubernetes workloads in vSphere as well as Virtual Machines.
You can see that I will get and isolated workload domain meaning no Enhanced Linked Mode with the vCenter in the Management Domain. This is the only way going forward. We can still use the same SSO Domain Name.
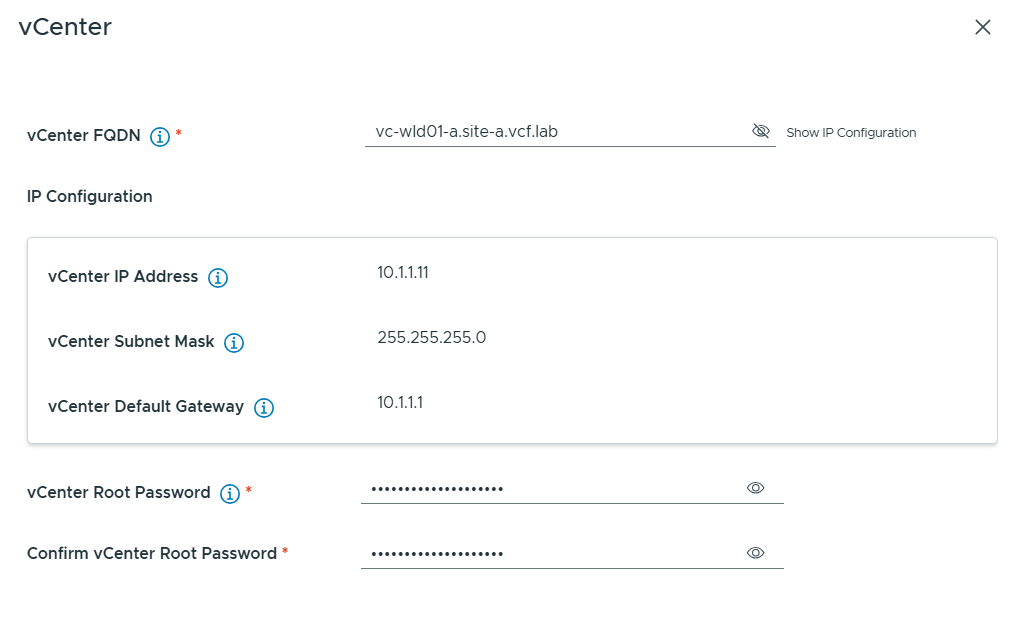
Next I had to provide the FQDN and password for the vCenter in my new Workload Domain. Note that the wizard looks up in DNS to find the IP address so make sure that is configured in advance.
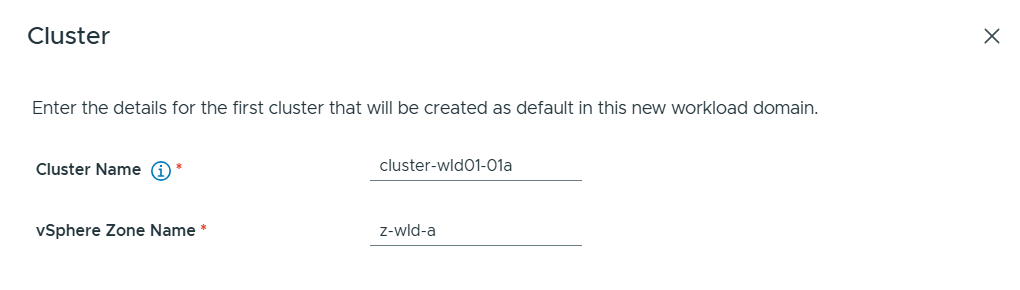
Then I had to provide Cluster details. vSphere Zone Name is used by the vSphere Supervisor to map to the vSphere cluster.
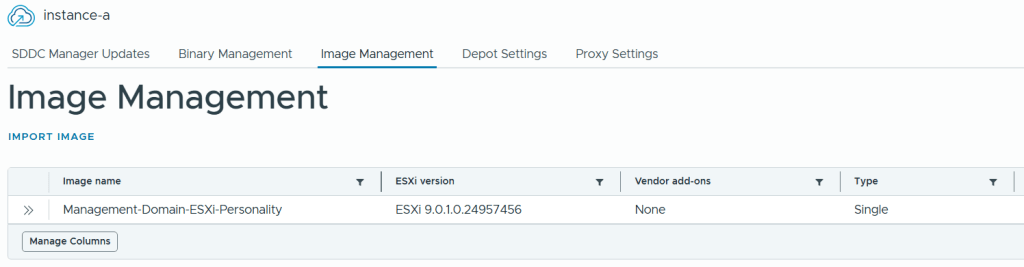
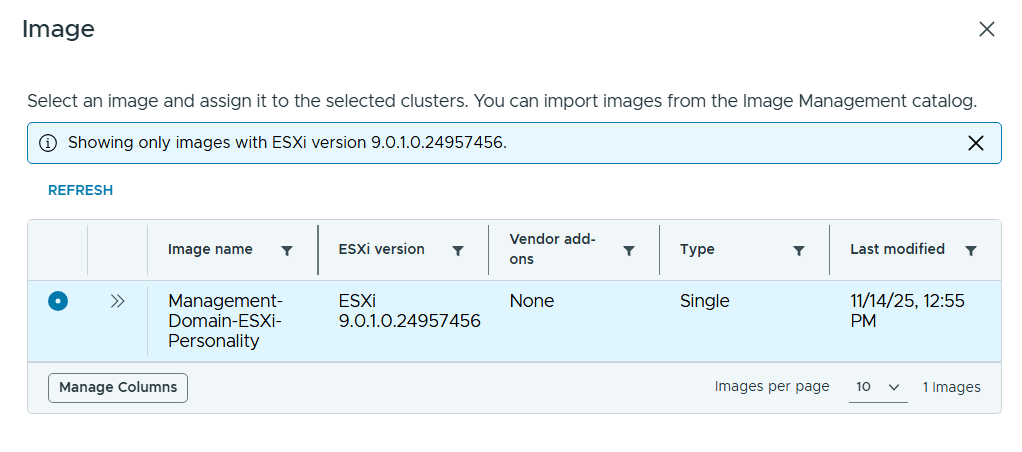
I selected the same image I used for my Management Domain.
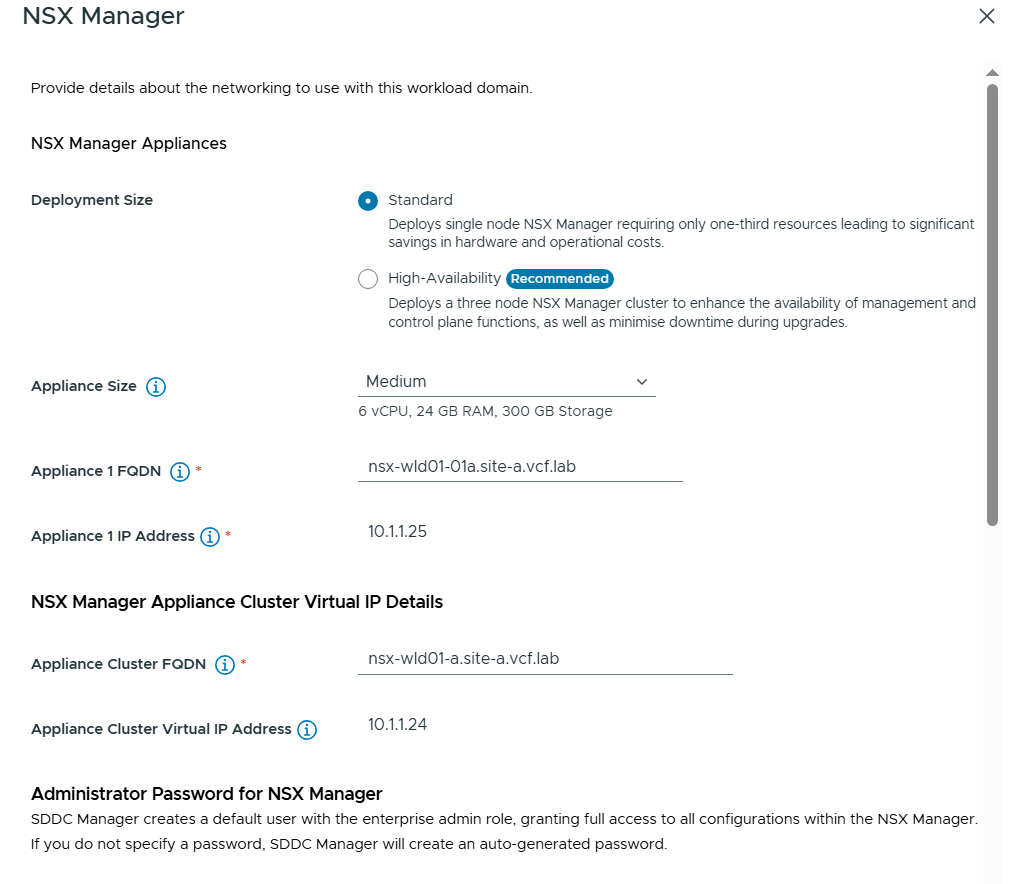
Next I had to enter details about NSX Manager. I chose to use the Standard deployment size since this was a lab deployment and I wanted to save some resources. Note that I still have to configure an Appliance Cluster FQDN and VIP so that we can easily expand the deployment into a three node cluster later if needed.
By scrolling down I could see that it was mandatory to configure the network connectivity with Centralized Connectivity since this is required by the vSphere Supervisor.
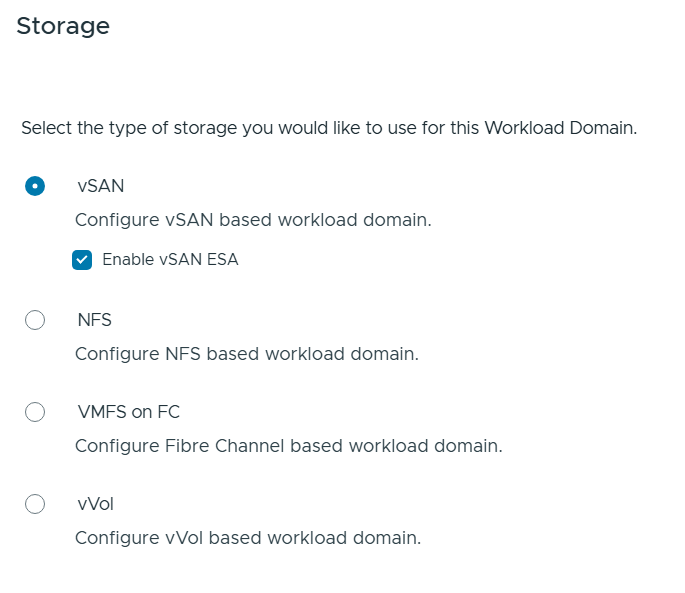
Then I had to choose my Storage type for the Workload Domain and since vSAN ESA is awesome I selected that.
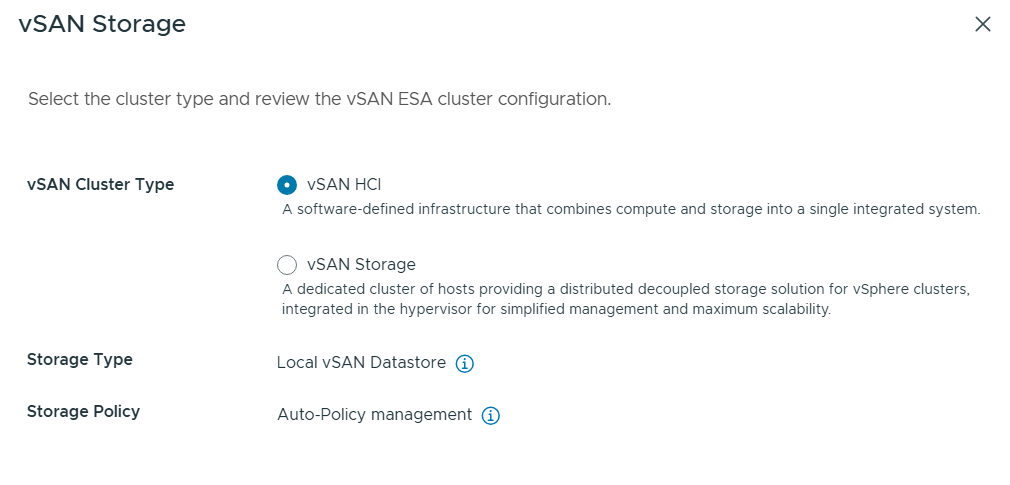
I also had to choose the type of vSAN Storage to use and selected vSAN HCI.
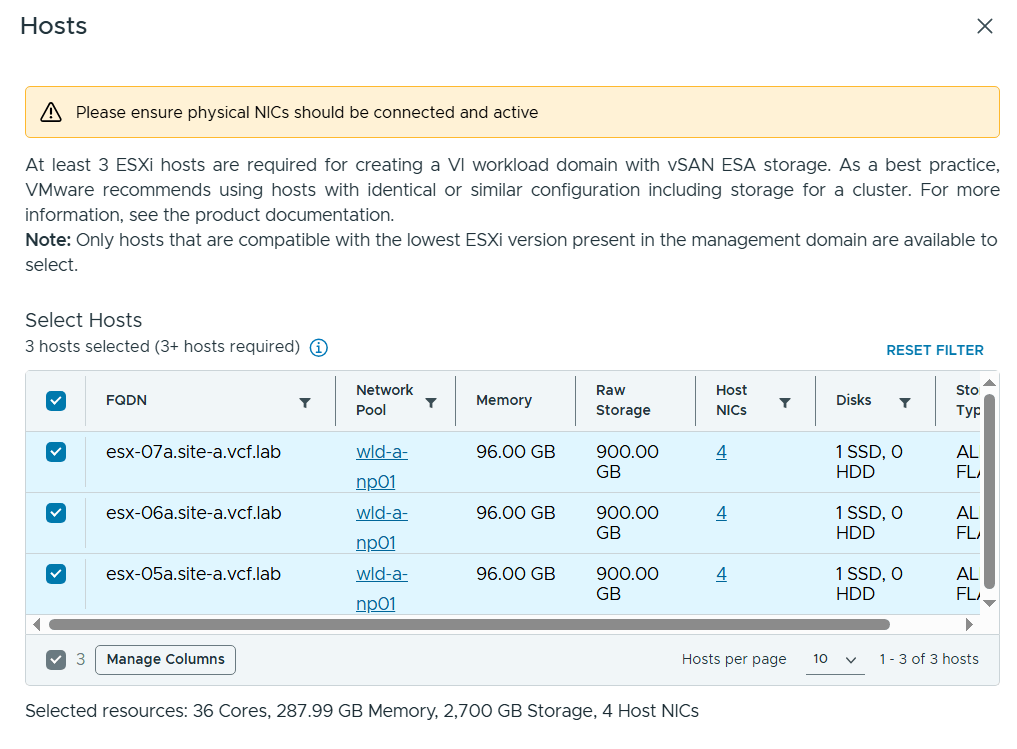
Next I had to select my three newly commissioned hosts to be used by the new Workload Domain.
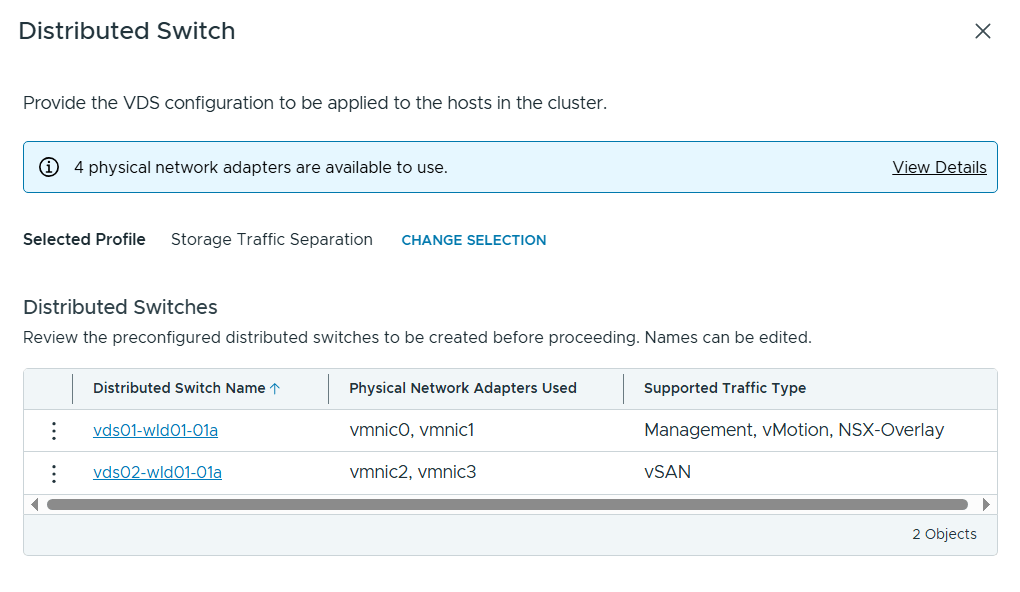
When configuring the Distributed Switch (VDS) I selected the Storage Traffic Separation profile to get vSAN traffic onto a separate VDS. I also had to edit the first VDS to specify my host transport VLAN for NSX.
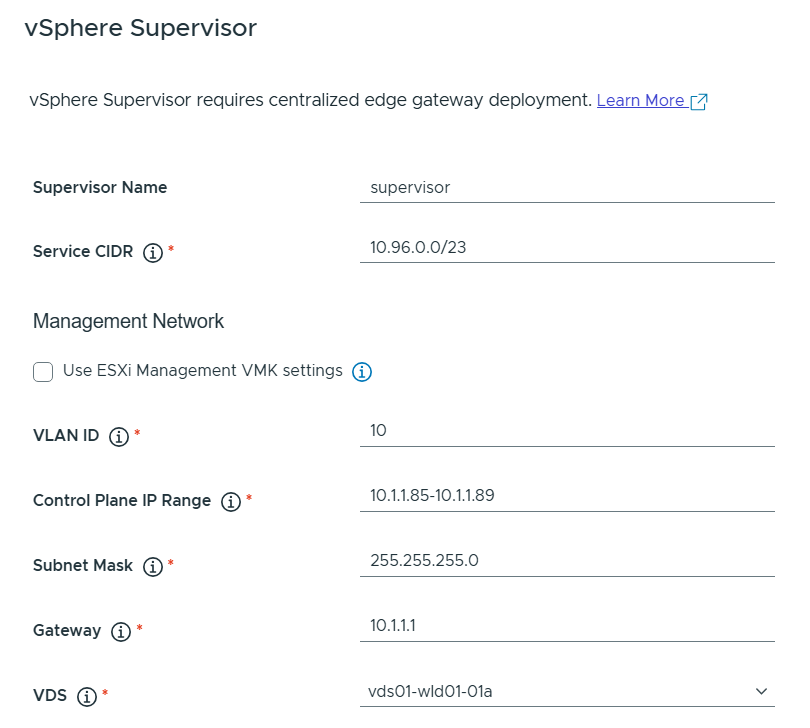
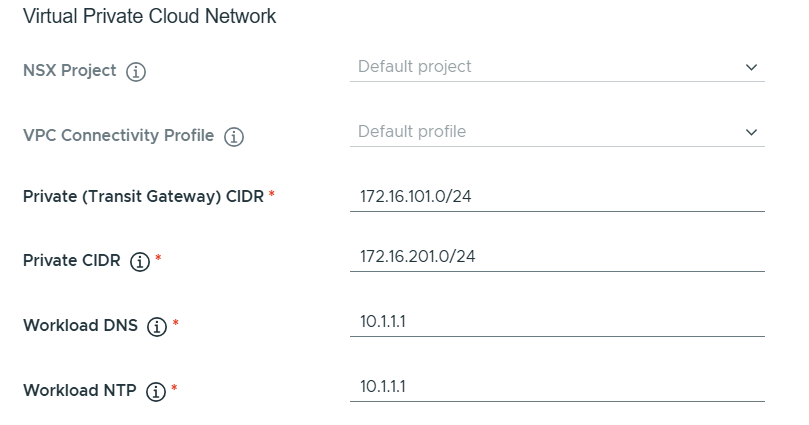
vSphere Supervisor was then configured like this.
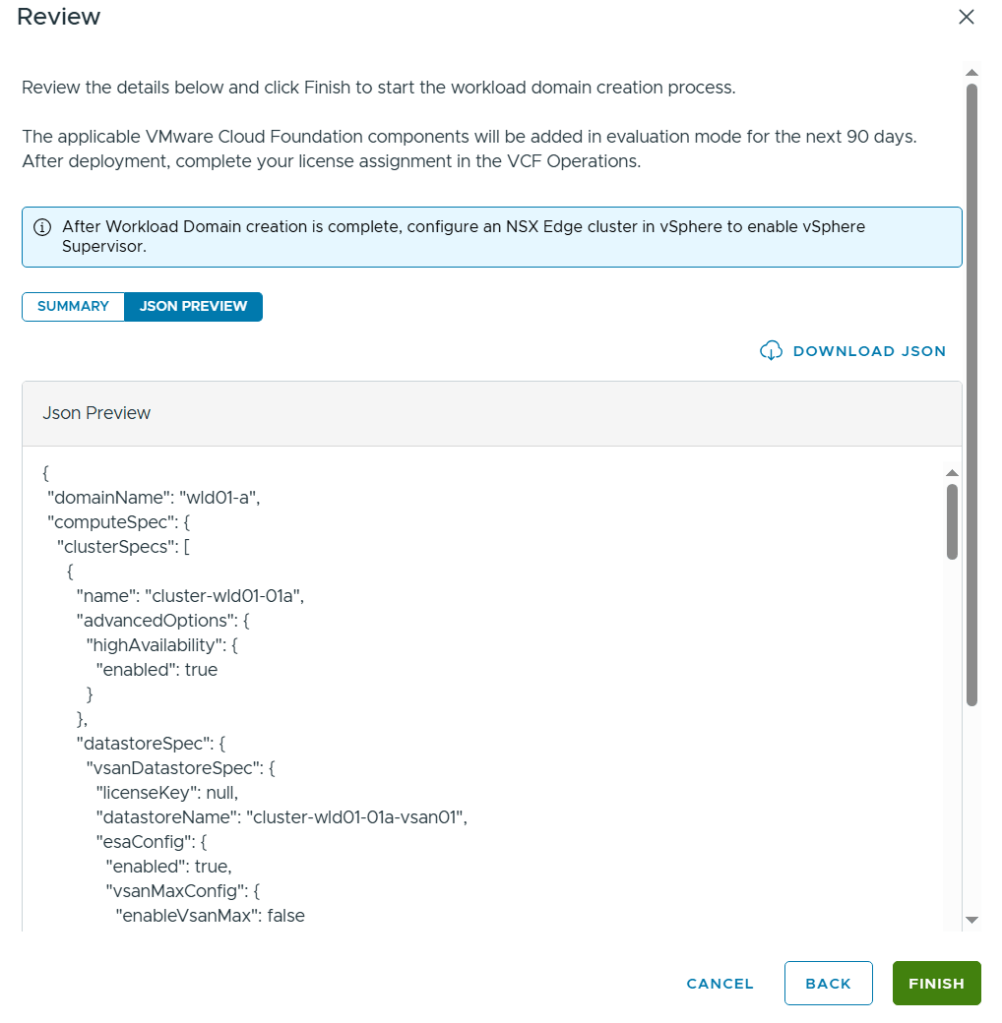
In the end I was able to review all my settings in a summary and also able to get a json preview as well as downloading the json file. The json file can be edited and used to deploy a Workload Domain in one step and is how I usually do it, but I wanted to get experience with all the steps in the wizard in VCF 9 first.
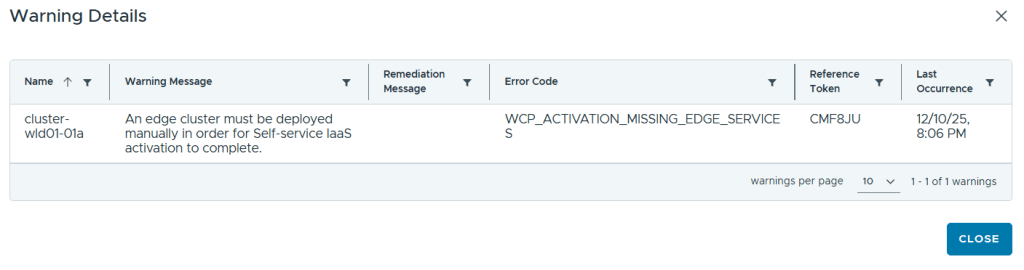
After clicking on Finish it kicks of a task and after some time the deployment is done. I got the following warning, but that was expected since I knew that Centralized Connectivity requires an NSX Edge Cluster.
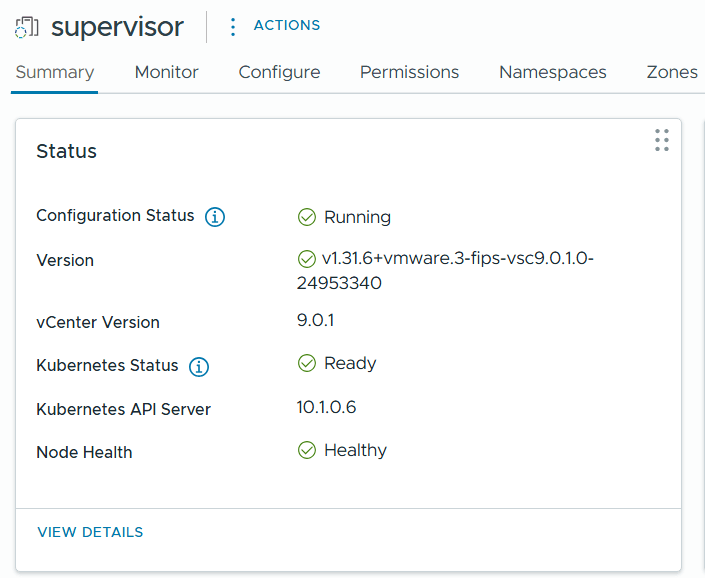
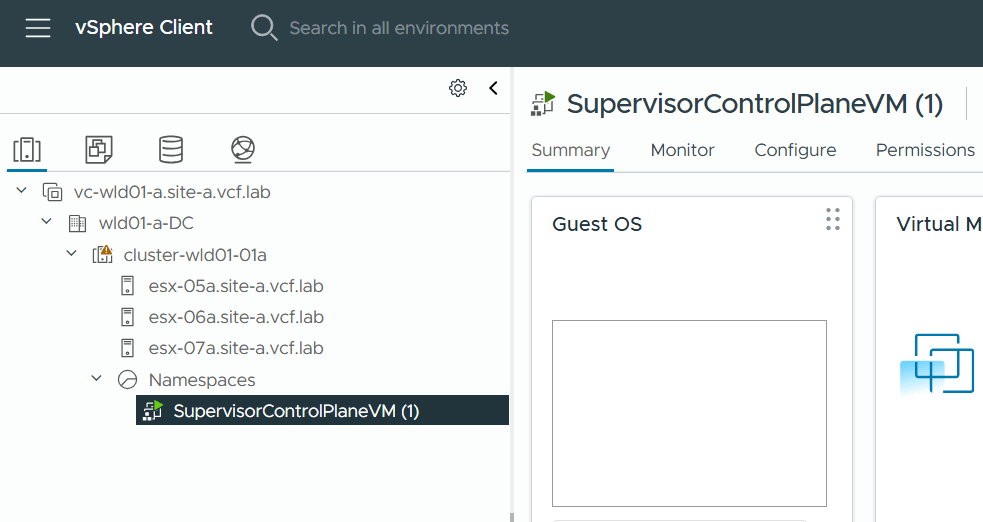
Logging into the new Workload Domain vCenter showed that I had one SupervisorControlPlaneVM running.
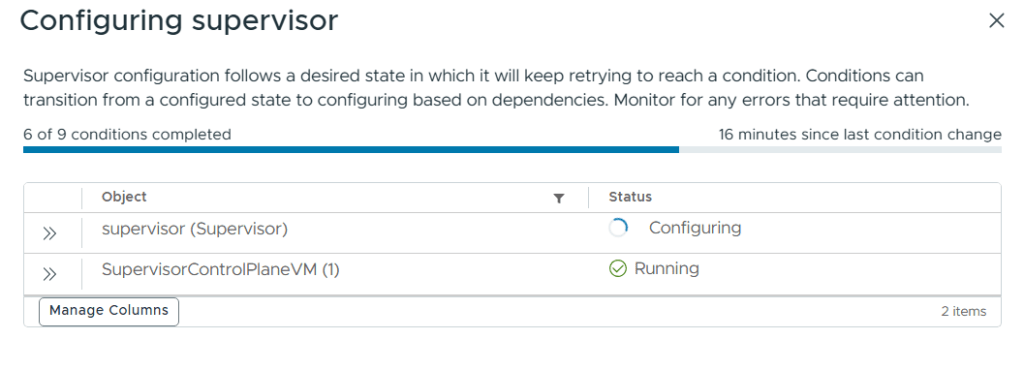
I went to Supervisor Management and could see that it was still configuring.
Next up is deploying the NSX Edge Cluster and looking into creating an All Apps Org in VCF Automation.
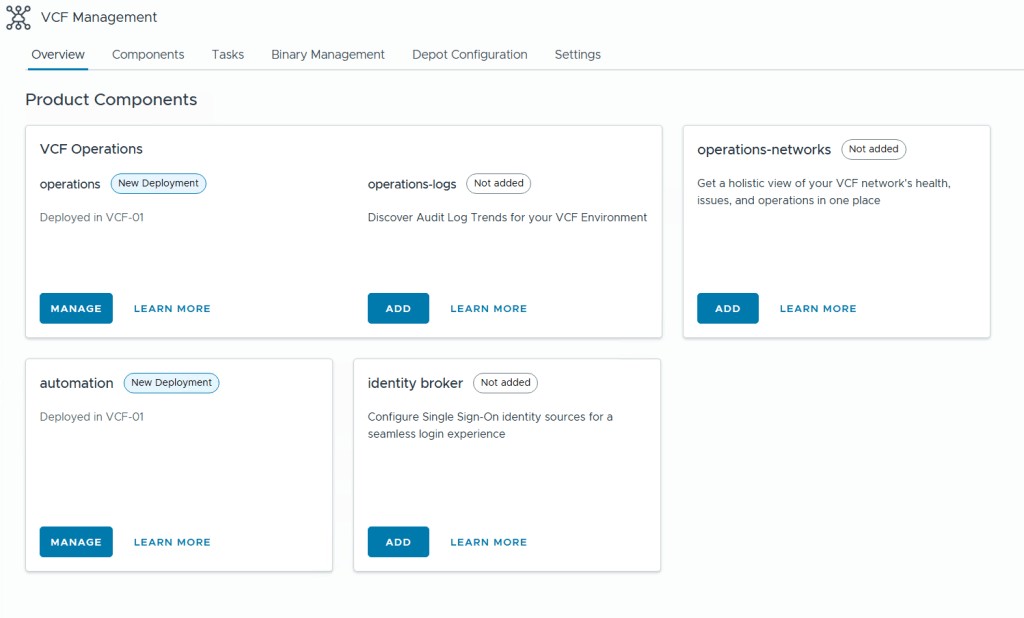
When deploying a new VCF Fleet, Operations for Logs is not deployed and needs to be done using VCF Operations later. As you can see from the image below, VCF Operations and VCF Automation (automation) are labeled with “New Deployment” since they are deployed, while VCF Operations for Logs (operations-logs), VCF Identity Broker (identity broker) and VCF Operations for Networks (operations-networks) are not deployed (Not added).
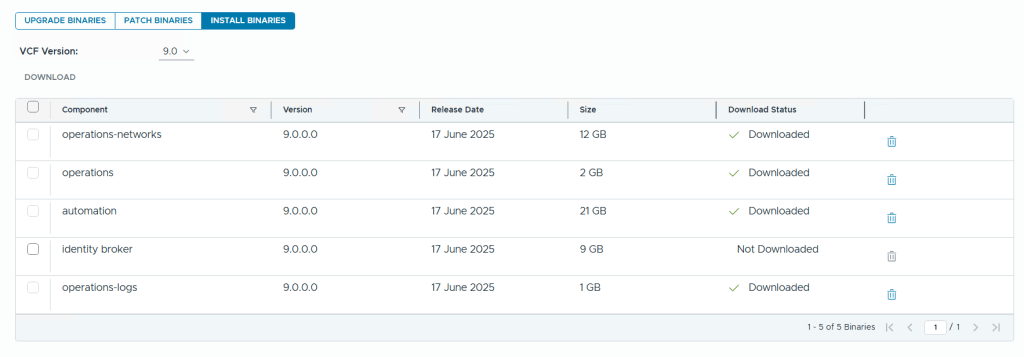
To be able to add product components we first have to add the binaries by going to Binary Management and download the required install binaries. Note that you can also download Upgrade Binaries and Patch Binaries here. After deployment you can choose to delete the binaries here to free up disk space on you Fleet Manager appliance.
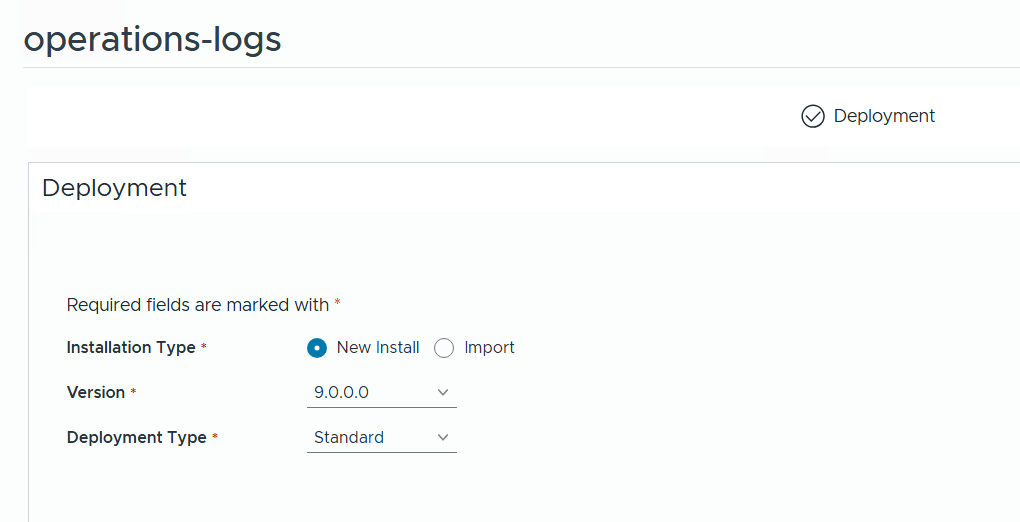
To deploy Operations for Logs we go back to the Overview page and click on Add which takes us to this page where we can choose between a new install, importing an existing deployment, what version we want, and if we want a standard or clustered deployment.
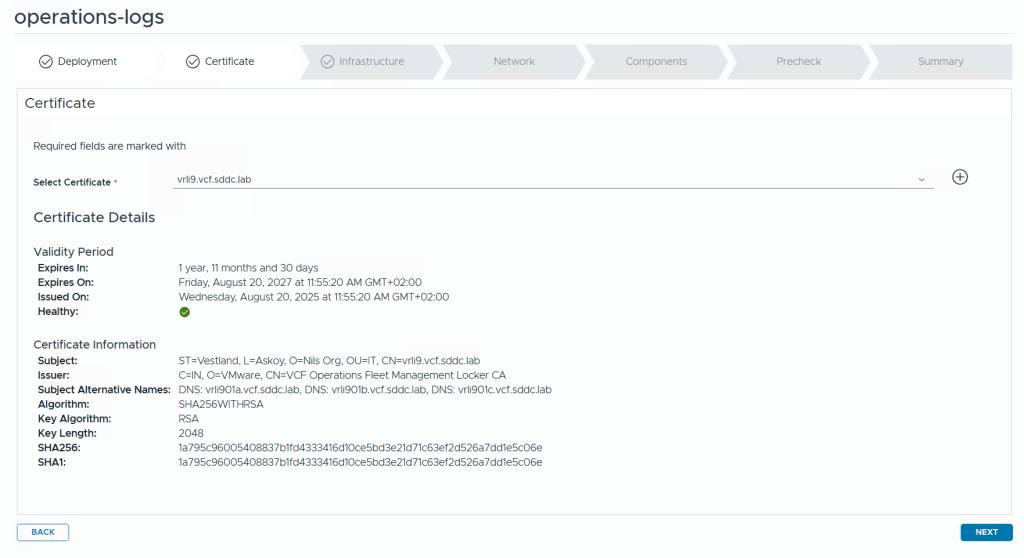
The first step is to select a certificate. If you don’t already have one you can click on the plus icon to create a new one directly in the wizard.
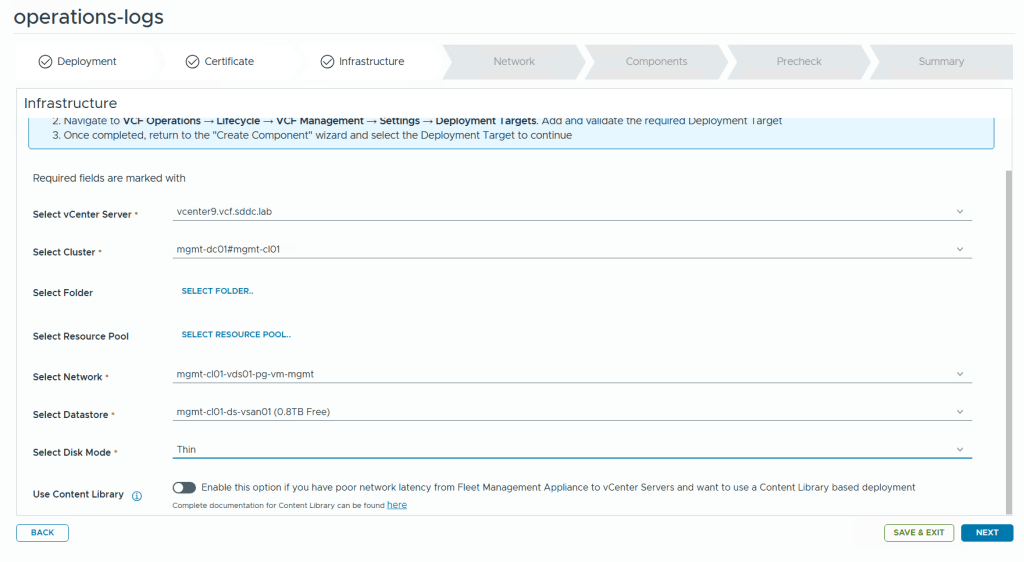
The next step needs details about the infrastructure you want to deploy to. Most of the information is populated automatically.
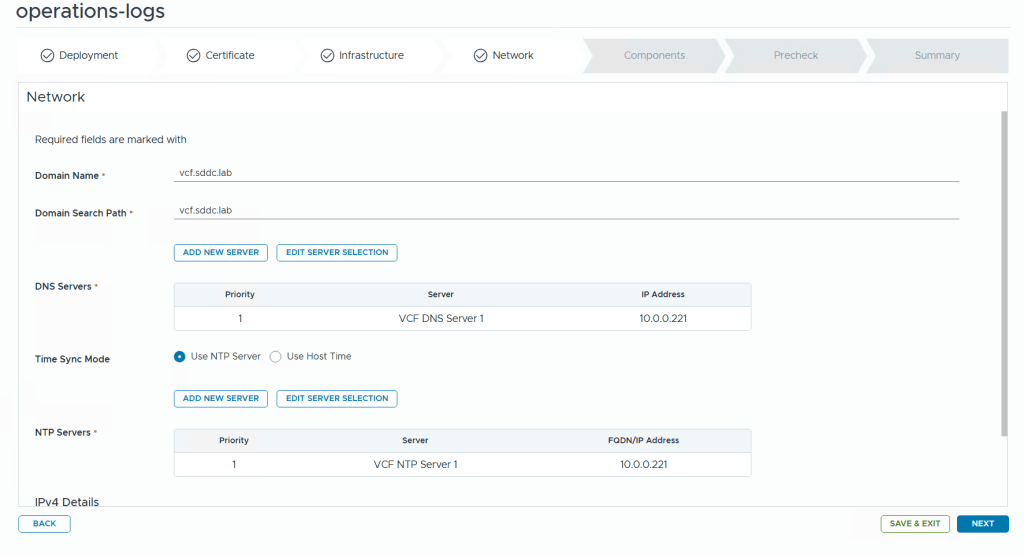
We are then asked to configure network settings like DNS domain name, DNS Servers, NTP Servers and so on.
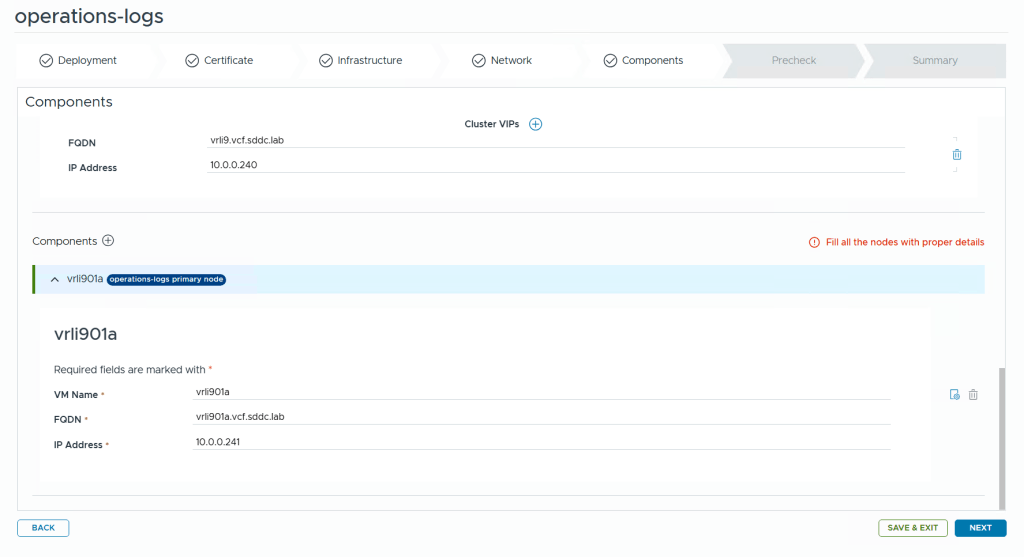
Finally we get to the components page where details about the appliance nodes are requested. Note that there is a tiny icon with a gear on the right side where you configure the VM name. Clicking on this takes us to the advanced settings where we can set things like root password and also choose a different network for each node if you deploy multiple nodes. This can be very useful when deploying other components like VCF Operations or VCF Operations for Networks where you also deploy collector nodes which often is to be deployed in a different network than the platform nodes.
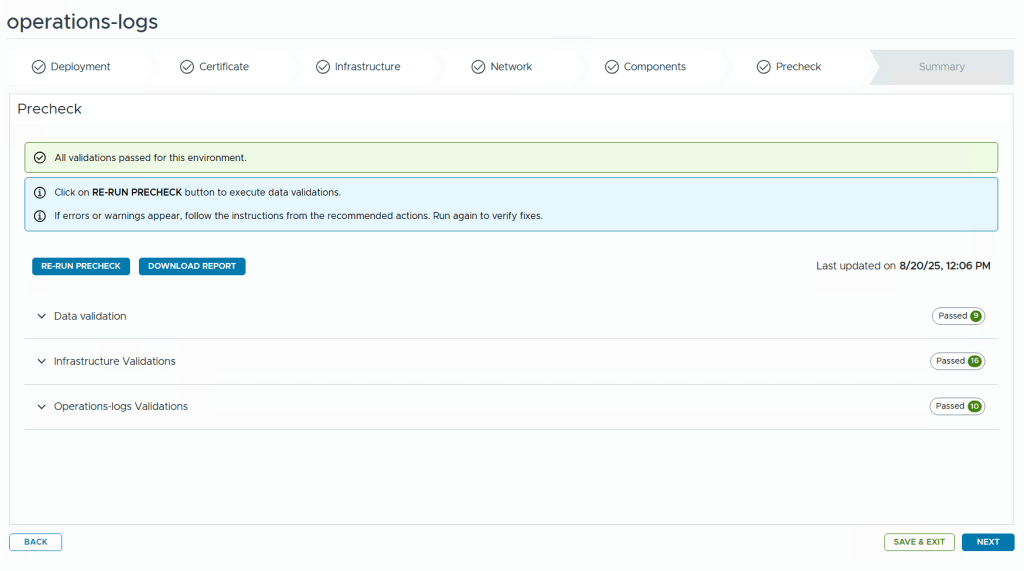
Before kicking off the deployment we get to run a pre-check. I highly recommend fixing any warnings or errors detected before starting the deployment or you will most likely be sorry later.
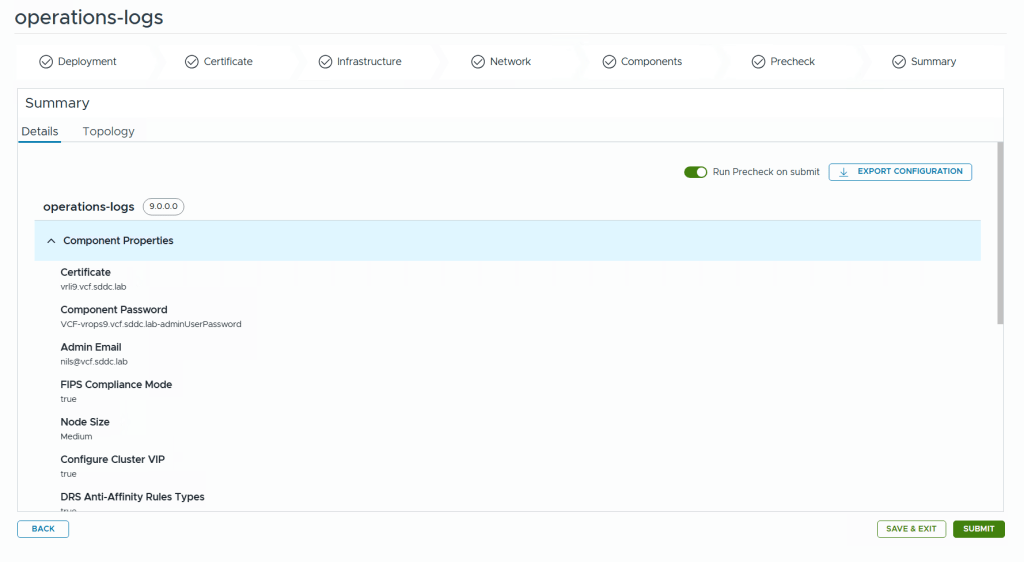
Note that you can export the configuration to a json file before submitting. You can also choose to Save and exit the wizard and continue at a later time.
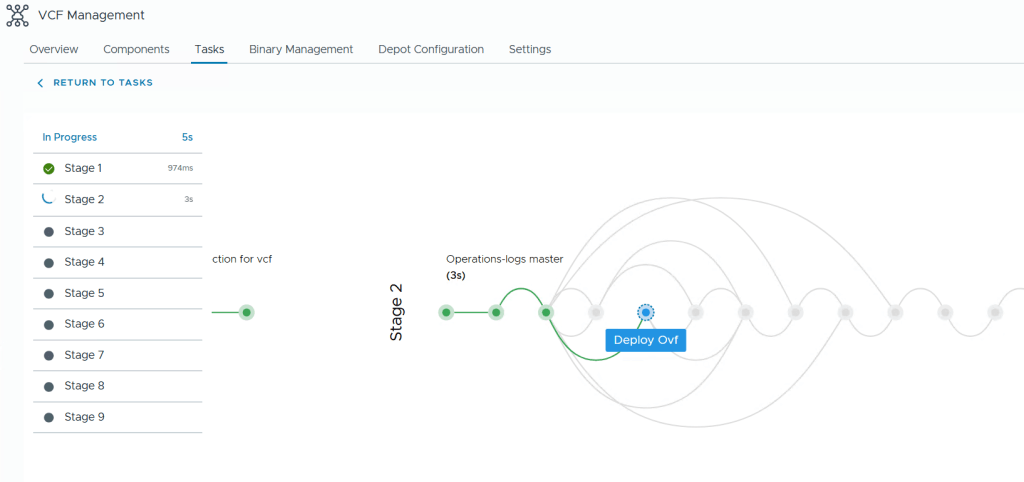
During the deployment you get this beautiful status page with fancy animations showing you how far it is in the process and a few words about what is currently doing.
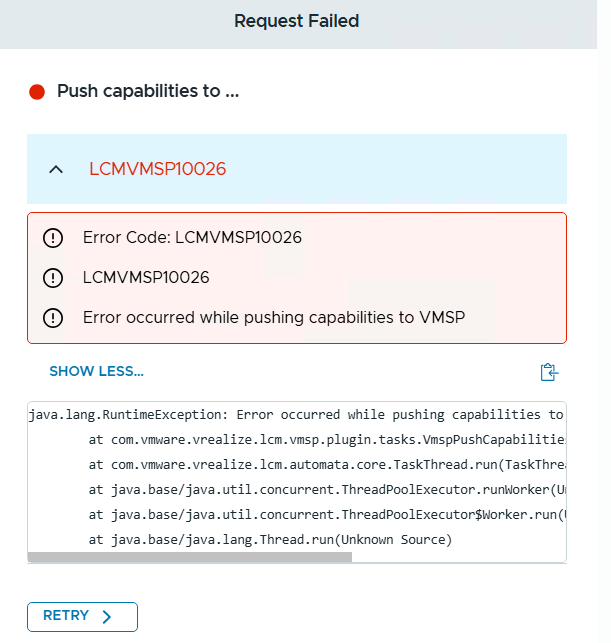
When it fails though, like it did in my lab, the error messages are not very beautiful, but rather cryptic.
Even though we were logged into the VCF Operations interface, it is the VCF Fleet Manager appliance who is doing all the lifecycle work like deploying Operations for Logs. The log file /var/log/vrlcm/vmware_vrlcm.log on my Fleet Manager appliance showed me that it timed out trying to connect to 10.0.0.234 which is my VCF Automation appliance which was powered off at this time to save some resources. Looking back at which stage it failed on, I could see that it was when trying to “Push Capabilities to services platform”. Starting up VCF Automation and retrying the task made the deployment task complete successfully.
I wanted to redeploy my VCF 9 lab and thought I would use the JSON spec file that I exported when deploying it using the wizard the first time.
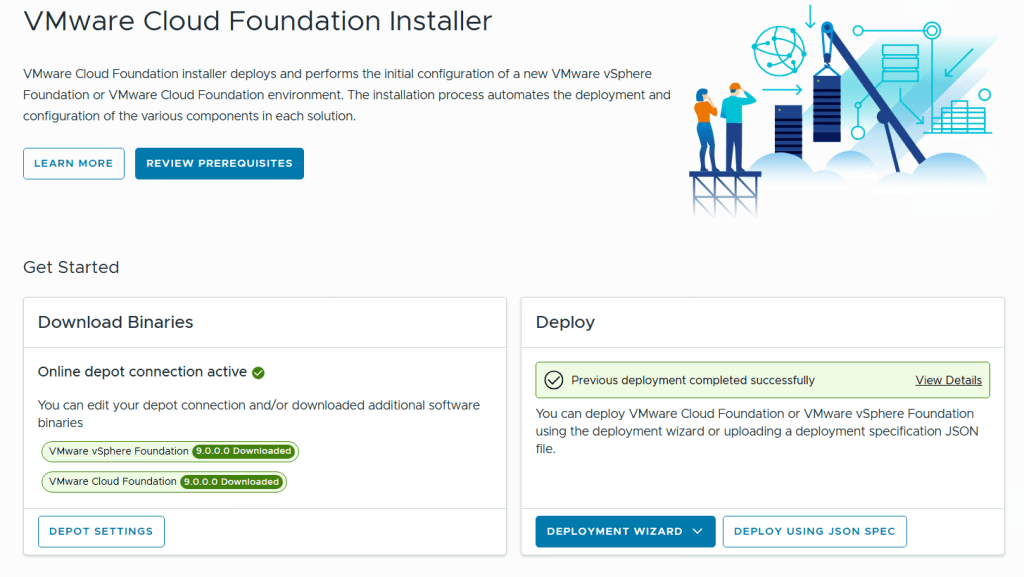
I started with logging in to the VCF Installer Appliance and selected Deploy Using JSON Spec instead of Deployment Wizard.
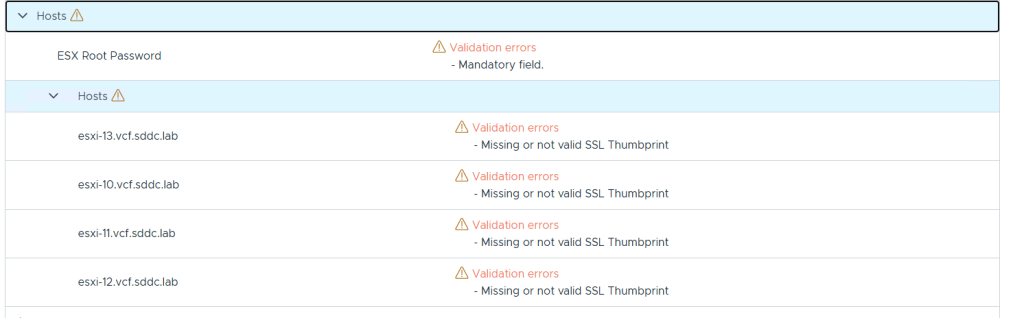
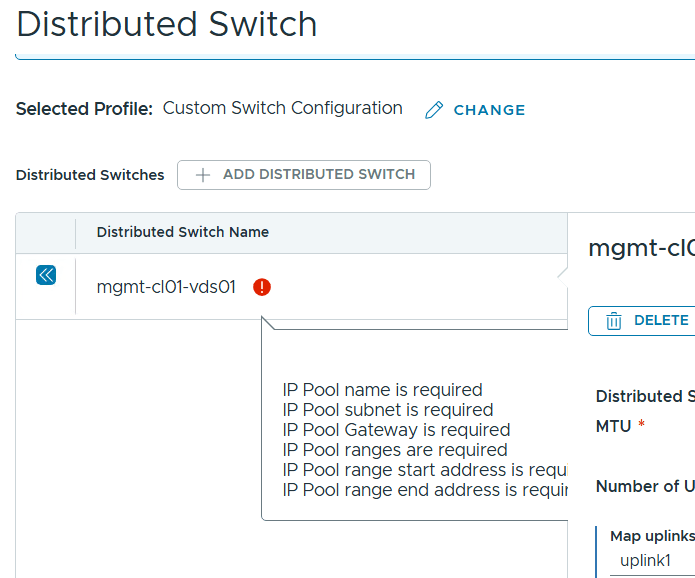
After uploading my JSON spec file it was validated and I saw two categories with a warning symbol next to it, Hosts and Distributed Switch.
Expanding the Hosts category gave me more details telling me that the root passwords and SSL thumbprints were missing, and this made sense since they are not exported to the json file for security reasons.
There is also a nice JSON Preview button to quickly check the content without opening it in a separate editor.
After adding the root passwords and the SSL thumbprints to my json file, these warnings were cleared, but expanding the Distributed Switch category didn’t give me any indications why that also had a warning present.
There is an Edit in Wizard function that let us go through the deployment wizard with the uploaded JSON spec file as input parameters. When using this I found what was causing the warning. It is expecting IP Pool details, but since I use DHCP for IP Assignment (TEP) I omitted the entire ipAddressPoolSpec part of the json file. In previous versions of VCF this would make it use DHCP but I haven’t found out how to do this in VCF 9 yet. I am planning on switching from DHCP to IP Pool soon anyway so not a big deal for my lab use.
Manually switching from IP Pool to DHCP in the wizard worked fine and VCF 9 was deployed successfully four hours later, including VCF Operations and VCF Automation.
Since I work a lot with VCF I wanted to see if my lab was able to run the new version. My newest server has 512 GB RAM, 2 x Intel Xeon Gold 6138 processors and 2 x 2 TB NVMe.
I started with deploying 4 nested ESXi 8 hosts with 24 vCPUs, 128 GB RAM and a 300 GB NVMe disk each. Note that 24 vCPUs are required to run VCF Automation, and while you can get a VCF 9 lab running without it you will miss out on a lot of private cloud functionality. The hosts were then upgraded to ESX 9 by booting on the iso. It complained about my CPU being unsupported but I could choose to force it to upgrade and I have not noticed any issues so far.
Since I already have a nested VCF 5.2 lab running I decided to reuse some of the components like a virtual router and DNS server to save some time.
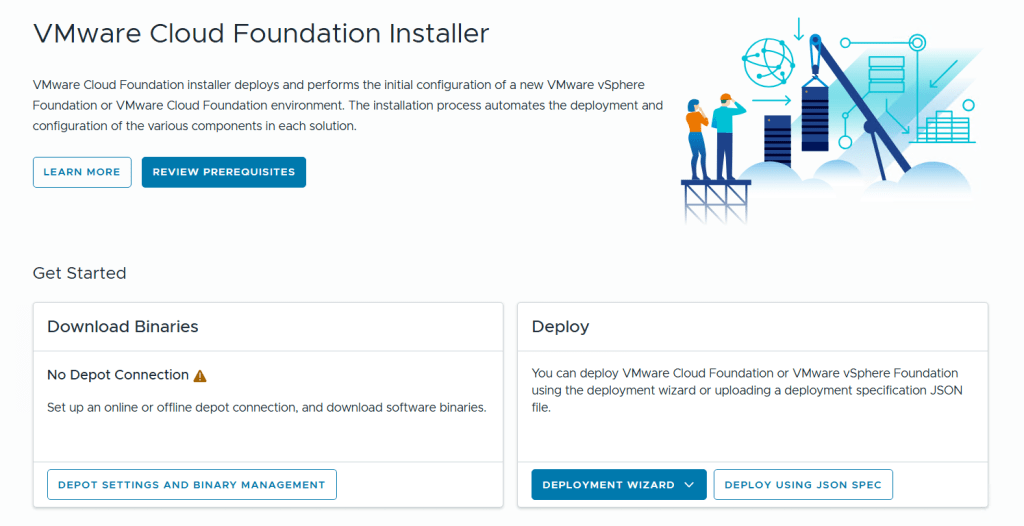
I started with deploying the VMware Cloud Foundation Installer on vSphere 8 and point a browser to its FQDN.
Before we can deploy anything we need to download binaries for all the components either directly from the Internet or from an offline depot. I chose to download directly from the Internet, then selected all the components and clicked on the Download button.
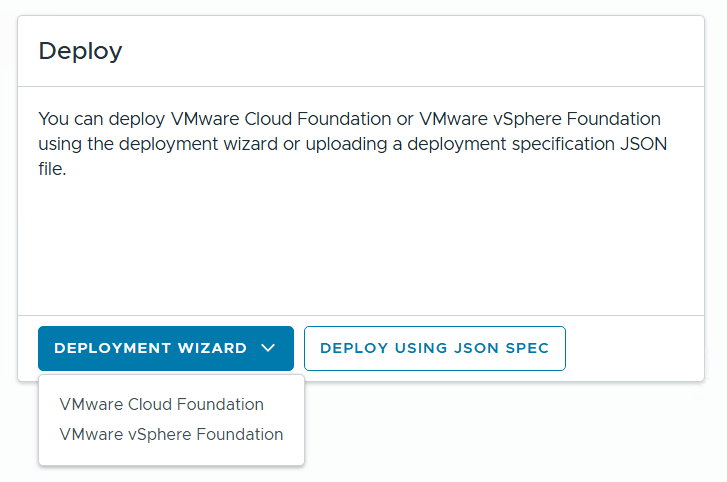
The installer lets you choose between Deploying VMware Cloud Foundation or VMware vSphere Foundation, and you can decide if you want to use a deployment wizard where you are guided through all the input parameters in the user interface or deploy using a json file. I chose to deploy VCF using the wizard this time.
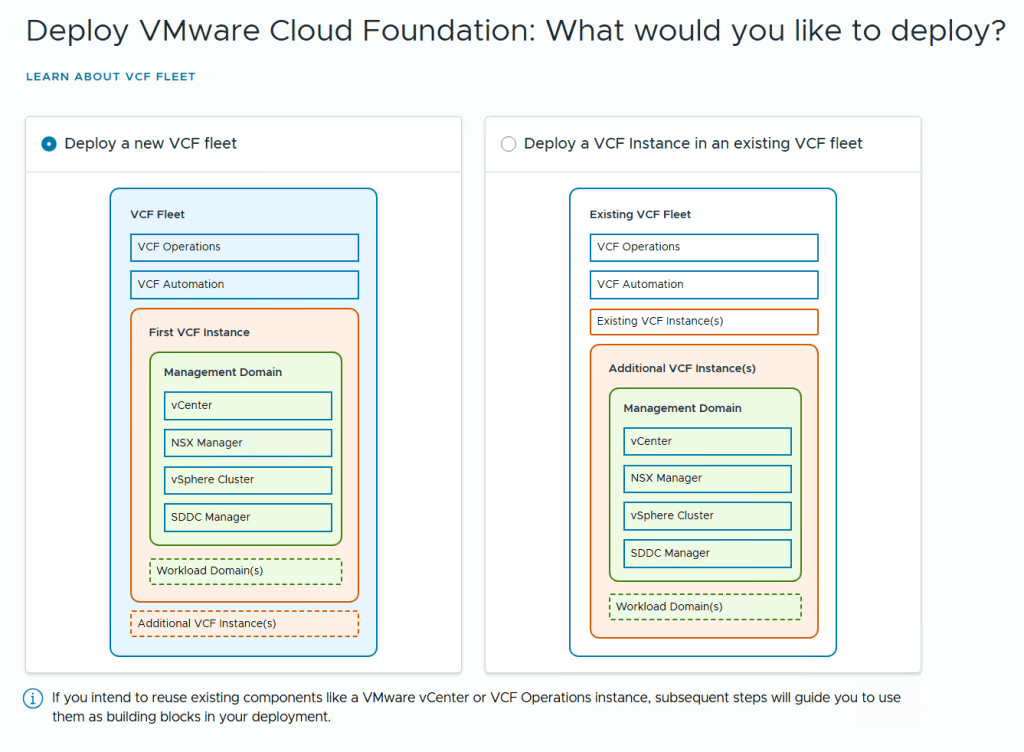
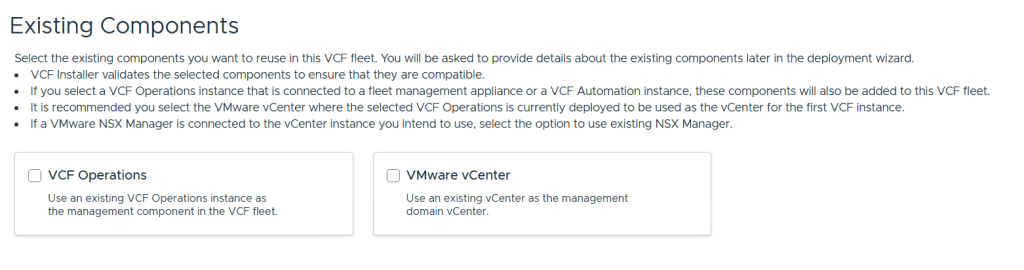
We are then able to point to existing VCF Operations and vCenter instances to use in this fleet. I didn’t select any of them since I wanted to deploy brand new ones.
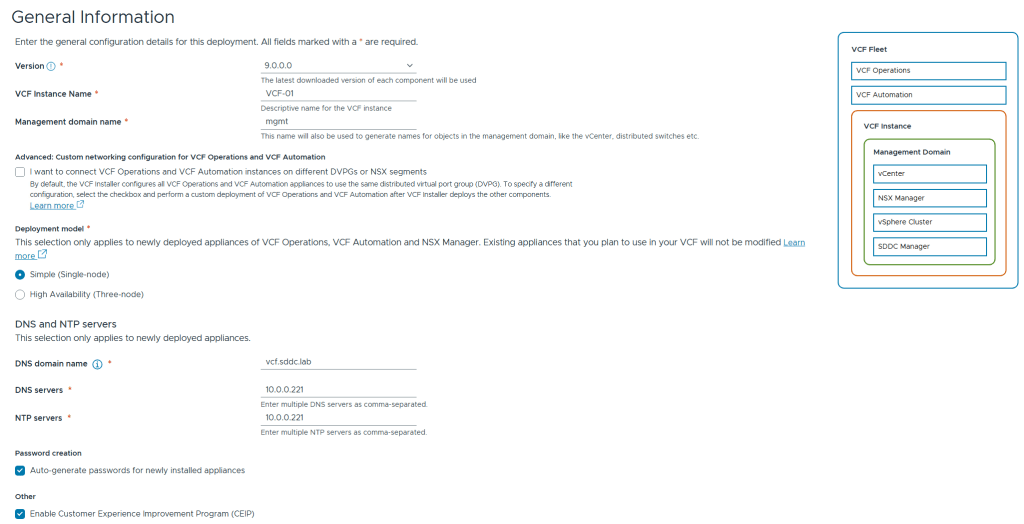
We are then presented with the following screen asking for general information. To save on resources I chose the Simple deployment model which deploys a single node of each appliance instead of three nodes for high availability. I also chose to have all the passwords auto-generated. These are presented in the user interface at the end of the deployment including user names and FQDNs for each product in VCF 9.
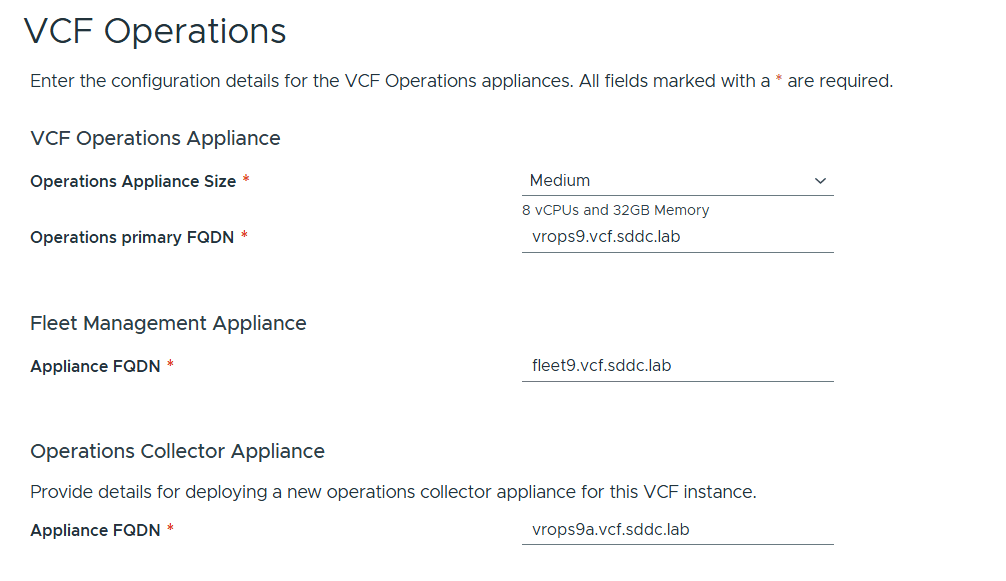
VCP Operations is mandatory in VCF 9, and so is also the Fleet Management Appliance which is based on Aria Suite Lifecycle but with more features. You also have to deploy an Operations Collector Appliance. Note that you don’t have to provide any IP addresses as they are populated by looking up from DNS so make sure those are present and correct, both forward and reverse records.
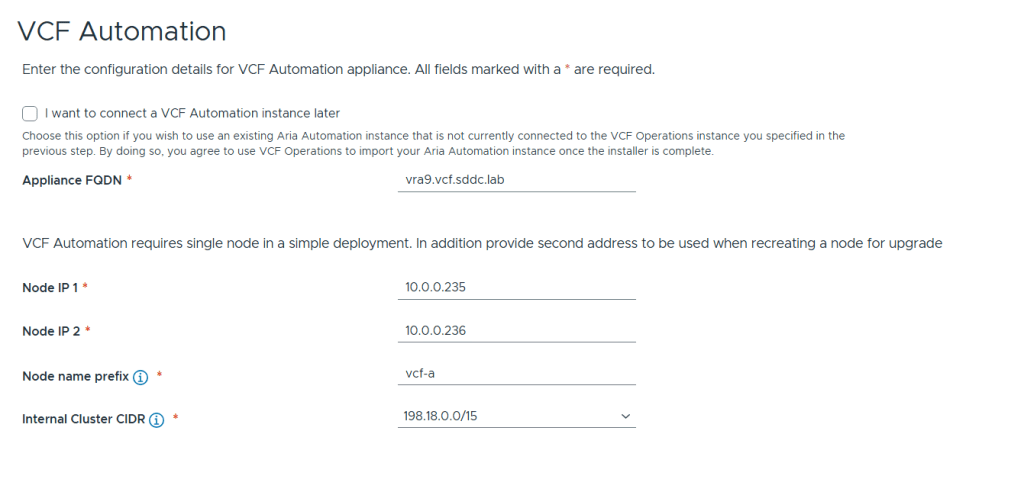
Next up is VCF Automation configuration which has the option to be skipped and connected later. I chose to deploy it now since I wanted a proper private cloud as fast as possible 🙂
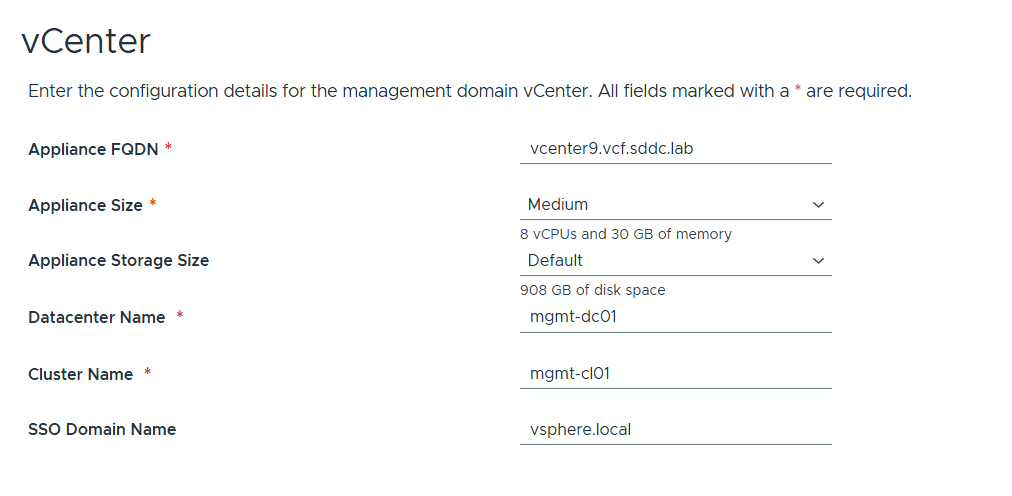
vCenter configuration is straight forward and nothing new here. I chose Medium size since I have bad experience with anything smaller than that and would like to avoid having to scale up later.
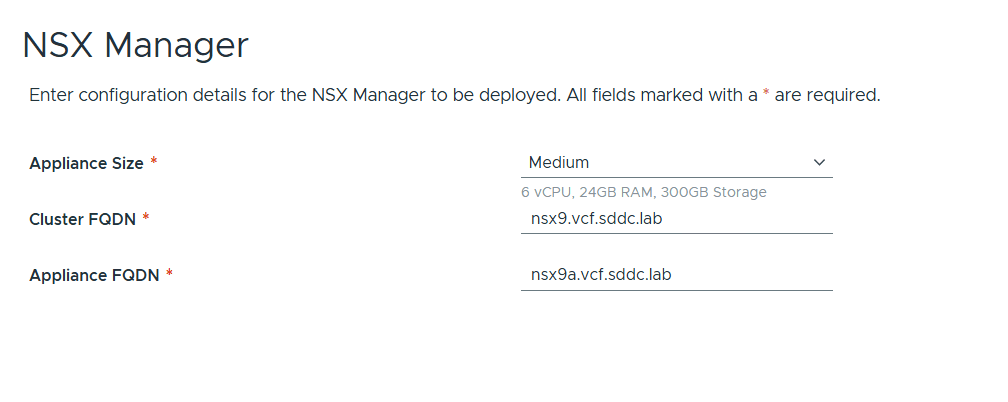
NSX Manager configuration is also very simple. Note that only a single node is supported but not recommended for a productions environment due to lack of redundancy. I also chose Medium size here to avoid performance issues down the road. NSX Manager is mandatory but NSX Edges are not and also not part of this initial deployment.
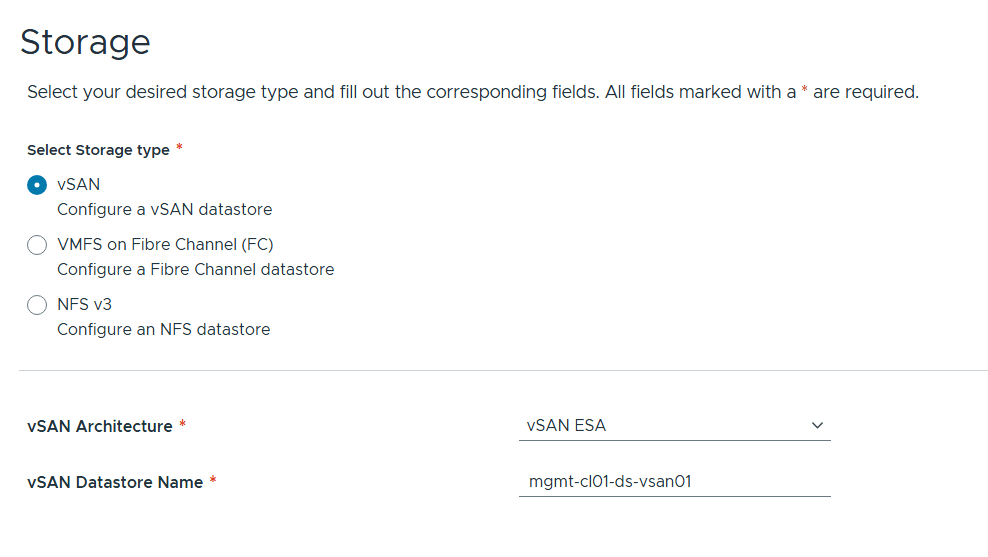
You have three options for Storage as pictured above. I chose vSAN ESA as that is the new improved standard for vSAN that I want to get more experience with.
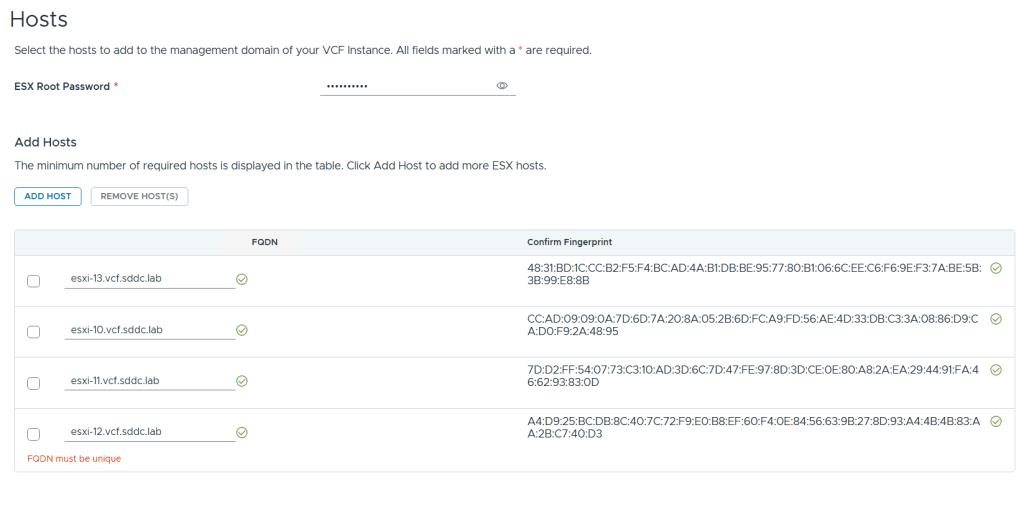
Adding ESX hosts is straight forward. Simply provide the root password, FQDNs and confirm the fingerprints (if they match your hosts :-).
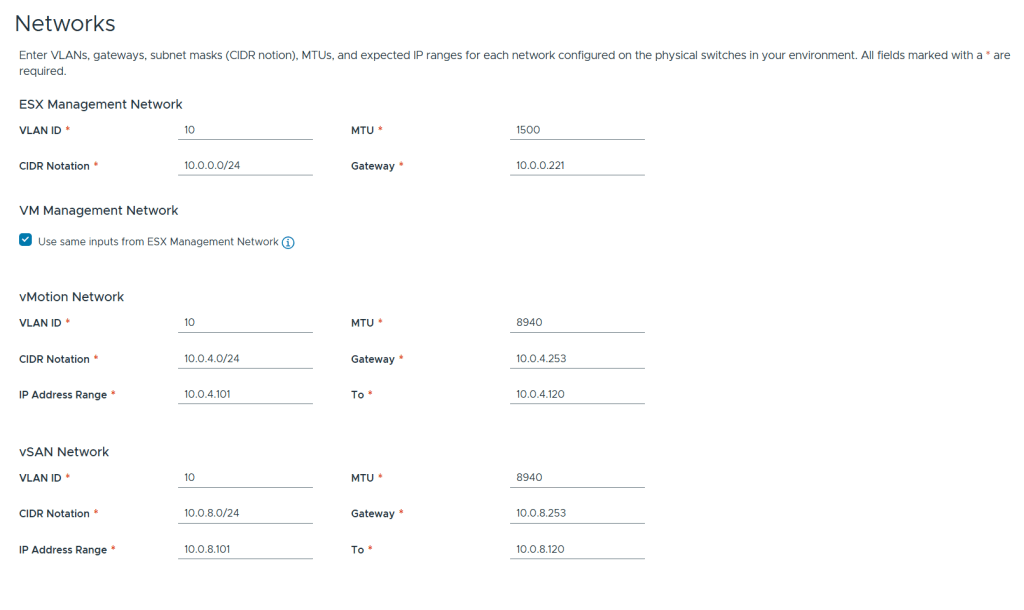
There is nothing new regarding networks configuration. I chose to use the same VLAN ID for all the networks for simplicity in my lab but in a production deployment these should be unique. I use 8940 MTU for vMotion and vSAN since this is a nested lab. The VDS use the standard 9000 MTU.
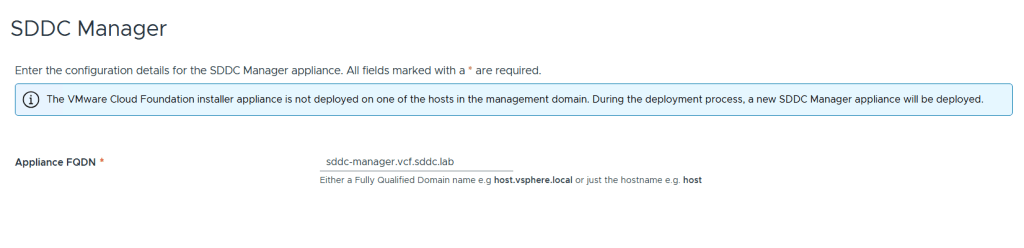
All that is needed for SDDC Manager is the FQDN. Note that it is possible to turn the VCF Installer appliance into the SDDC Manager appliance during the deployment. I wanted them to be two separate appliances since I will probably use the VCF Installer many times.
We are then presented with a Review screen where we get a summary of the configuration, the option to see a json preview and also the option to download the json spec as a file. This file can be edited and imported into the VCF Installer again for another deployment. Another nice detail about the VCF Installer is that you can close it at any time during the configuration process and it will let you save the progress so that you can continue at a later time.
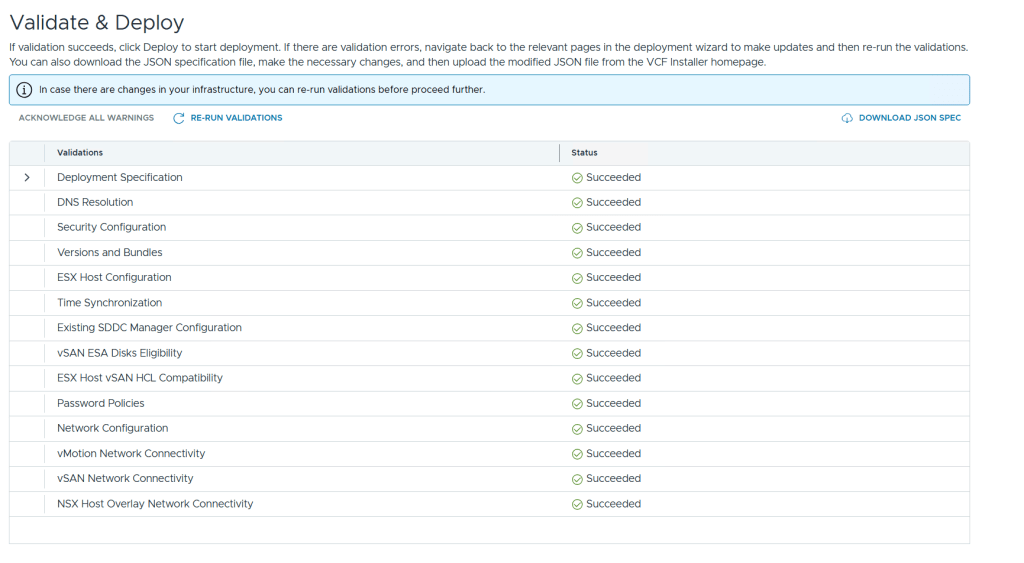
Before you can start the deployment you must run a validation. If the validation detects any errors you will have to resolve those before it allows you to deploy, but any warnings can be acknowledged so that you may still start the deployment. Lucky for me I didn’t get any warnings or errors.
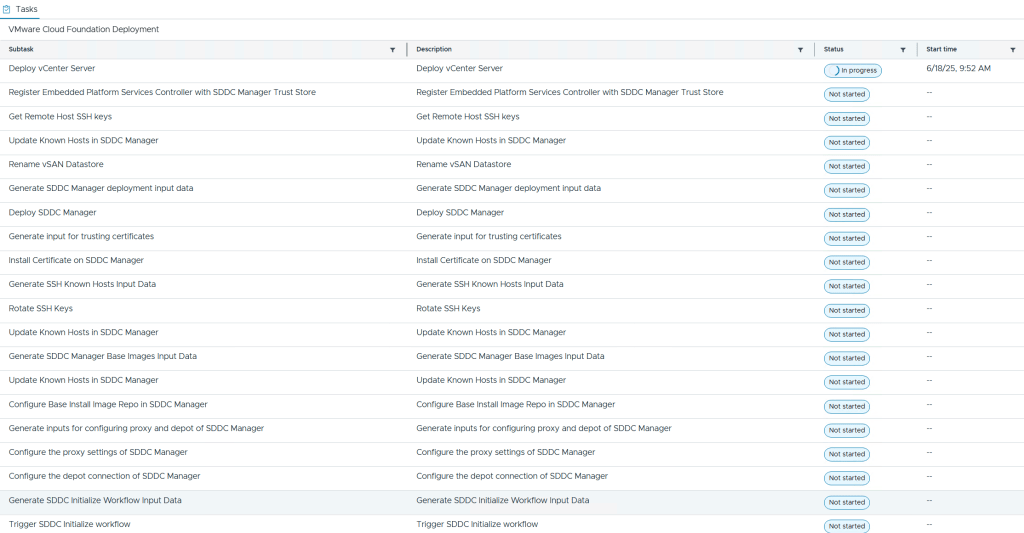
During the deployment you are able to see each subtask with their status. I also recommend that you follow the domainmanager.log file on the VCF Installer appliance so you can spot and fix problems before they cause the VCF Installer to time out with an error message. My deployment failed once after it deployed VCF Automation due to running out of disk space. After freeing up disk space I could choose to retry the deployment and it started again at the point where it failed and didn’t need to start from the beginning. Note that it was my local datastore hosting the nested ESX hosts that ran out of disk space so 300 GB was enough for each nested ESX host. The vSAN ESA datastore consumed less than 50% after the deployment.
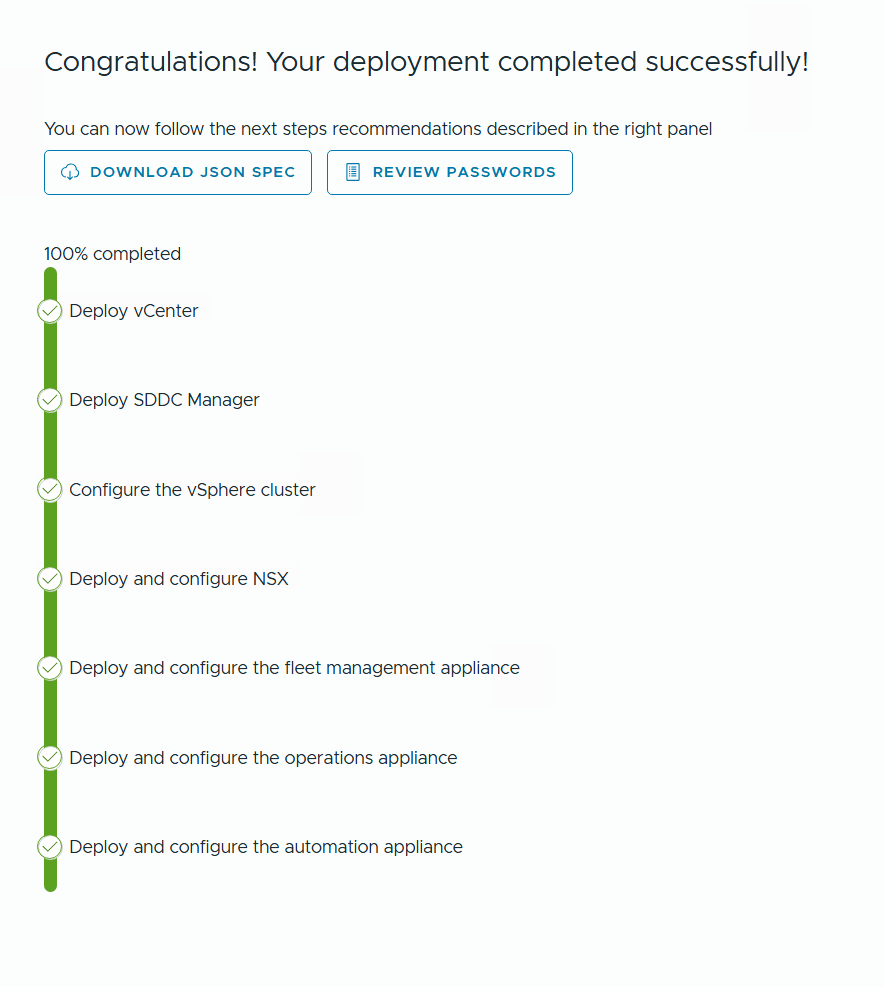
After a few hours I was presented with this happy message and by clicking on Review Passwords I could see how to log into my brand new VCF 9 lab.
When using nested ESXi we have to enable either Promiscuous mode or MAC Learning on the VDS on the physical host running the nested environment. Forged transmits is also required to be enabled. I changed to MAC Learning long ago since I knew Promiscuous mode had a performance impact. I have had great results running a nested VCF lab but keep hearing about others having performance issues, and sometimes it comes down to slow storage, low memory or weak processors, but not always. I was wondering what kind of performance impact Promiscuous mode vs MAC Learning could have in my lab so I tested it using iperf3 and here is the result.
Note that if you are using vSphere Standard Switches (VSS) instead of vSphere Distributed Switches (VDS), you are stuck with using Promiscuous mode. I would recommend deploying a vCenter and set up a VDS if you want to use nested ESXi, especially if you want to run nested VCF.
Promiscuous mode
[root@esxi-2:~] /usr/lib/vmware/vsan/bin/iperf3.copy -i 1 -t 10 -c 10.0.0.101
Connecting to host 10.0.0.101, port 5201
[  5] local 10.0.0.102 port 30109 connected to 10.0.0.101 port 5201
iperf3: getsockopt - Function not implemented
[ ID] Interval           Transfer     Bitrate         Retr  Cwnd
[  5]   0.00-1.00   sec  35.2 MBytes   296 Mbits/sec    0   0.00 Bytes
iperf3: getsockopt - Function not implemented
[  5]   1.00-2.00   sec  14.5 MBytes   122 Mbits/sec    0   0.00 Bytes
iperf3: getsockopt - Function not implemented
[  5]   2.00-3.00   sec  24.2 MBytes   203 Mbits/sec    0   0.00 Bytes
iperf3: getsockopt - Function not implemented
[  5]   3.00-4.00   sec  16.1 MBytes   135 Mbits/sec    0   0.00 Bytes
iperf3: getsockopt - Function not implemented
[  5]   4.00-5.00   sec  22.1 MBytes   186 Mbits/sec    0   0.00 Bytes
iperf3: getsockopt - Function not implemented
[  5]   5.00-6.00   sec  18.6 MBytes   156 Mbits/sec    0   0.00 Bytes
iperf3: getsockopt - Function not implemented
[  5]   6.00-7.00   sec  21.0 MBytes   176 Mbits/sec    0   0.00 Bytes
iperf3: getsockopt - Function not implemented
[  5]   7.00-8.00   sec  19.2 MBytes   161 Mbits/sec    0   0.00 Bytes
iperf3: getsockopt - Function not implemented
[  5]   8.00-9.00   sec  19.5 MBytes   164 Mbits/sec    0   0.00 Bytes
iperf3: getsockopt - Function not implemented
[  5]   9.00-10.00  sec  20.5 MBytes   172 Mbits/sec    0   0.00 Bytes
- - - - - - - - - - - - - - - - - - - - - - - - -
[ ID] Interval           Transfer     Bitrate         Retr
[  5]   0.00-10.00  sec   211 MBytes   177 Mbits/sec    0             sender
[  5]   0.00-10.00  sec   211 MBytes   177 Mbits/sec                  receiver
MAC Learning
root@esxi-2:~] /usr/lib/vmware/vsan/bin/iperf3.copy -i 1 -t 10 -c 10.0.0.101
Connecting to host 10.0.0.101, port 5201
[  5] local 10.0.0.102 port 60767 connected to 10.0.0.101 port 5201
iperf3: getsockopt - Function not implemented
[ ID] Interval           Transfer     Bitrate         Retr  Cwnd
[  5]   0.00-1.00   sec  1019 MBytes  8.54 Gbits/sec  469059936   0.00 Bytes
iperf3: getsockopt - Function not implemented
[  5]   1.00-2.00   sec  1011 MBytes  8.48 Gbits/sec    0    215 Bytes
iperf3: getsockopt - Function not implemented
[  5]   2.00-3.00   sec   987 MBytes  8.28 Gbits/sec    0    215 Bytes
iperf3: getsockopt - Function not implemented
[  5]   3.00-4.00   sec  1000 MBytes  8.38 Gbits/sec    0    215 Bytes
iperf3: getsockopt - Function not implemented
[  5]   4.00-5.00   sec  1.01 GBytes  8.68 Gbits/sec    0    215 Bytes
iperf3: getsockopt - Function not implemented
[  5]   5.00-6.00   sec  1.03 GBytes  8.81 Gbits/sec    0    215 Bytes
iperf3: getsockopt - Function not implemented
[  5]   6.00-7.00   sec  1.01 GBytes  8.68 Gbits/sec    0    215 Bytes
iperf3: getsockopt - Function not implemented
[  5]   7.00-8.00   sec   995 MBytes  8.35 Gbits/sec    0    215 Bytes
iperf3: getsockopt - Function not implemented
[  5]   8.00-9.00   sec  1004 MBytes  8.42 Gbits/sec    0    215 Bytes
iperf3: getsockopt - Function not implemented
[  5]   9.00-10.00  sec  1.00 GBytes  8.59 Gbits/sec  3825907360   0.00 Bytes
- - - - - - - - - - - - - - - - - - - - - - - - -
[ ID] Interval           Transfer     Bitrate         Retr
[  5]   0.00-10.00  sec  9.92 GBytes  8.52 Gbits/sec    0             sender
[  5]   0.00-10.00  sec  9.92 GBytes  8.52 Gbits/sec                  receiver
As you can see, the difference is huge so please make sure to always use Mac Learning over Promiscuous mode in your nested lab.
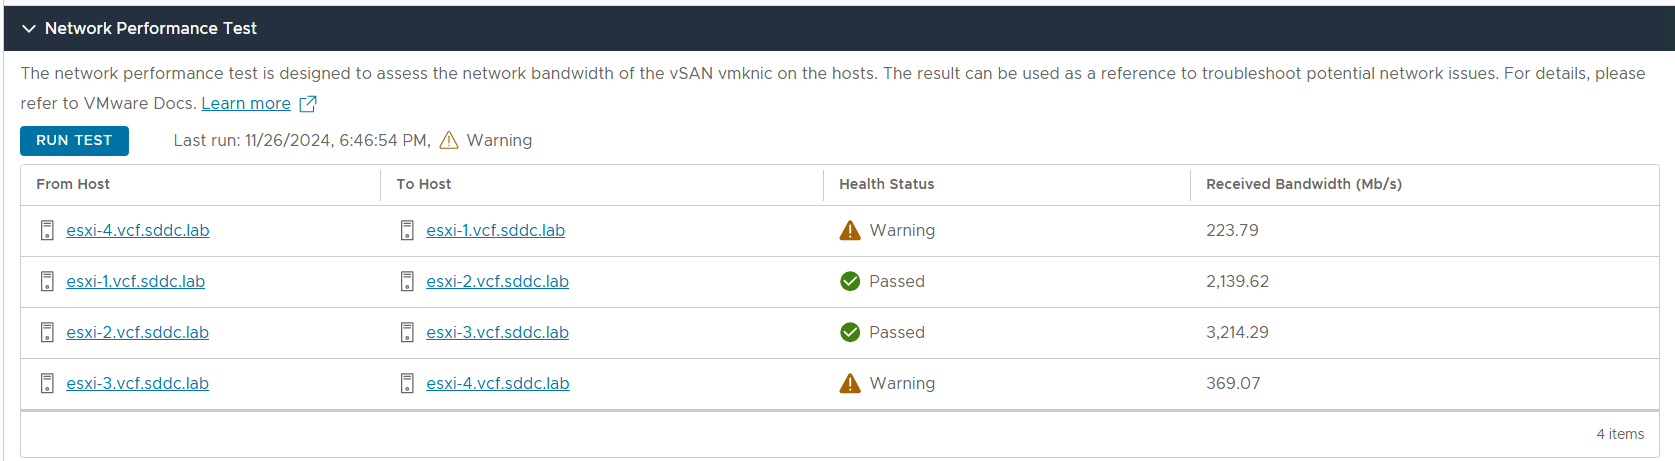
Below you can see the result from the vSAN Network Performance Test.
Promiscuous mode
MAC Learning
If you have to use Promiscuous mode on a VSS it seems that using a single Active NIC can minimize the performance impact. Take a look at Daniel Kriegers blog for more details: MAC Learning is your friend
When going to Lifecycle Management – Bundle Management in SDDC Manager, I saw the following two error messages:
Retrieving all applicable bundles failed. Encountered fetching http://127.0.0.1/lcm/inventory/upgrades api - FAILED_TO_VALIDATE_SDDC_MANAGER_COMPATIBILITY; Failed to validate if SDDC Manager with version 5.0.0.1-22485660 is compatible with system.
Retrieving available bundles failed. Unable to retrieve aggregated domains upgrade status: Encountered fetching http://127.0.0.1/lcm/inventory/upgrades api - FAILED_TO_VALIDATE_SDDC_MANAGER_COMPATIBILITY; Failed to validate if SDDC Manager with version 5.0.0.1-22485660 is compatible with system.
Then I found a way to download the VmwareCompatibilityData.json file manually to see if that would work:
root@vcf001 [ /home/vcf ]# grep vcf.compatibility.controllers.vvs.api.endpoint= /opt/vmware/vcf/lcm/lcm-app/conf/application-prod.properties
vcf.compatibility.controllers.vvs.api.endpoint=vvs.esp.vmware.com
root@vcf001 [ /home/vcf ]# curl --location 'https://vvs.esp.vmware.com/v1/products/bundles/type/vcf-lcm-bundle?format=json' --header 'Content-type: application/json' --header 'X-Vmw-Esp-ClientId: vcf-lcm' > VmwareCompatibilityData.json
% Total % Received % Xferd Average Speed Time Time Time Current
Dload Upload Total Spent Left Speed
0 0 0 0 0 0 0 0 --:--:-- --:--:-- --:--:-- 0
0 0 0 0 0 0 0 0 --:--:-- 0:04:59 --:--:-- 0
curl: (28) Failed to connect to storage.googleapis.com port 443 after 298678 ms: Couldn't connect to server
As we can see I was trying to download from the allowed URL https://vvs.esp.vmware.com, but it fails to connect to storage.googleapis.com so it seems to redirect to a URL that is not listed in the KB. Allowing connections to storage.googleapis.com from SDDC Manager solved the issue and SDDC Manager was immediately able to download bundles again. I contacted Broadcom support who confirmed this and later updated the KB with the correct URL.
A while after kicking off the SDDC Manager 5.2.1.0 upgrade I was presented with the nginx error “502 Bad Gateway” in my browser. Thinking that this was caused by the services being restarted as part of the upgrade I waited 15 more minutes but the error would not go away like it use to. Checking the log files on SDDC Manager didn’t show any progress and lcm-debug.log halted after this:
2024-10-25T06:23:02.415+0000 INFO [vcf_lcm,0000000000000000,0000] [com.zaxxer.hikari.HikariDataSource,SpringApplicationShutdownHook] HikariPool-1 - Shutdown initiated...
2024-10-25T06:23:02.455+0000 INFO [vcf_lcm,0000000000000000,0000] [com.zaxxer.hikari.HikariDataSource,SpringApplicationShutdownHook] HikariPool-1 - Shutdown completed.
After waiting for another hour I figured that the appliance was supposed to reboot but didn’t manage to, so I rebooted it manually. After it was back up I was presented with this nice status page showing that it had expected a reboot to happen (Reboot SDDC Manager).
After about 10 more minutes the upgrade completed.